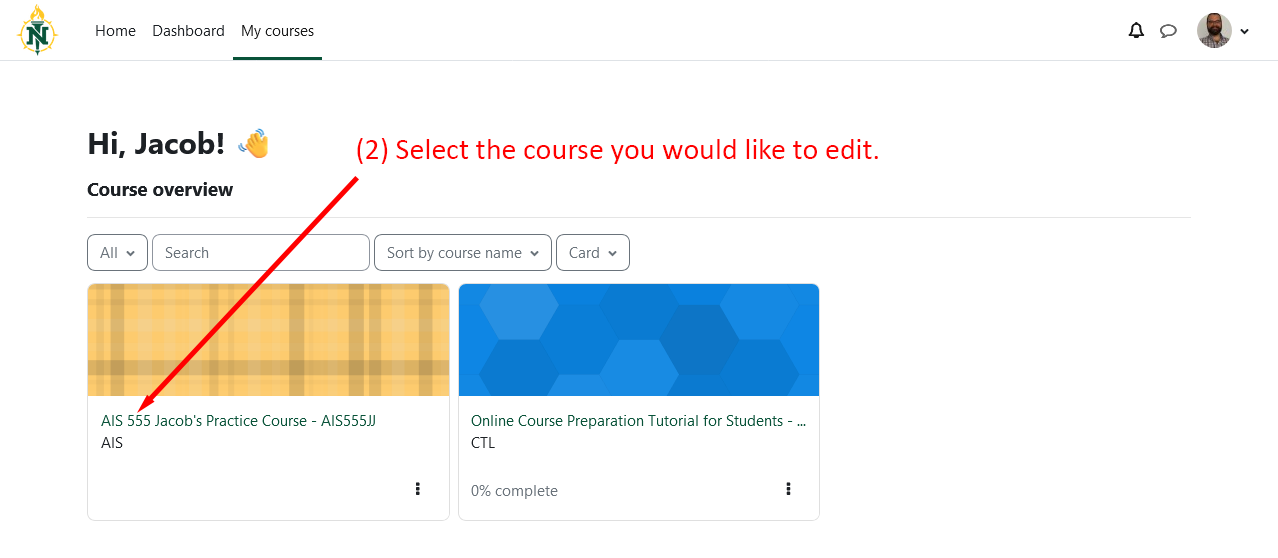
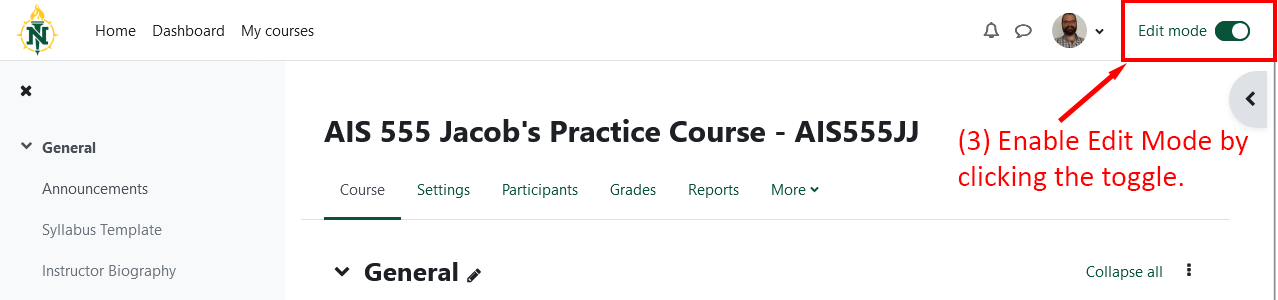
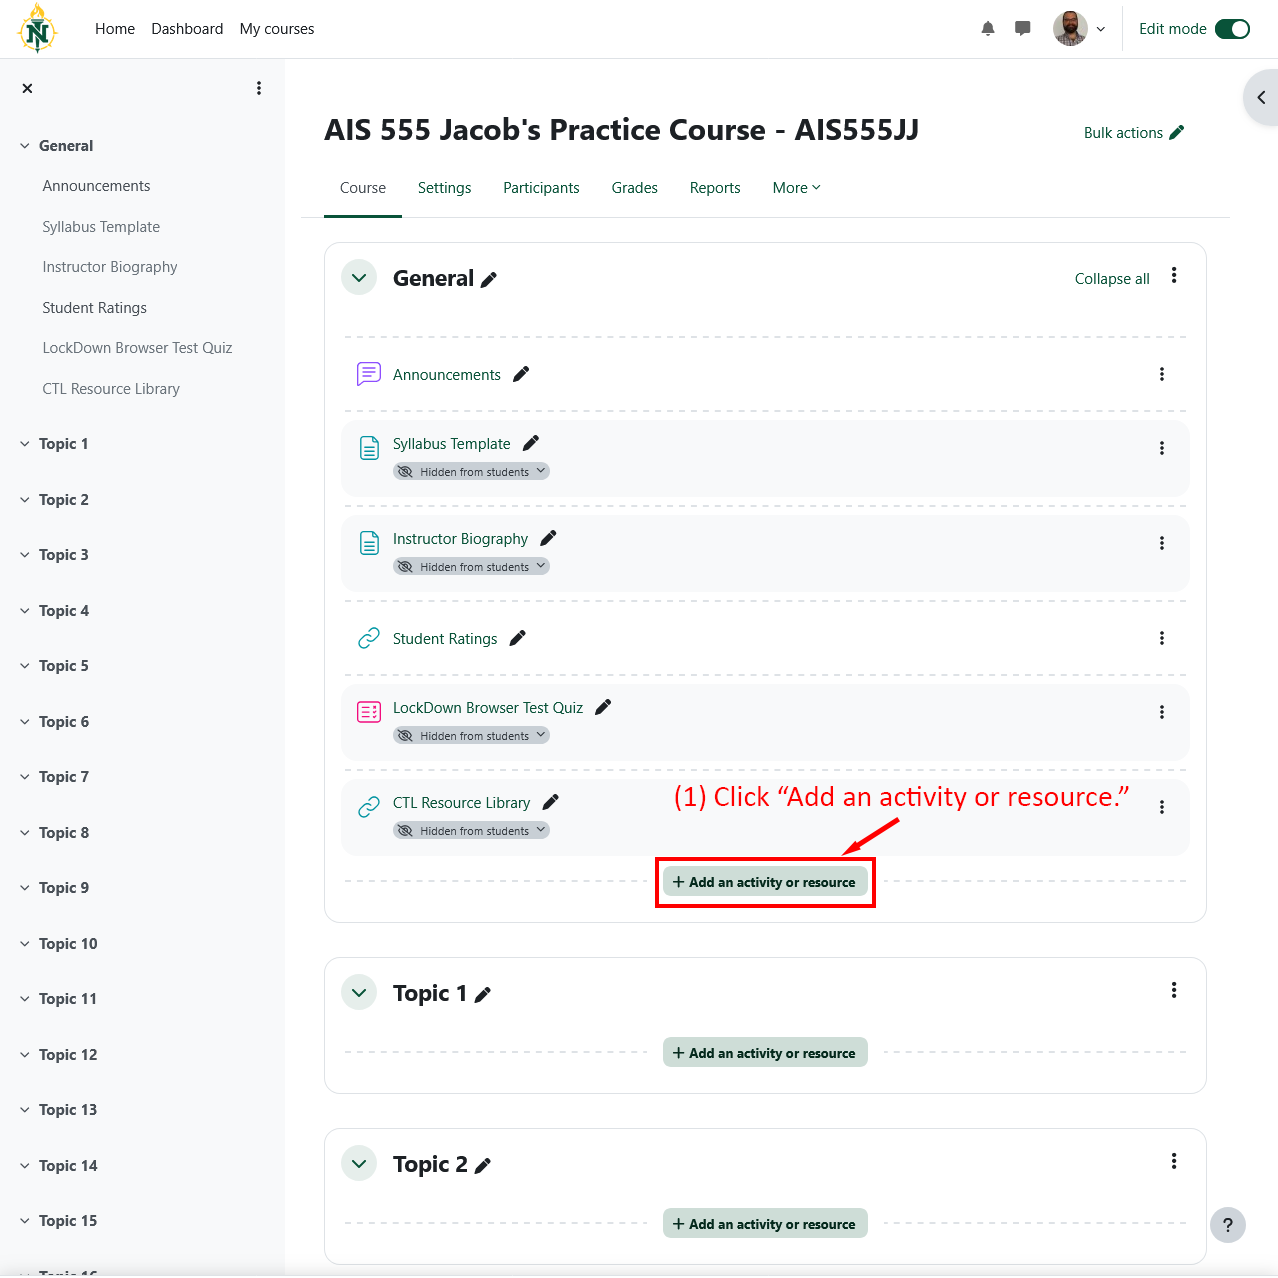
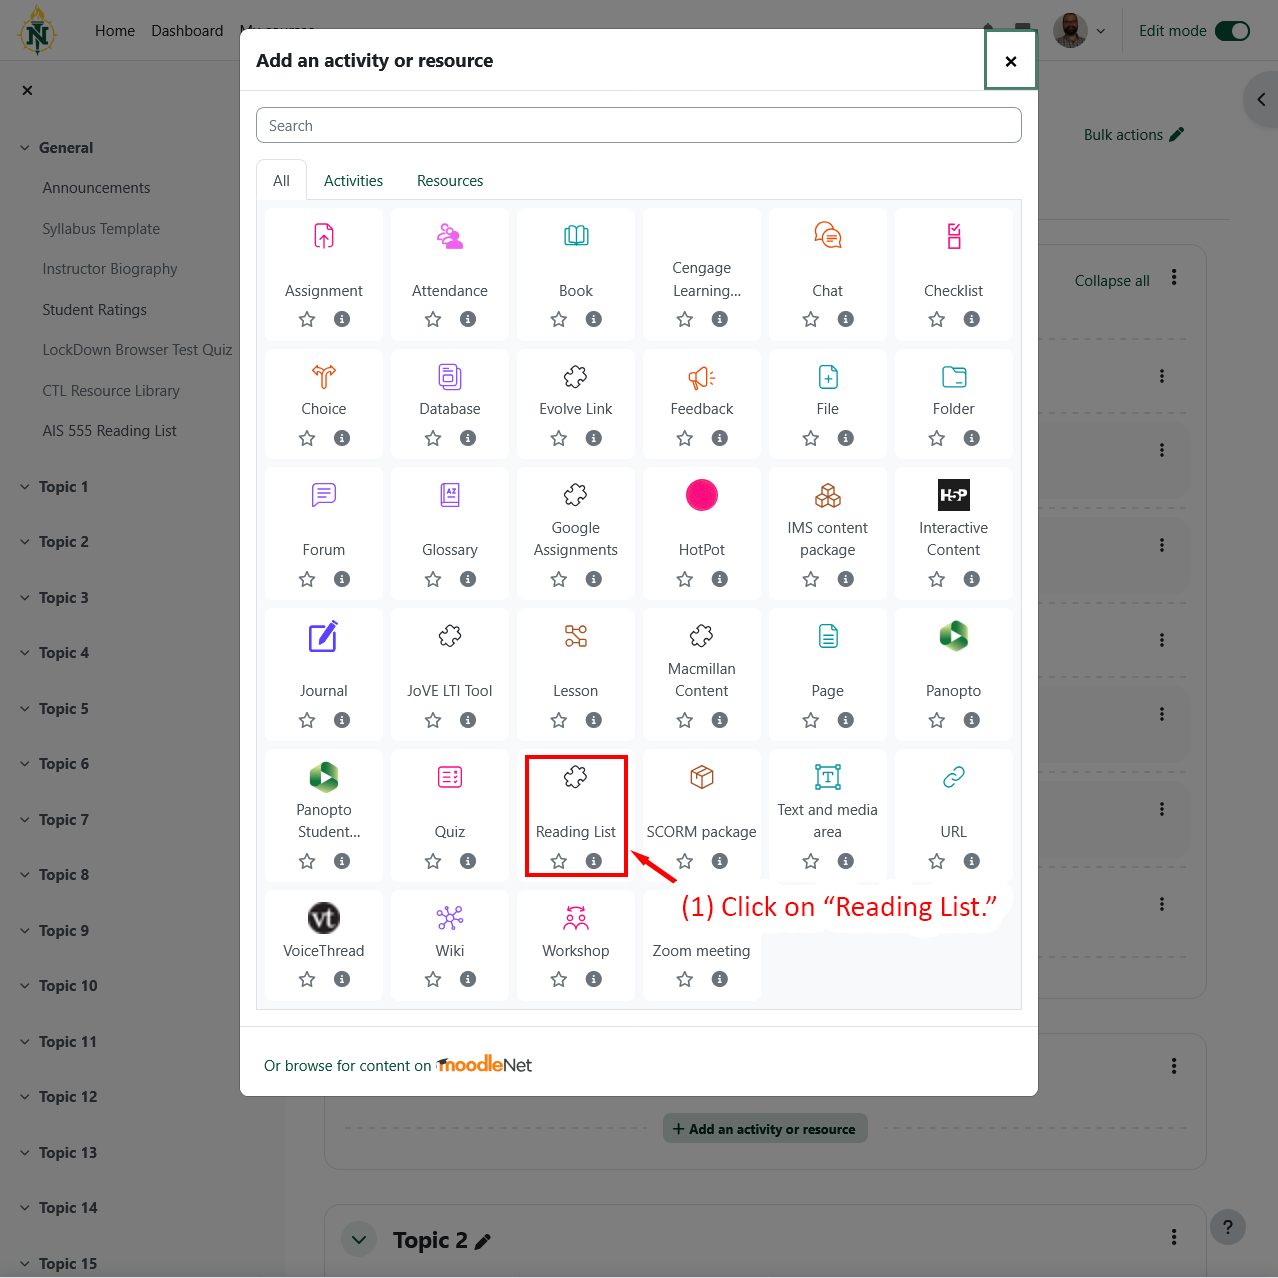
Sorry, you need to enable JavaScript to visit this website.
Skip to main content

Creating Course Reserves

Course reserves ensure that all students in a class have access to required materials selected by their instructor.

Hard copy items, such as books, videos, and physical objects are available at the Public Services Desk during regular library hours.

Electronic reserves, including journal articles, book chapters, and multimedia are accessible through the Reading List feature in EduCat.

Lydia M. Olson Library manages all copyright compliance related to course reserve materials. This includes securing permissions from publishers and covering any required fees. Library staff can also digitize print-only materials when permitted under copyright law.

Physical Course Reserves

To place physical items on reserve, instructors should complete the Course Reserves Request Form. If the item is not already part of the library’s collection, instructors must bring the physical material to the Circulation Desk after submitting the request form.

Instructors may select from the following loan period options:

  • 2-hour
  • 4-hour (recommended for media items)
  • 3-day use

Students must present a valid NMU ID to check out reserve materials.

Electronic Course Reserves

To use electronic reserves, instructors must integrate them into their EduCat course using the Reading List feature. Follow the step-by-step instructions below to add the tool and begin submitting reserve requests for the current semester. Students can access electronic reserve materials directly through the Reading List feature within EduCat.

If you would like to request digitization of materials not already available in electronic form, please submit a Course Reserves Request Form.

Create & Add Materials to an EduCat Reading List

Steps:

  1. Login to EduCat
  2. Select the course you would like to add a reading list to.
Dashboard with highlighted course selection.
Detailed Image Description

Screenshot of a course management dashboard. The screen includes a greeting, "Hi, Jacob!" with a waving hand emoji. Below it is a "Course overview" section displaying courses as tiles. A red arrow points to the course titled "AIS 555 Jacob's Practice Course - AIS555JJ," with the label "(2) Select the course you would like to edit." The image highlights course selection functionality in a tutorial context.

  1. Enable Edit Mode by clicking the toggle in the top right of the screen.
Course page with edit mode toggle highlighted.
Detailed Image Description

Screenshot of the "AIS 555 Jacob's Practice Course - AIS555JJ" course page. The left sidebar displays navigation options like "General," "Announcements," and "Syllabus Template." The top right corner includes a toggle labeled "Edit mode," which is turned on and highlighted with a red arrow and the text "(3) Enable Edit Mode by clicking the toggle." The image demonstrates enabling edit mode for course customization.

Steps:

  1. Scroll down to the Section of interest and click "Add an Activity or Resource."
    1. You are able to generate one reading list per course, however within that reading list you may create different sections (instructions to follow). We recommend adding a reading list as a general course resource.
Course page with activity/resource addition highlighted.
Detailed Image Description

Screenshot of the "AIS 555 Jacob's Practice Course - AIS555JJ" course page. The left sidebar shows sections like "General" and various topics. The main section under "General" lists course items, such as "Announcements," "Syllabus Template," and "Instructor Biography," with some marked as "Hidden from students." At the bottom of the "General" section, a green button labeled "Add an activity or resource" is highlighted with a red box and arrow pointing to it, accompanied by the text "(1) Click "Add an activity or resource."" The image demonstrates how to add activities or resources to a course.

Steps:

  1. Click on "Reading List."
Dialog showing resource type selection.
Detailed Image Description

Screenshot of a pop-up window titled "Add an activity or resource." The window shows a grid of icons representing different activities and resources, such as Assignments, Database, and Quizzes. A red arrow points to the "Reading List" option, highlighted with a red box. The accompanying text reads "(1) Click on "Reading List."" The image demonstrates how to select the Reading List resource type for a course.

Steps:

  1. Type an activity name, e.g. "AIS 555 Reading List."
    1. We recommend naming your reading list the same as the course, e.g. if the course is titled, "AIS 555," name the reading list, "AIS 555 Reading List." This names the reading list in the context of EduCat.
  2. Click "Save and return to course."
Activity setup screen with name field and save button highlighted.
Detailed Image Description

Screenshot of the "Adding a new External tool" page within the "AIS 555 Jacob's Practice Course - AIS555JJ." The page shows an input field under "General" labeled "Activity name," which has "AIS 555 Reading List" entered. A red box highlights this field with the text "(1) Type an activity name." Below the form, a green button labeled "Save and return to course" is highlighted with a red box and the text "(2) Click "Save and return to course."" The image demonstrates how to name an activity and save it to the course.

Steps:

  1. Click the reading list link that you just added and saved to your course.
    1. Clicking the reading list link will open a new window and bring you to the Lydia Olson Library's integrated library software called Leganto.
Course page with the Reading List link highlighted.
Detailed Image Description

The image shows an EduCat course page titled "AIS 555 Jacob's Practice Course - AIS555JJ" with a list of resources in the "General" section. The resources include items like "Announcements," "Syllabus Template," "Instructor Biography," and "Student Ratings," among others. Each item is displayed with an icon indicating its type (e.g., "FORUM," "PAGE," "URL," "QUIZ").


The left sidebar includes navigation links such as "General," "Topic 1," "Topic 2," and so on, and the top header has course management tabs like "Course," "Settings," "Participants," "Grades," and "Reports."

At the bottom of the list, a new item labeled "AIS 555 Reading List" is highlighted, with a red box around it and an annotation that says, "(1) Click the reading list link that you just created."

  1. Create a new reading list or roll over a previous semester's reading list.
    1. If you want to create a new reading list, click on "Create new list."
    2. If you have a reading list from a previous semester, click on "Select existing list."
Options to create a new reading list or select an existing one.
Detailed Image Description

Screenshot of the Ex Libris Leganto interface showing two options: "Create a new list from scratch" and "Create list from an existing list." The left option includes a green button labeled "Create new list," highlighted with a red arrow and text reading "Click "Create new list," to start a fresh reading list." The right option includes a green button labeled "Select existing list," highlighted with another red arrow and text reading "Click "Select existing list," to reuse an existing list." The image illustrates the process of starting a new reading list or reusing an existing one.

Steps:

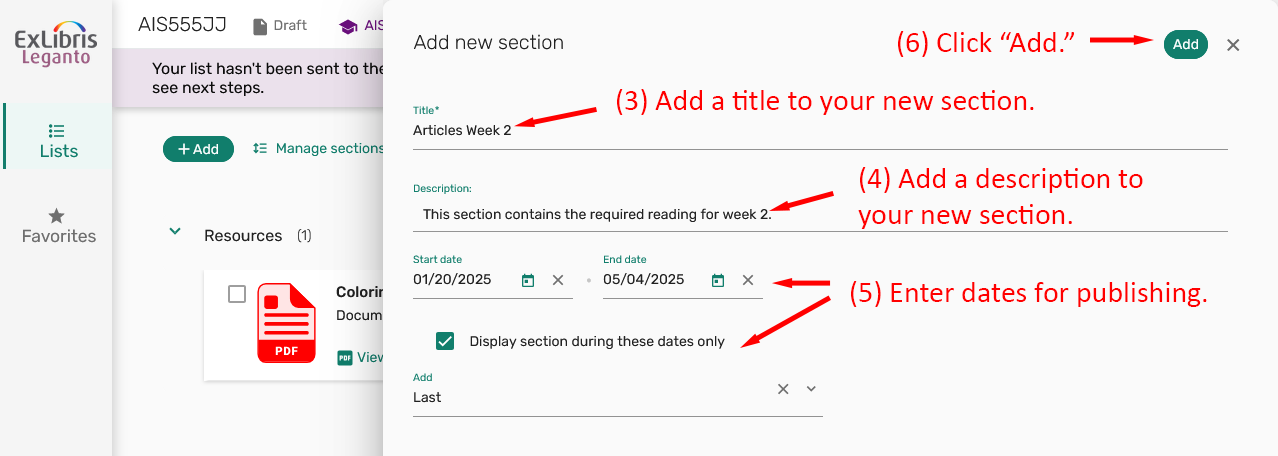
You can only create a single reading list for your course, however you may add multiple sections to that reading list. Each section can have its own title and rules for visibility, the steps for adding new sections to a reading list are described in the next accordion section.

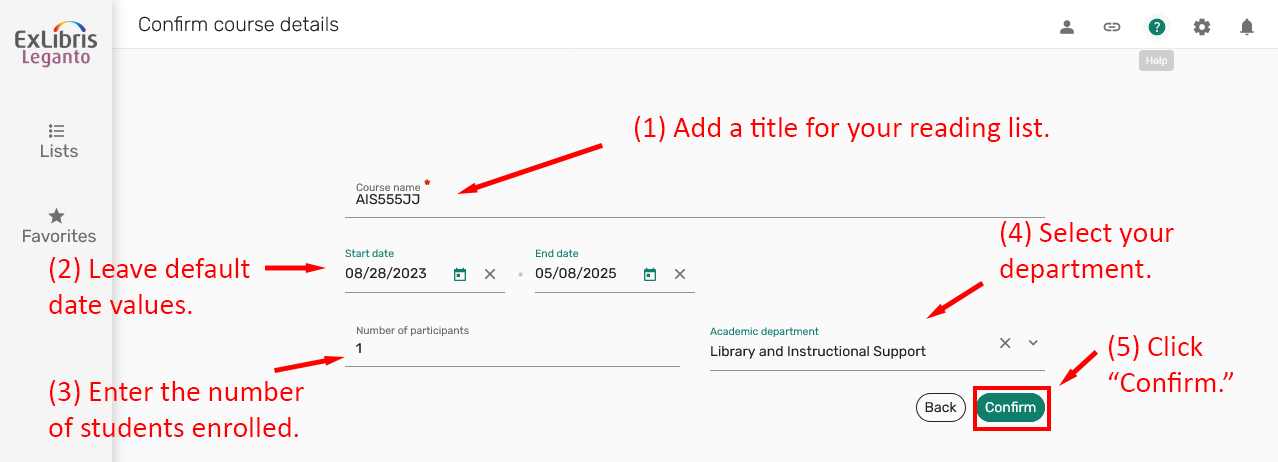
If this is the first time setting up your course and reading list, you may need to confirm the course details.

  1. Add a title for your reading list.
    1. We recommend naming your reading list the same as the course. This facilitates ease of service by our library staff when updating or linking new materials to your reading list. While this seems repetitive to step 4, in this step, you are now titling the reading list in the context of the Lydia Olson Library's integrated library system, while in step 4 you named the reading list in the context of EduCat.
  2. Leave the default date values.
  3. Enter the number of students enrolled in your course.
  4. Select your department.
  5. Click "Confirm." This will open a from to continue configuring your new reading list.
Form to confirm course details for a reading list.
Detailed Image Description

Screenshot of the Ex Libris Leganto interface displaying the "Confirm course details" form. The form includes fields for "Course name," "Start date," "End date," "Number of participants," and "Academic department." Red arrows and text provide instructions: "(1) Add a title for your reading list," "(2) Leave default date values," "(3) Enter the number of students enrolled," "(4) Select your department," and "(5) Click "Confirm."" The green "Confirm" button is highlighted. The image demonstrates how to complete and confirm course details for a reading list.

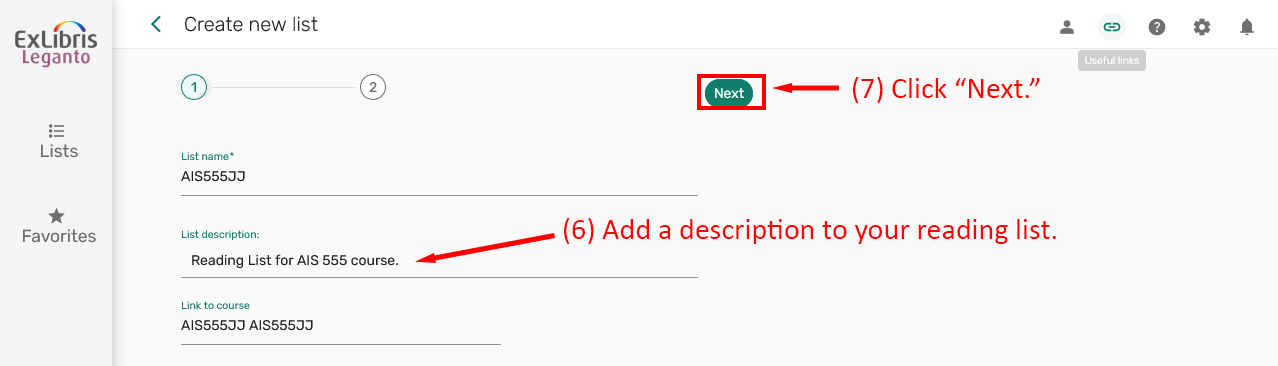
  1. Add a description to you reading list, leave the other fields as their default values.
  2. Click "Next."
Form for adding a description to a reading list.
Detailed Image Description

Screenshot of the Ex Libris Leganto "Create new list" interface. The form includes fields for "List name," "List description," and "Link to course." The "List description" field contains the text "Reading List for AIS 555 course." Red arrows and instructions guide the user: "(6) Add a description to your reading list" and "(7) Click "Next."" The "Next" button is highlighted in green. The image demonstrates how to add a description and proceed to the next step of creating a reading list.

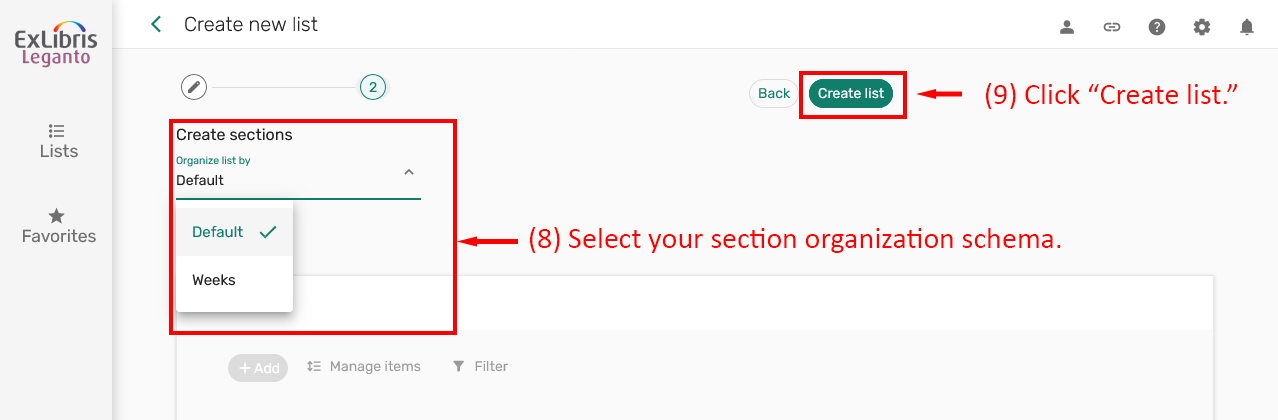
  1. Select your section organization schema.
    1. We recommend selecting the default structure which allows you to create your own sections as you please. For more information about using the "Weeks," option, please contact the Center for Teaching and Learning.
  2. Click "Create list."
Options for selecting section organization schema for a reading list.
Detailed Image Description

Screenshot of the Ex Libris Leganto "Create new list" interface. The "Create sections" panel shows a dropdown menu labeled "Organize list by," with options including "Default" and "Weeks." The "Default" option is selected. Red arrows and text provide guidance: "(8) Select your section organization schema," and "(9) Click "Create list."" The "Create list" button is highlighted in green. The image illustrates how to choose a section organization schema and finalize the creation of a reading list.

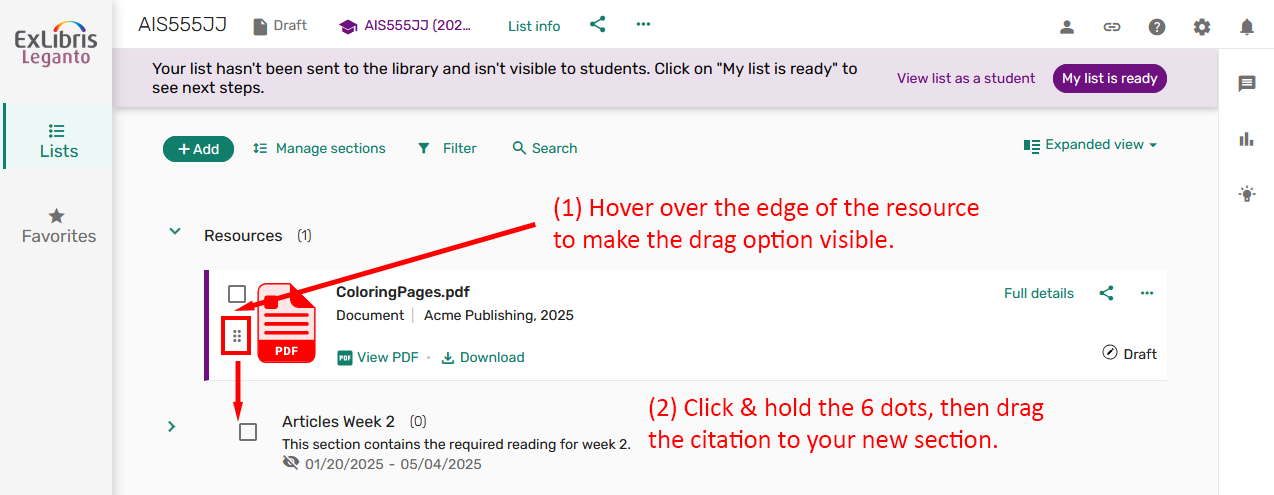
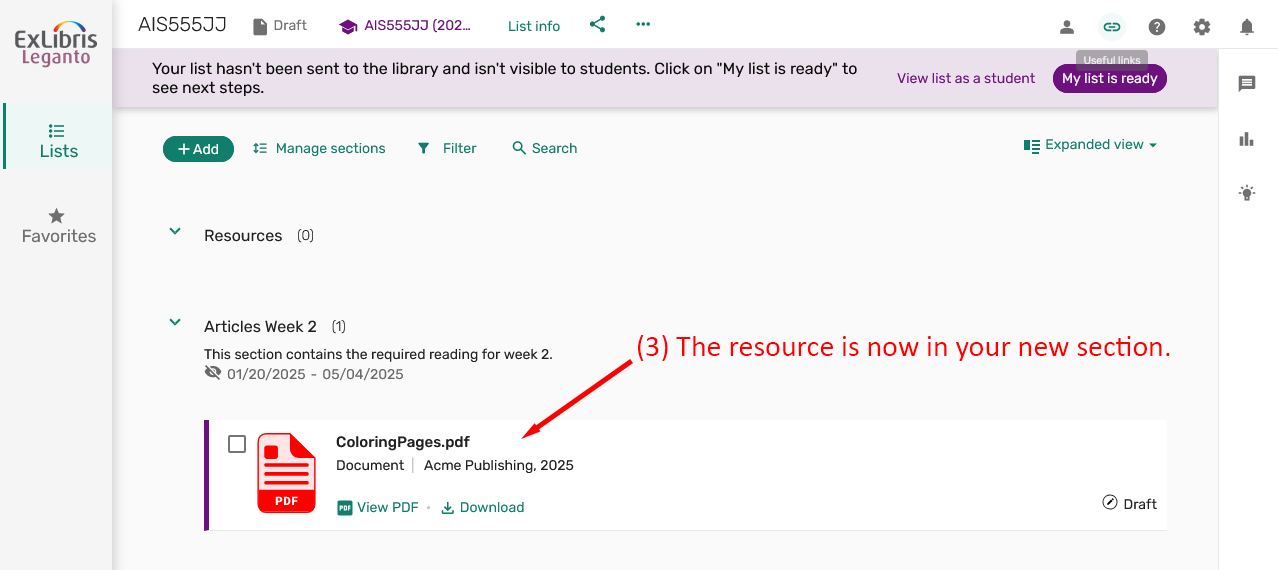
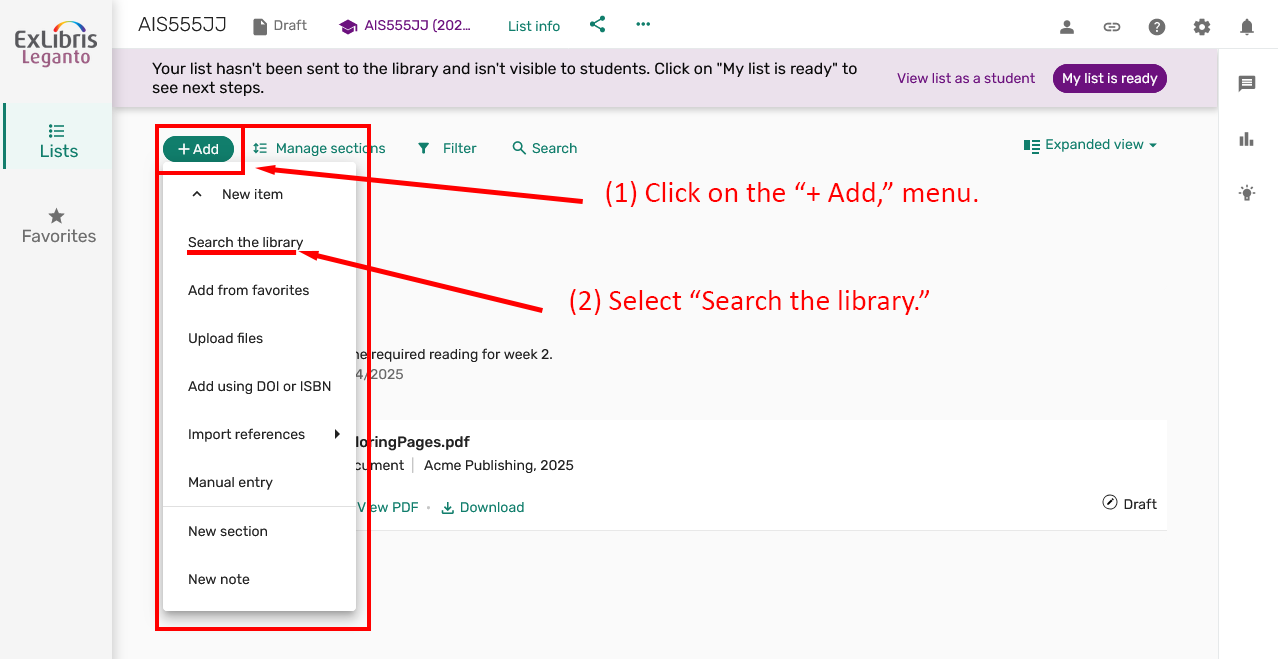
Once the new reading list is created, it is a great time to make a course reserves request for course required materials. By going through this process the library handles copyright concerns, and provides digital resources directly on your Resources section of your new reading list which you can add to student-viewable sections of a reading list. Instructions for adding materials to your reading list are covered in subsequent steps.

Make a Course Reserves Request

Steps:

  1. Click on the "+ Add," menu.
  2. Select "New section."
Menu for adding a new section to a reading list.
Detailed Image Description

Screenshot of the Ex Libris Leganto interface showing the process of adding a new section to a reading list. A dropdown menu is displayed under the "+ Add" button. The "New section" option is highlighted with a red box. Red arrows and text provide instructions: "(1) Click on the "+ Add" menu," and "(2) Select "New section."" The image demonstrates how to access and select the option to create a new section in the reading list.

  1. Add a title to your new section.
  2. Add a description to your new section.
  3. OPTIONAL: Enter dates for publishing.
  4. Click "Add."
Form for adding a new section to a reading list.
Detailed Image Description

Screenshot of the Ex Libris Leganto interface displaying the "Add new section" form. The form includes fields for "Title," "Description," "Start date," "End date," and a checkbox for "Display section during these dates only." The "Title" field contains "Articles Week 2," and the "Description" field reads "This section contains the required reading for week 2." Red arrows and text provide step-by-step instructions: "(3) Add a title to your new section," "(4) Add a description to your new section," "(5) Enter dates for publishing," and "(6) Click "Add."" The "Add" button is highlighted in green. The image demonstrates how to input details for a new section in a reading list.

Steps for adding items requested through the Library's course reserves form:

  1. Locate the resource in your reading list Resources section, hover over the edge of the resource to make the drag option visible.
    1. Any electronic items requested through our courses reserves form, will be added to your Resources section by library staff.
  2. Click and hold the 6 dots, then drag the citation to your new section.
Interface showing how to drag a resource to a new section in a reading list.
Detailed Image Description

Screenshot of the Ex Libris Leganto interface demonstrating how to move a resource to a new section. A resource titled "ColoringPages.pdf" is displayed, with a PDF icon and publication details. The "Articles Week 2" section is visible below. Red arrows and text provide instructions: "(1) Hover over the edge of the resource to make the drag option visible," and "(2) Click & hold the 6 dots, then drag the citation to your new section." The 6-dot drag handle is highlighted. The image illustrates how to move a resource within the reading list interface.

  1. The resource is now in your new section.
Reading list showing a resource moved to a new section.
Detailed Image Description

Screenshot of the Ex Libris Leganto interface showing the "Articles Week 2" section in a reading list. The section contains the resource "ColoringPages.pdf," a document published by Acme Publishing in 2025. A red arrow and text indicate: "(3) The resource is now in your new section." The image demonstrates the successful movement of a resource to a newly created section in the reading list.

Steps for adding items from the Library Catalog:

  1. Click on, "+ Add," menu.
  2. Select "Search the library."
Menu option for searching the library to add resources.
Detailed Image Description

Screenshot of the Ex Libris Leganto interface showing the "+ Add," menu expanded. The menu includes options like "New item," "Search the library," "Add from favorites," and more. The "Search the library" option is highlighted with a red arrow and text reading "(2) Select "Search the library."" Another arrow points to the "+ Add" button with the text "(1) Click on the "+ Add," menu." The image demonstrates how to access the library search option to add resources to a reading list.

  1. Enter your search query and press "Enter."
  2. Drag and drop the resource into your section.
  3. OPTIONAL: Click on the "+" symbol to enable more detailed resource options.
Interface showing search results and actions to add a resource to a reading list.
Detailed Image Description

Screenshot of the Ex Libris Leganto "Search the library" interface. The search bar contains the query "miRNA-223 at the crossroads of inflammation and cancer." A search result is displayed, showing an article with details like title, authors, and publication. Red arrows and text provide step-by-step instructions: "(3) Enter your search query and press "Enter,"" for the search bar, "(4) Drag and drop the resource into your section," for the resource icon, and "(5) Click on the "+" symbol to enable more detailed resource options." The image demonstrates how to search the library, view results, and add resources to a reading list.

  1. OPTIONAL: If you clicked on the "+" symbol to enable more detailed resource options: Select your reading list section.
  2. Click "Add," to add the resource to your reading list.

Adding Streaming Resources to Your Reading List:

  1. Similar to the steps above: click on the "+ Add" menu and select "Search the library," then enter the title of the streaming resource into the search query and press "Enter."
  2. You can add the selected resource to your reading list as shown above by either dragging and dropping, or by selecting the detailed options and picking a specific section.
  3. Click "Add," to add the resource to our reading list.
Interface showing how to add a video resource to a specific section in a reading list.
Detailed Image Description

Screenshot of the Ex Libris Leganto "Search the library" interface. The search bar contains the query "Count Dracula." A search result displays a video resource titled "Count Dracula" with details such as director, actors, publisher, and year. Below the result, the "Add to:" dropdown is set to "List," and the "Section" field is set to "Articles Week 2." Red arrows and text provide step-by-step instructions: "(1) Enter your search query and press "Enter,"" "(2) Select your reading list," and "(3) Click "Add," to add the resource to your reading list." The green "Add" button is highlighted. The image demonstrates how to add a video resource to a reading list section.

Generating Your Own Materials

For instructions on adding your own materials to your reading list, please contact the Center for Teaching and Learning.

Steps:

  1. Click, on the "My list is ready," button to start the publishing process.
Button for starting the publishing process of a reading list.
Detailed Image Description

Screenshot of the Ex Libris Leganto interface showing the "My list is ready" button. A purple banner at the top of the page reads, "Your list hasn't been sent to the library and isn't visible to students. Click on "My list is ready" to see next steps." Red arrows and text provide instructions: "(1) Click on the "My list is ready," button to start the publishing process." The button is highlighted in purple. The image demonstrates how to initiate the process of making a reading list visible to students and the library.

  1. Select the "Also publish the list to students," checkbox.
  2. Select the "Course students," radio button.
  3. Click the "Send," button to finish the publication process.
Dialog for sending a reading list to the library and publishing it to students.
Detailed Image Description

Screenshot of the "Send list to the library" dialog in the Ex Libris Leganto interface. The dialog includes a checkbox labeled "Also publish the list to students" and radio buttons for "Course students," "All students at the institution," and "Anyone." Red arrows and text provide step-by-step instructions: "(2) Select the "Also publish the list to students," checkbox," "(3) Select the "Course students" radio button," and "(4) Click the "Send," button to finish the publication process." The "Send" button is highlighted. The image demonstrates how to finalize and publish a reading list to students.

Congratulations!

  1. Your reading list is now published for students to access.
The reading list is now marked published.
Detailed Image Description

Screenshot of the Ex Libris Leganto interface showing the status of a reading list as "Published." A purple label at the top of the page reads "Published," highlighted with a red box and arrow. Below, the "Articles Week 2" section is displayed with details about the required reading and its dates. Red text indicates: "(1) The list is now published." The image confirms the successful publication of the reading list.

Finalize edits in EduCat

  1. Turn off edit mode for your course in EduCat.
Remember to exit edit mode in EduCat.
Detailed Image Description

Screenshot of the course interface for "AIS 555 Jacob\'s Practice Course - AIS555JJ." The top-right corner shows the "Edit mode" toggle, which is turned off. The toggle is highlighted with a red box and arrow pointing to it. Red text provides instructions: "(1) Exit edit mode." The image demonstrates how to turn off edit mode after making changes to the course.