Installing on Windows 11
The following set of instructions will guide you in installing the Library Color printer on a Windows 11 computer. This process may vary slightly on different versions of Windows, however the printer configuration options will remain the same (e.g. hostname and port configuration). If you run into problems installing the printer, please contact the NMU Help Desk for alternative instructions.
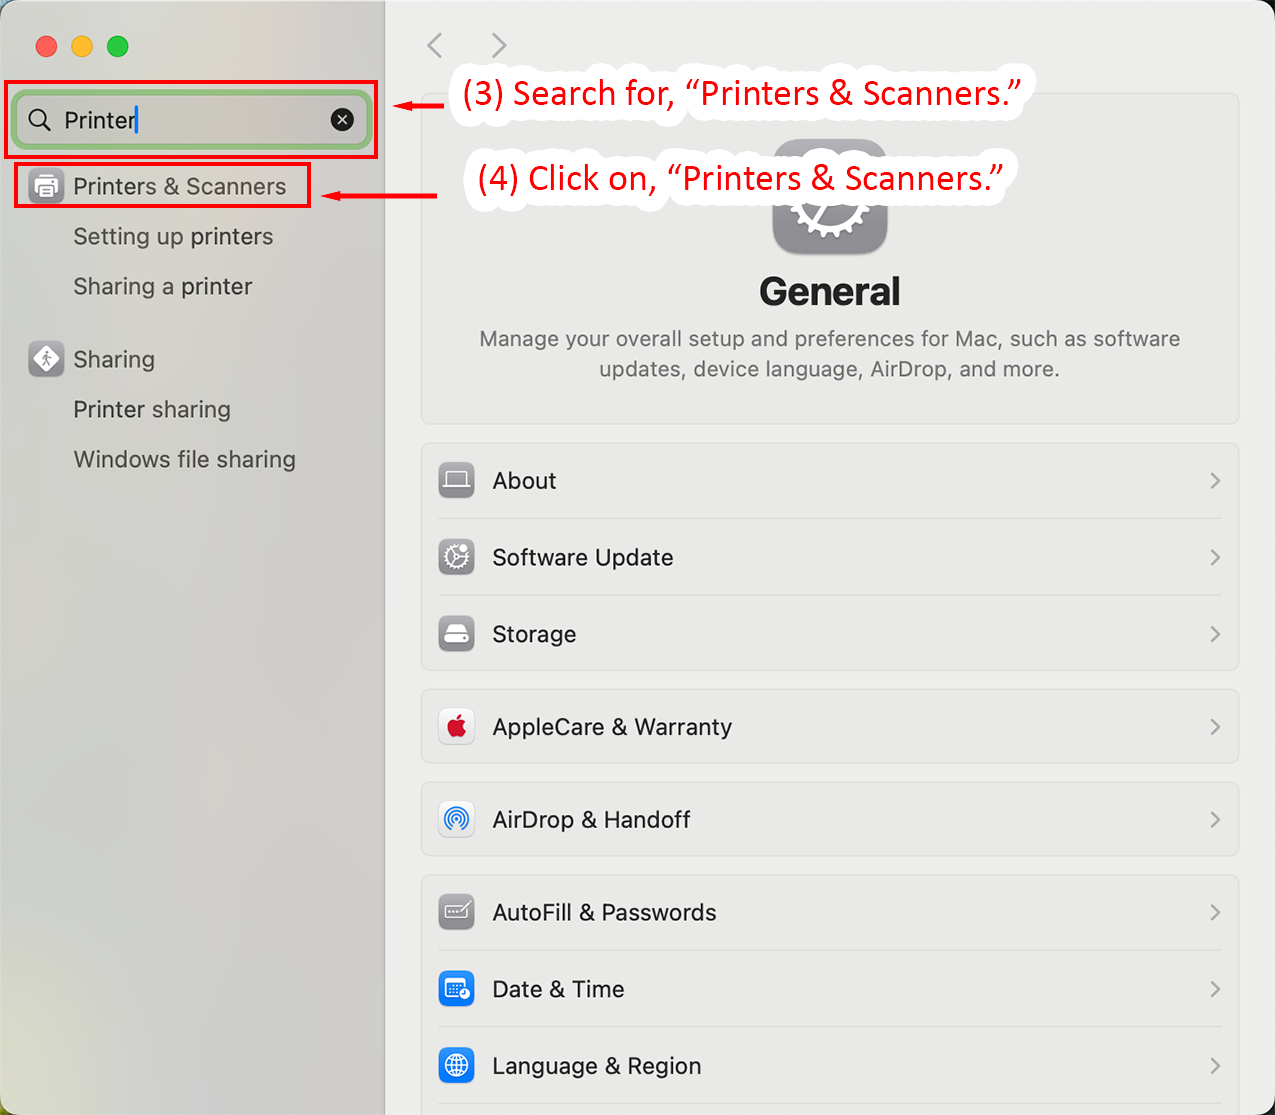
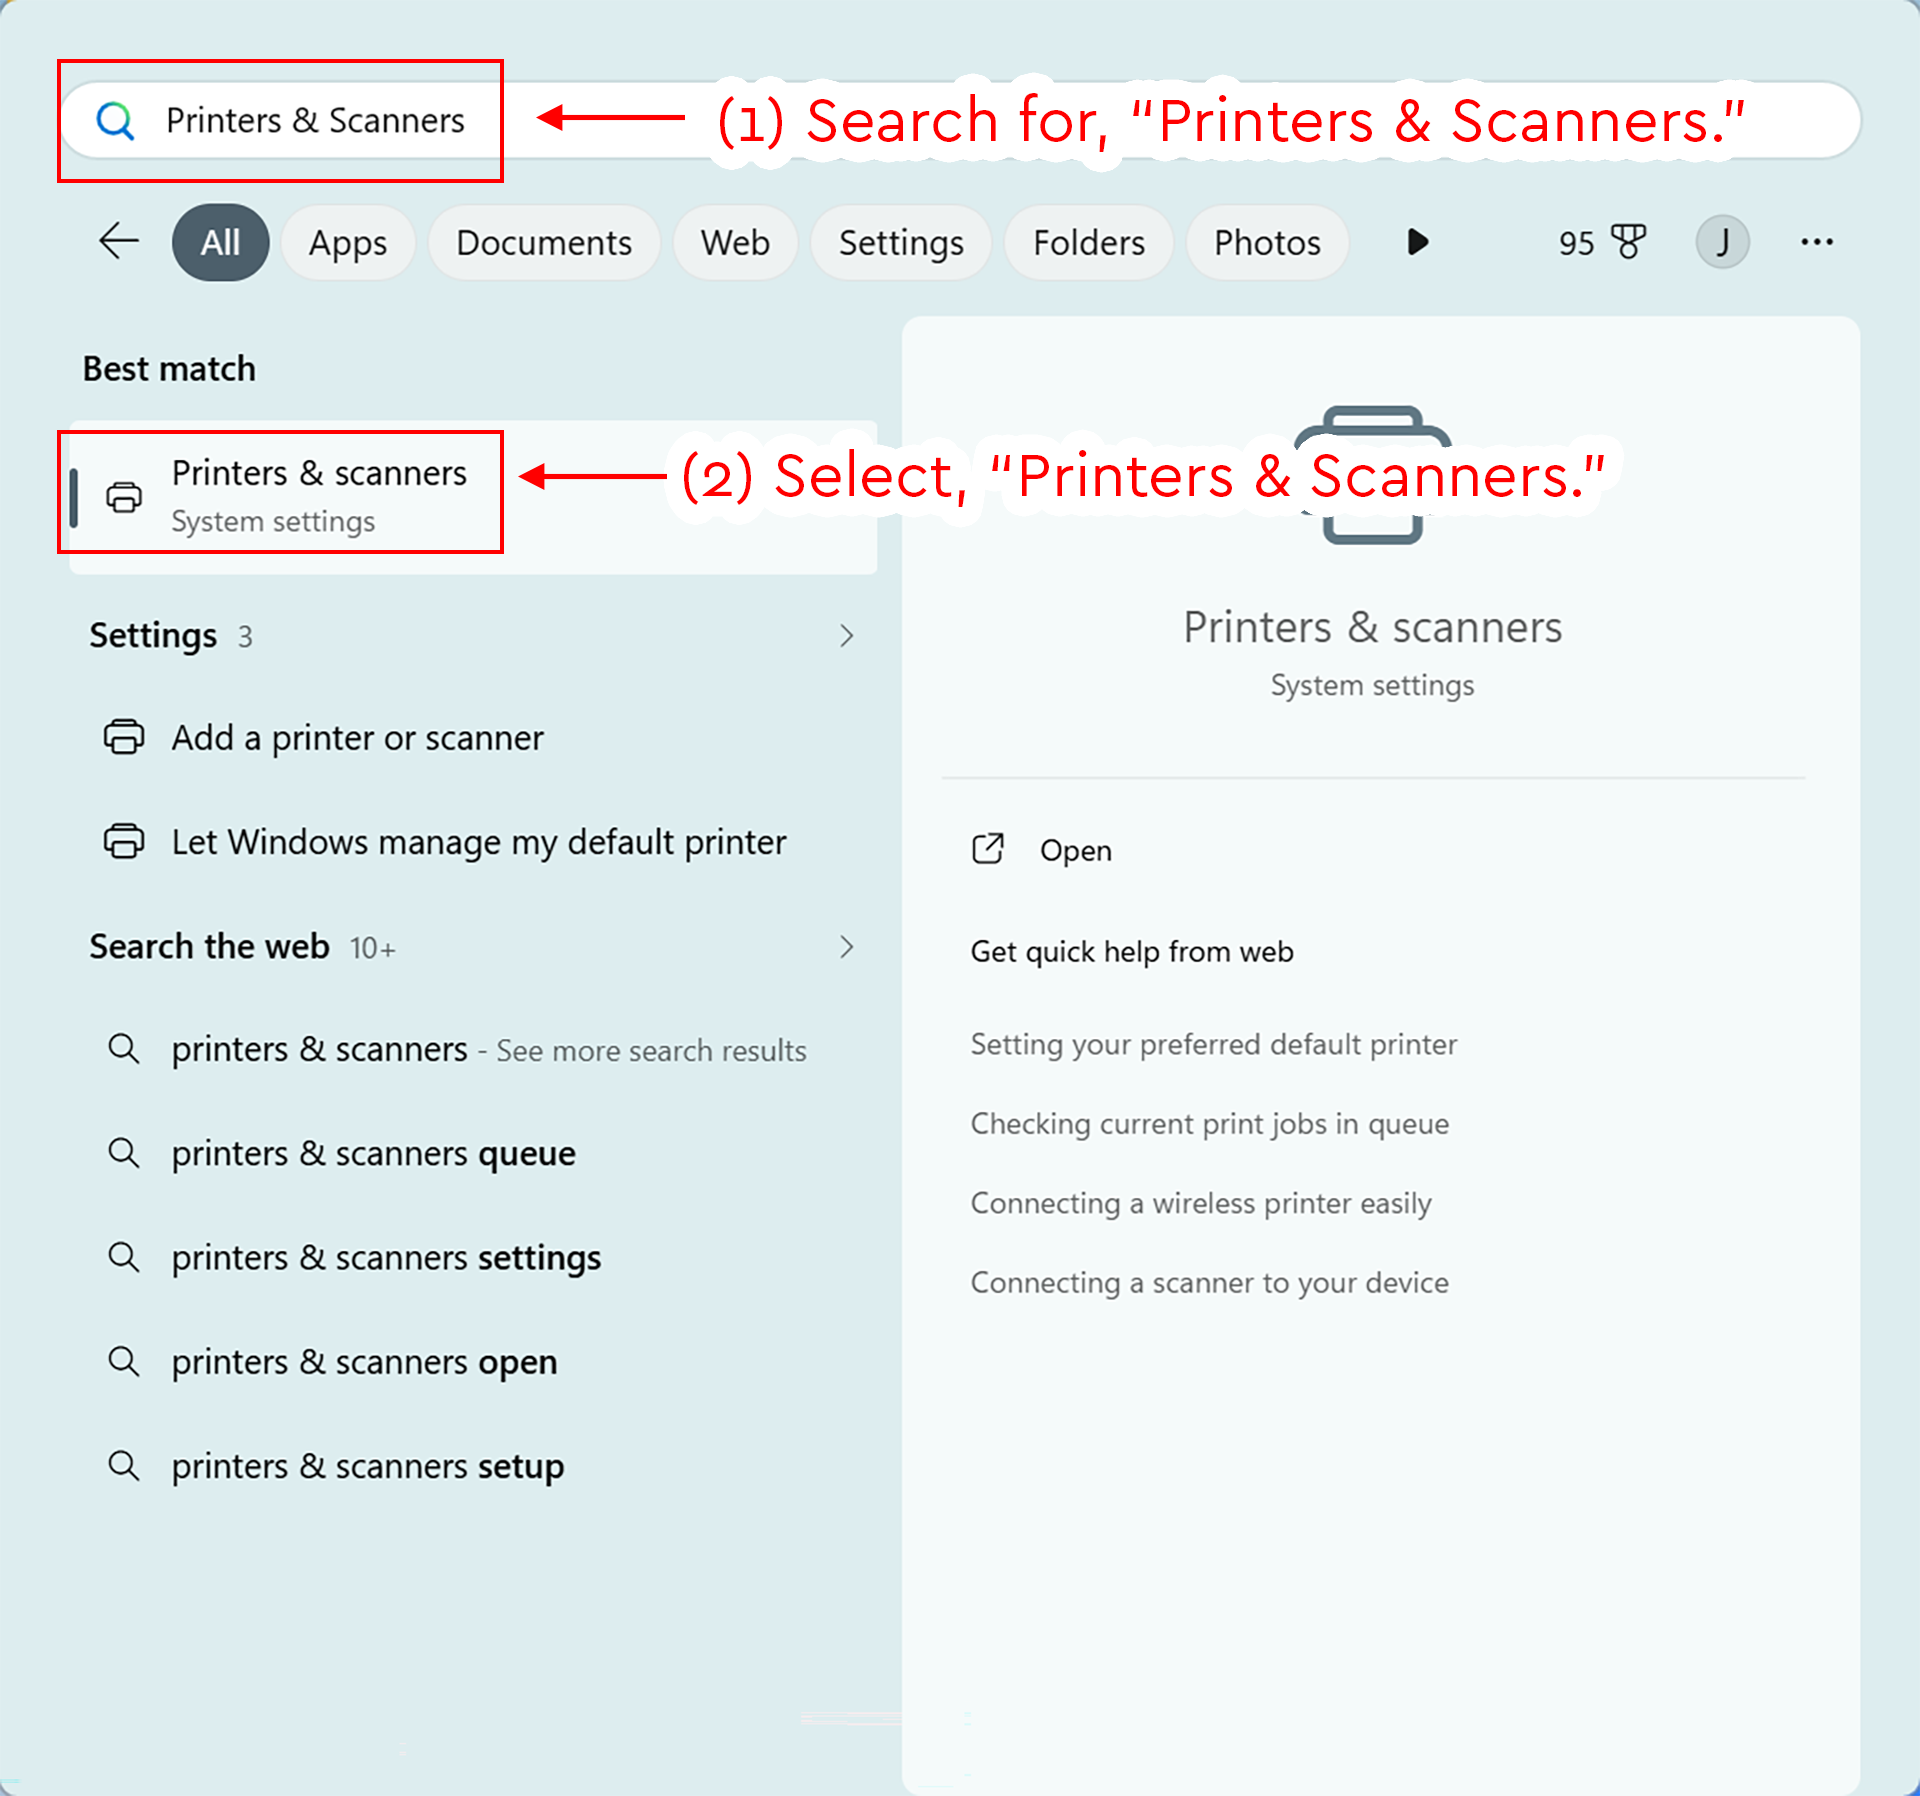
- Click the Start icon, or press the Windows Key, and search for "Printers & Scanners."
- Select "Printers & Scanners," from the results section.
Detailed Image Description
The figure shows the Windows 11 Search interface with instructional annotations for opening printer settings. At the top left, the search field contains the text “Printers & Scanners.” A red box surrounds the search field, and a red arrow points to it with the instruction “(1) Search for ‘Printers & Scanners.’”
Below the search field, the “Best match” result is highlighted with a red box. The result is labeled “Printers & scanners” and identified as “System settings.” A second red arrow points to this result with the instruction “(2) Select ‘Printers & Scanners.’”
The right side of the search window shows a preview panel for “Printers & scanners,” including a printer icon, the label “System settings,” and an “Open” option. Additional search categories and related settings are visible in the left column, including “Add a printer or scanner” and “Let Windows manage my default printer.”
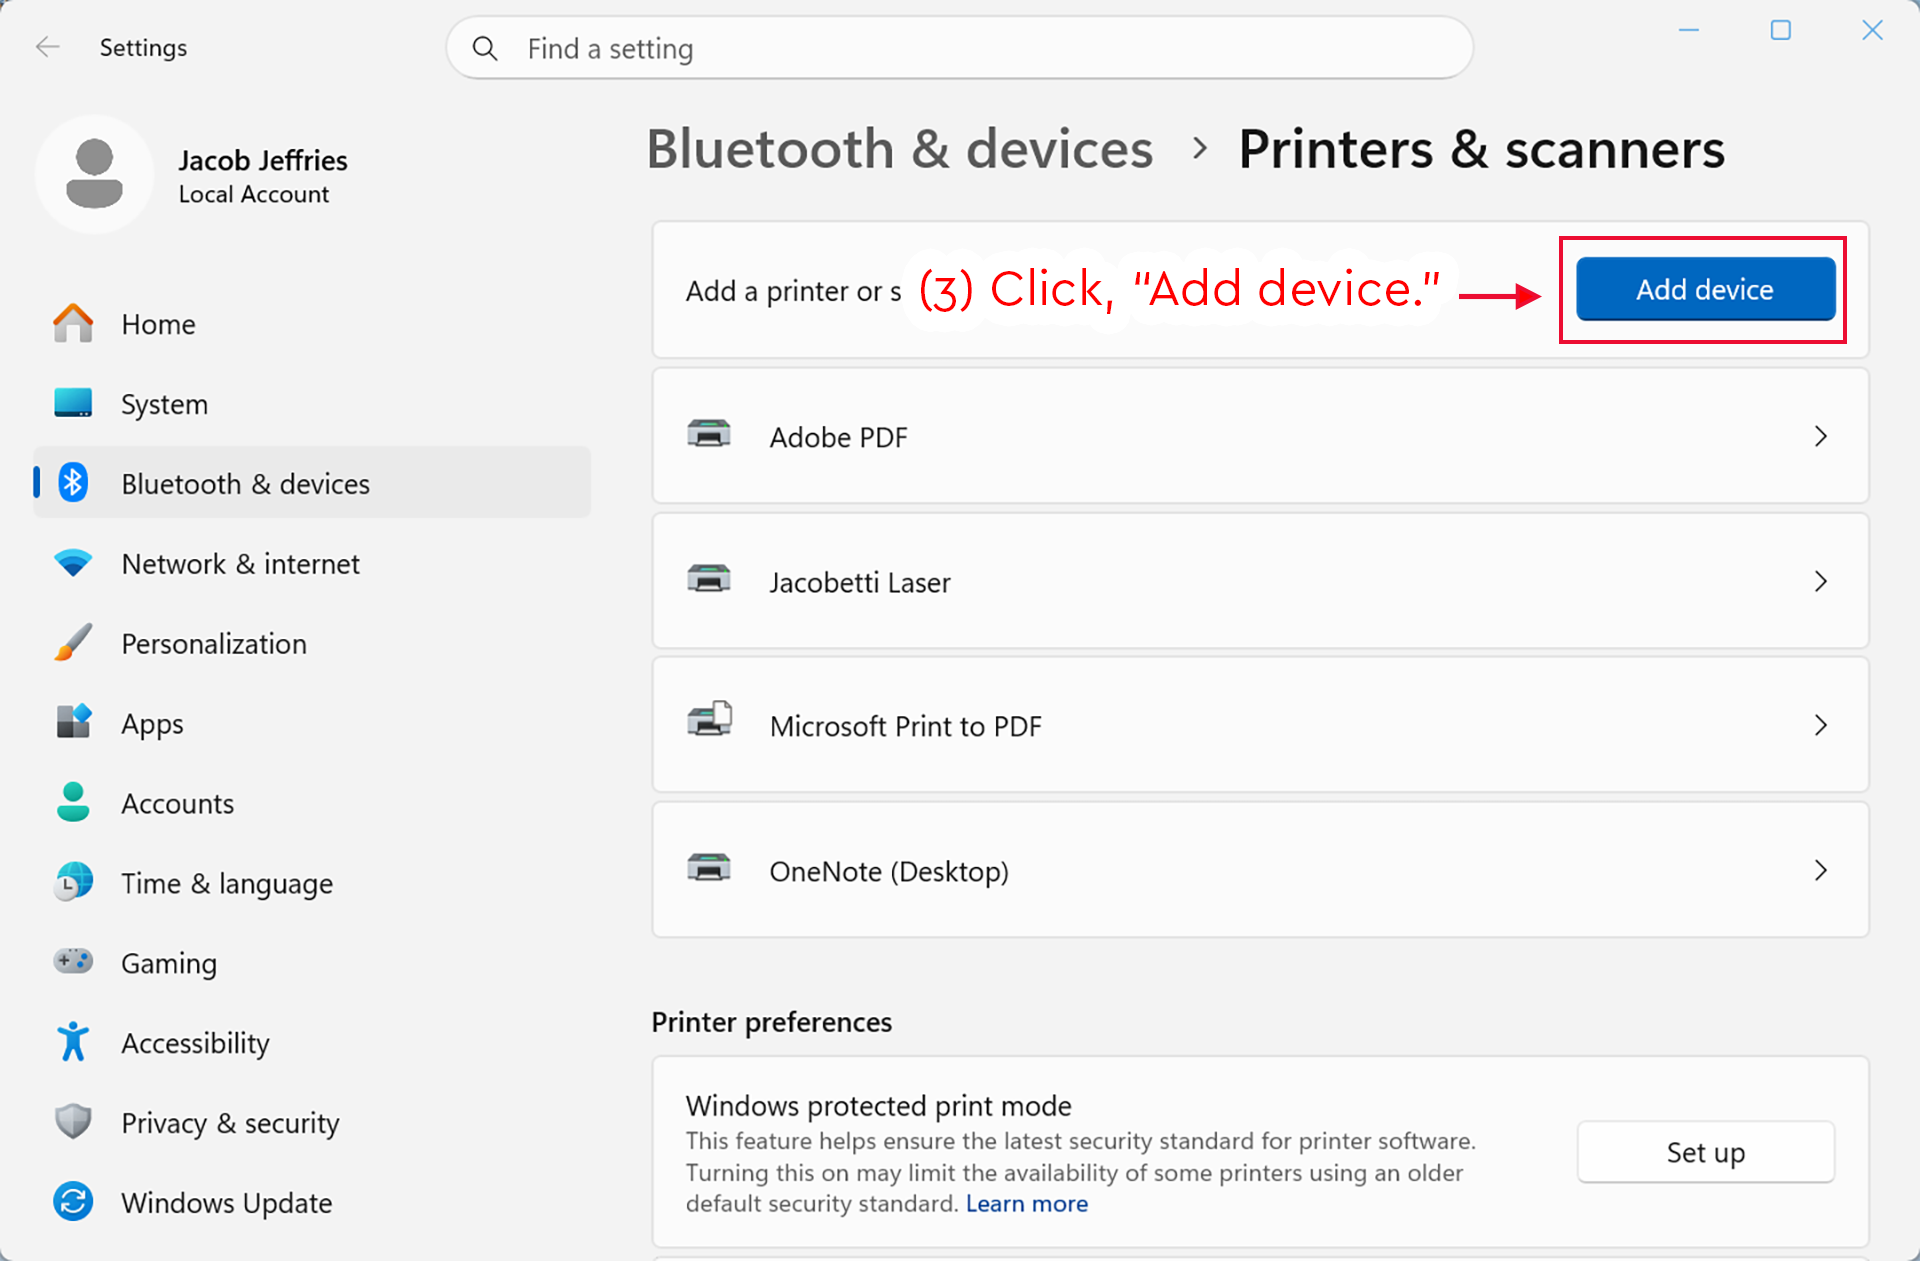
- Once the Settings panel loads, click on "Add Device."
Detailed Image Description
The figure shows the Windows 11 Settings app open to Bluetooth & devices > Printers & scanners. The main heading reads “Printers & scanners.” Near the top of the page, the “Add a printer or scanner” section appears with a blue “Add device” button on the right.
A red box surrounds the “Add device” button. A red arrow points to the button with the instruction “(3) Click ‘Add device.’” Below this section, several installed printers are listed, including “Adobe PDF,” “Jacobetti Laser,” “Microsoft Print to PDF,” and “OneNote (Desktop).”
The left sidebar shows the Windows Settings navigation menu, with “Bluetooth & devices” selected. Other menu options, including Home, System, Network & internet, Personalization, Apps, Accounts, Time & language, Gaming, Accessibility, Privacy & security, and Windows Update, are also visible.
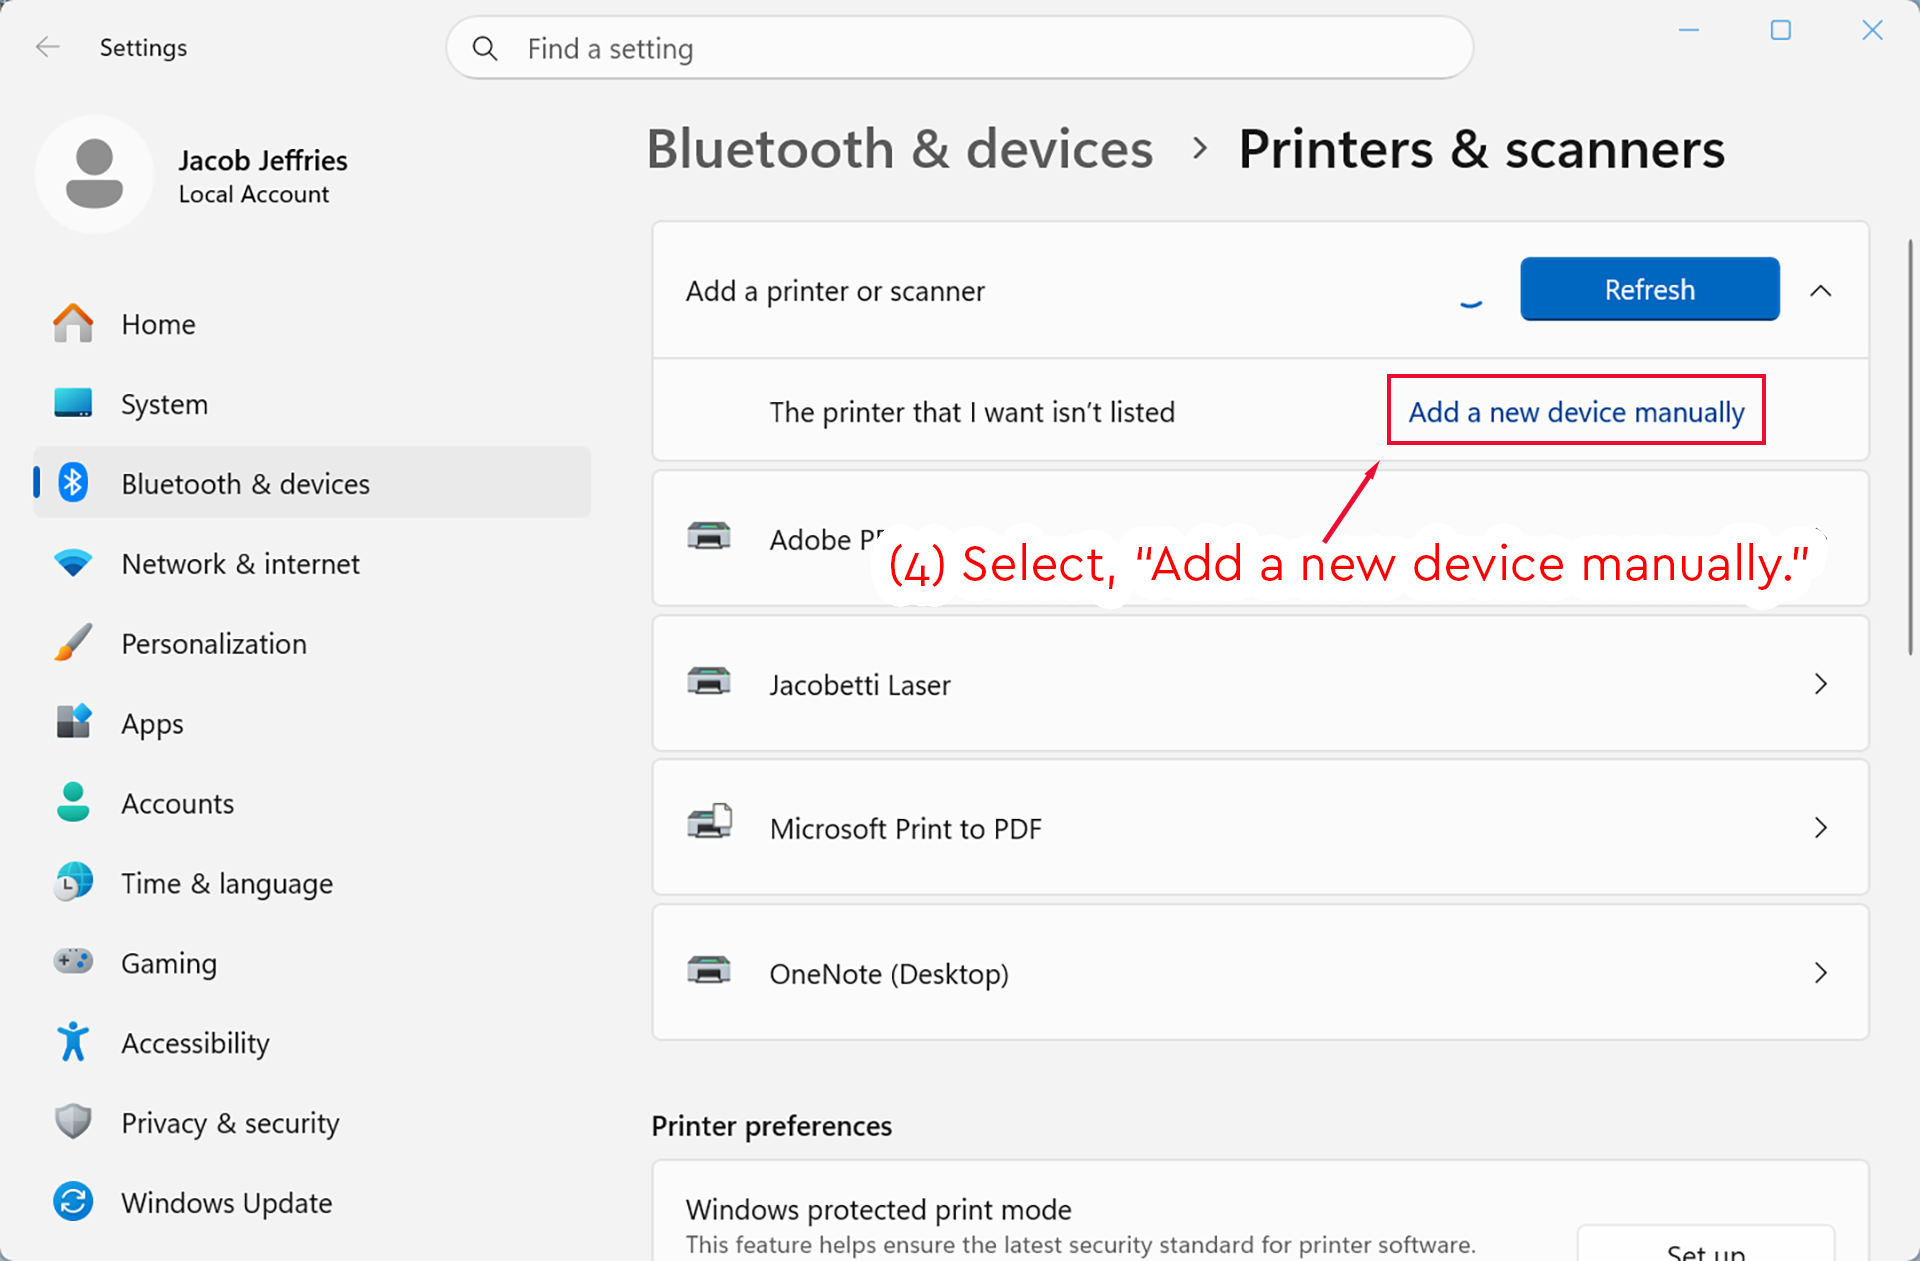
- After Windows scans for devices, click on, "Add manually."
Detailed Image Description
The figure shows the Windows 11 Settings app open to Bluetooth & devices > Printers & scanners. The main heading reads “Printers & scanners.”
The “Add a printer or scanner” section is expanded near the top of the page. A blue “Refresh” button appears on the right side of this section. Below it, a row reads “The printer that I want isn’t listed,” with a link on the right labeled “Add a new device manually.”
A red box surrounds the “Add a new device manually” link. A red arrow points to the link with the instruction “(4) Select, ‘Add a new device manually.’”
Below the expanded printer section, several installed printers are listed, including “Adobe PDF,” “Jacobetti Laser,” “Microsoft Print to PDF,” and “OneNote (Desktop).” The left sidebar shows the Windows Settings navigation menu, with “Bluetooth & devices” selected.
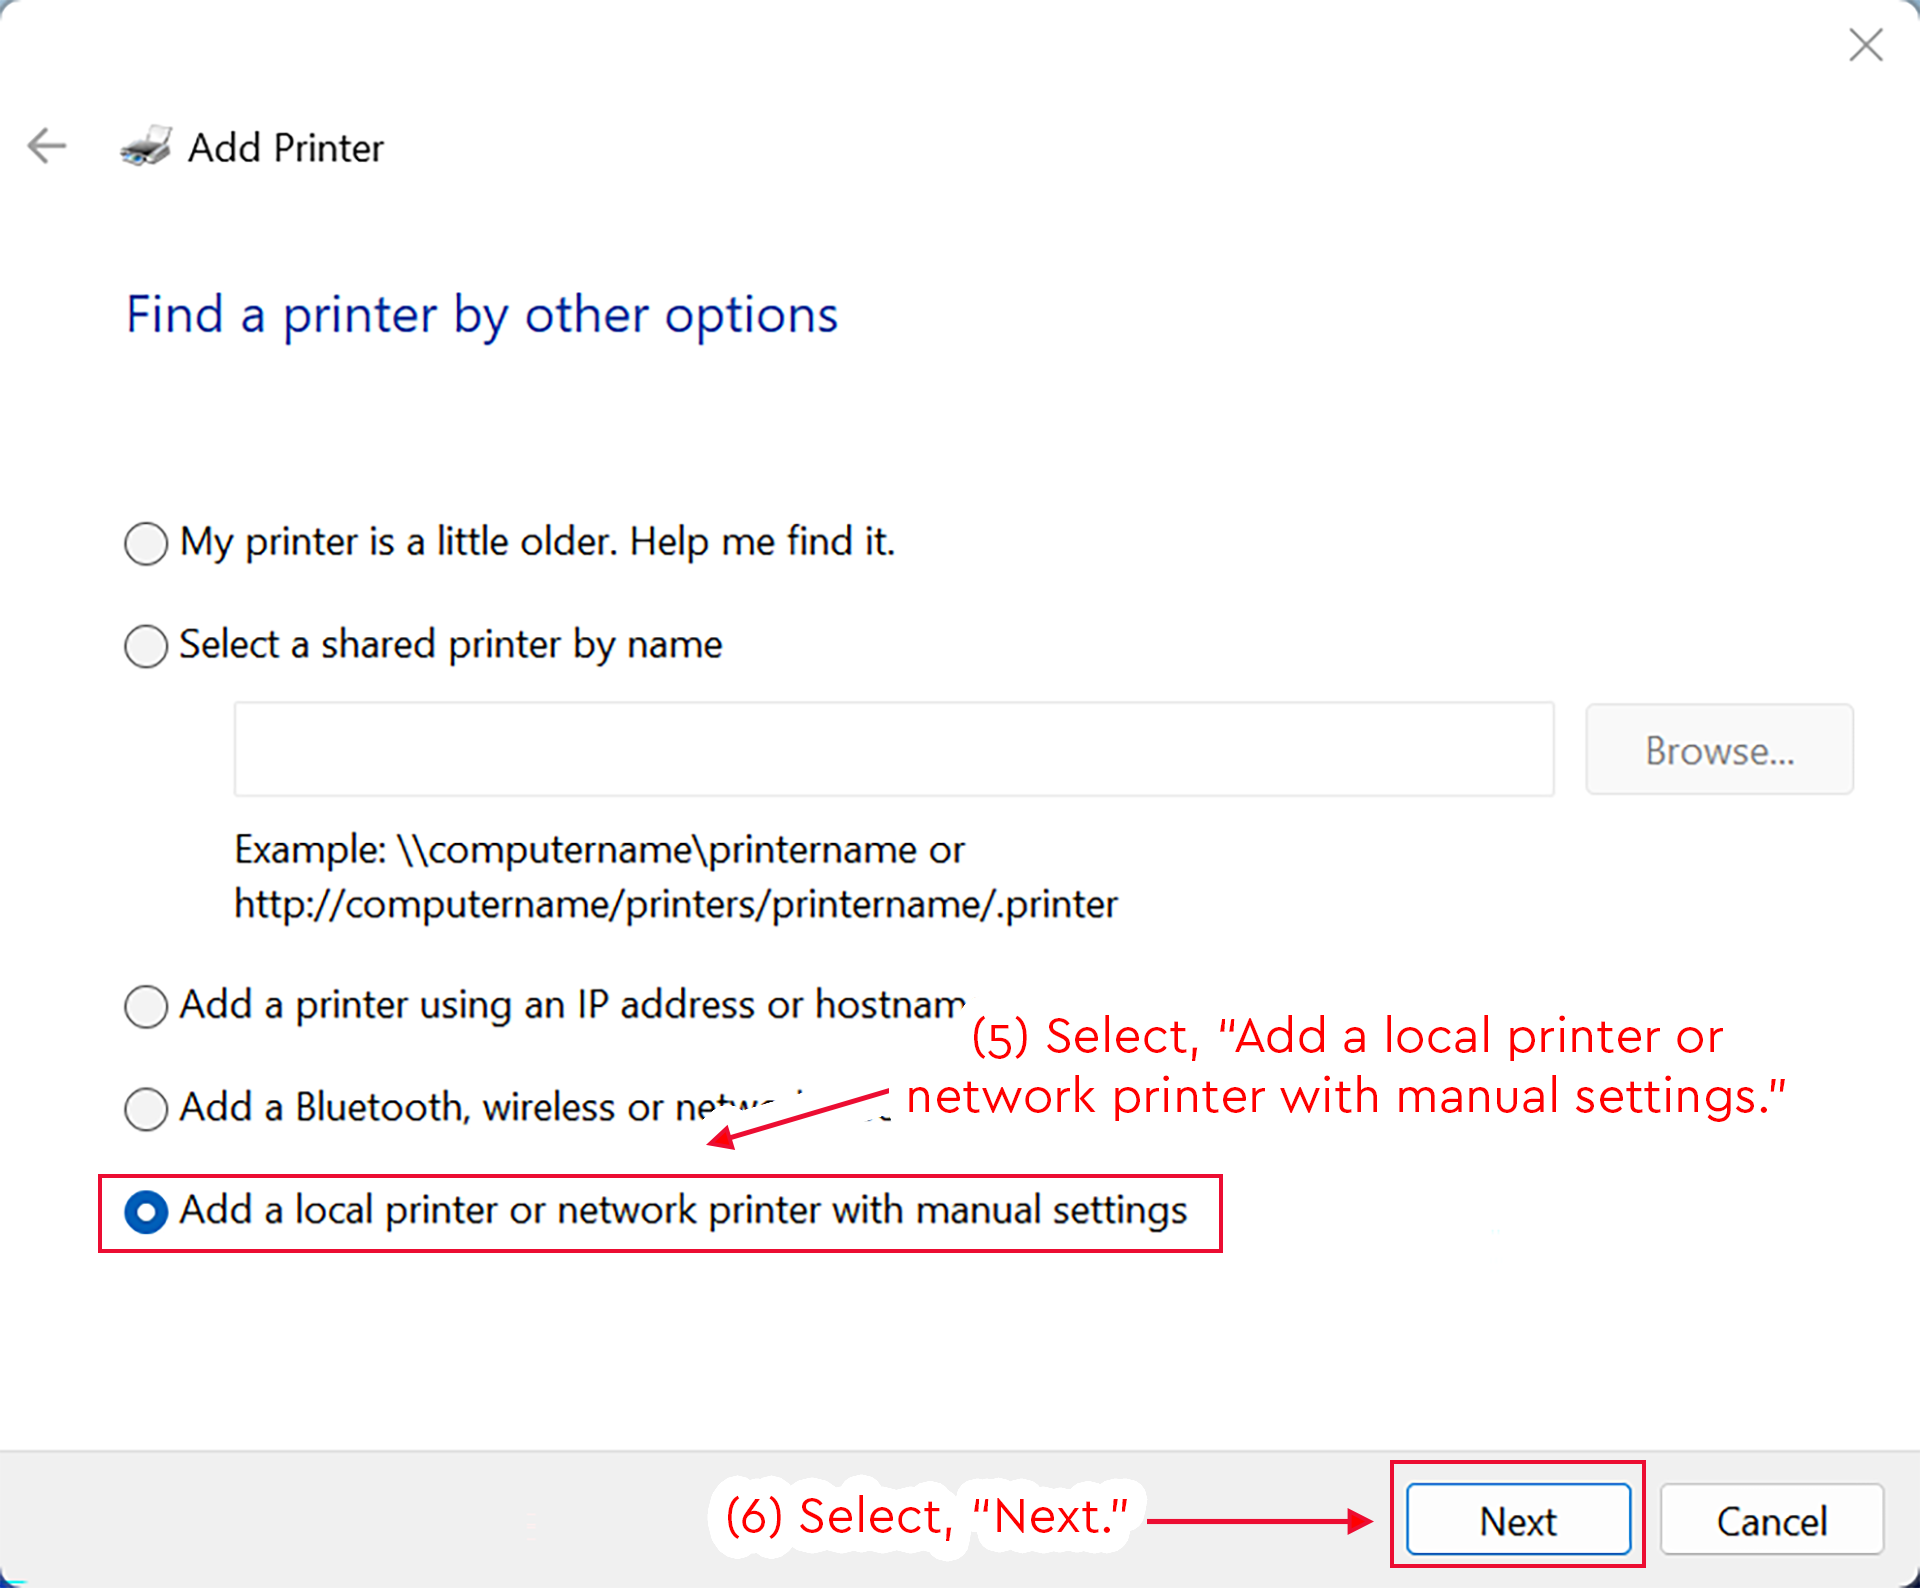
- On the Add Printer interface, select, "Add a local printer or network printer with manual settings."
- Select, "Next."
Detailed Image Description
The figure shows the Windows Add Printer window on the “Find a printer by other options” screen.
Several printer setup options are listed as radio buttons. The selected option is “Add a local printer or network printer with manual settings.” A red box surrounds this selected option, and a red arrow points to it with the instruction “(5) Select, ‘Add a local printer or network printer with manual settings.’”
At the bottom right of the window, the “Next” button is highlighted with a red box. A red arrow points to the button with the instruction “(6) Select, ‘Next.’” A “Cancel” button appears to the right of the “Next” button.
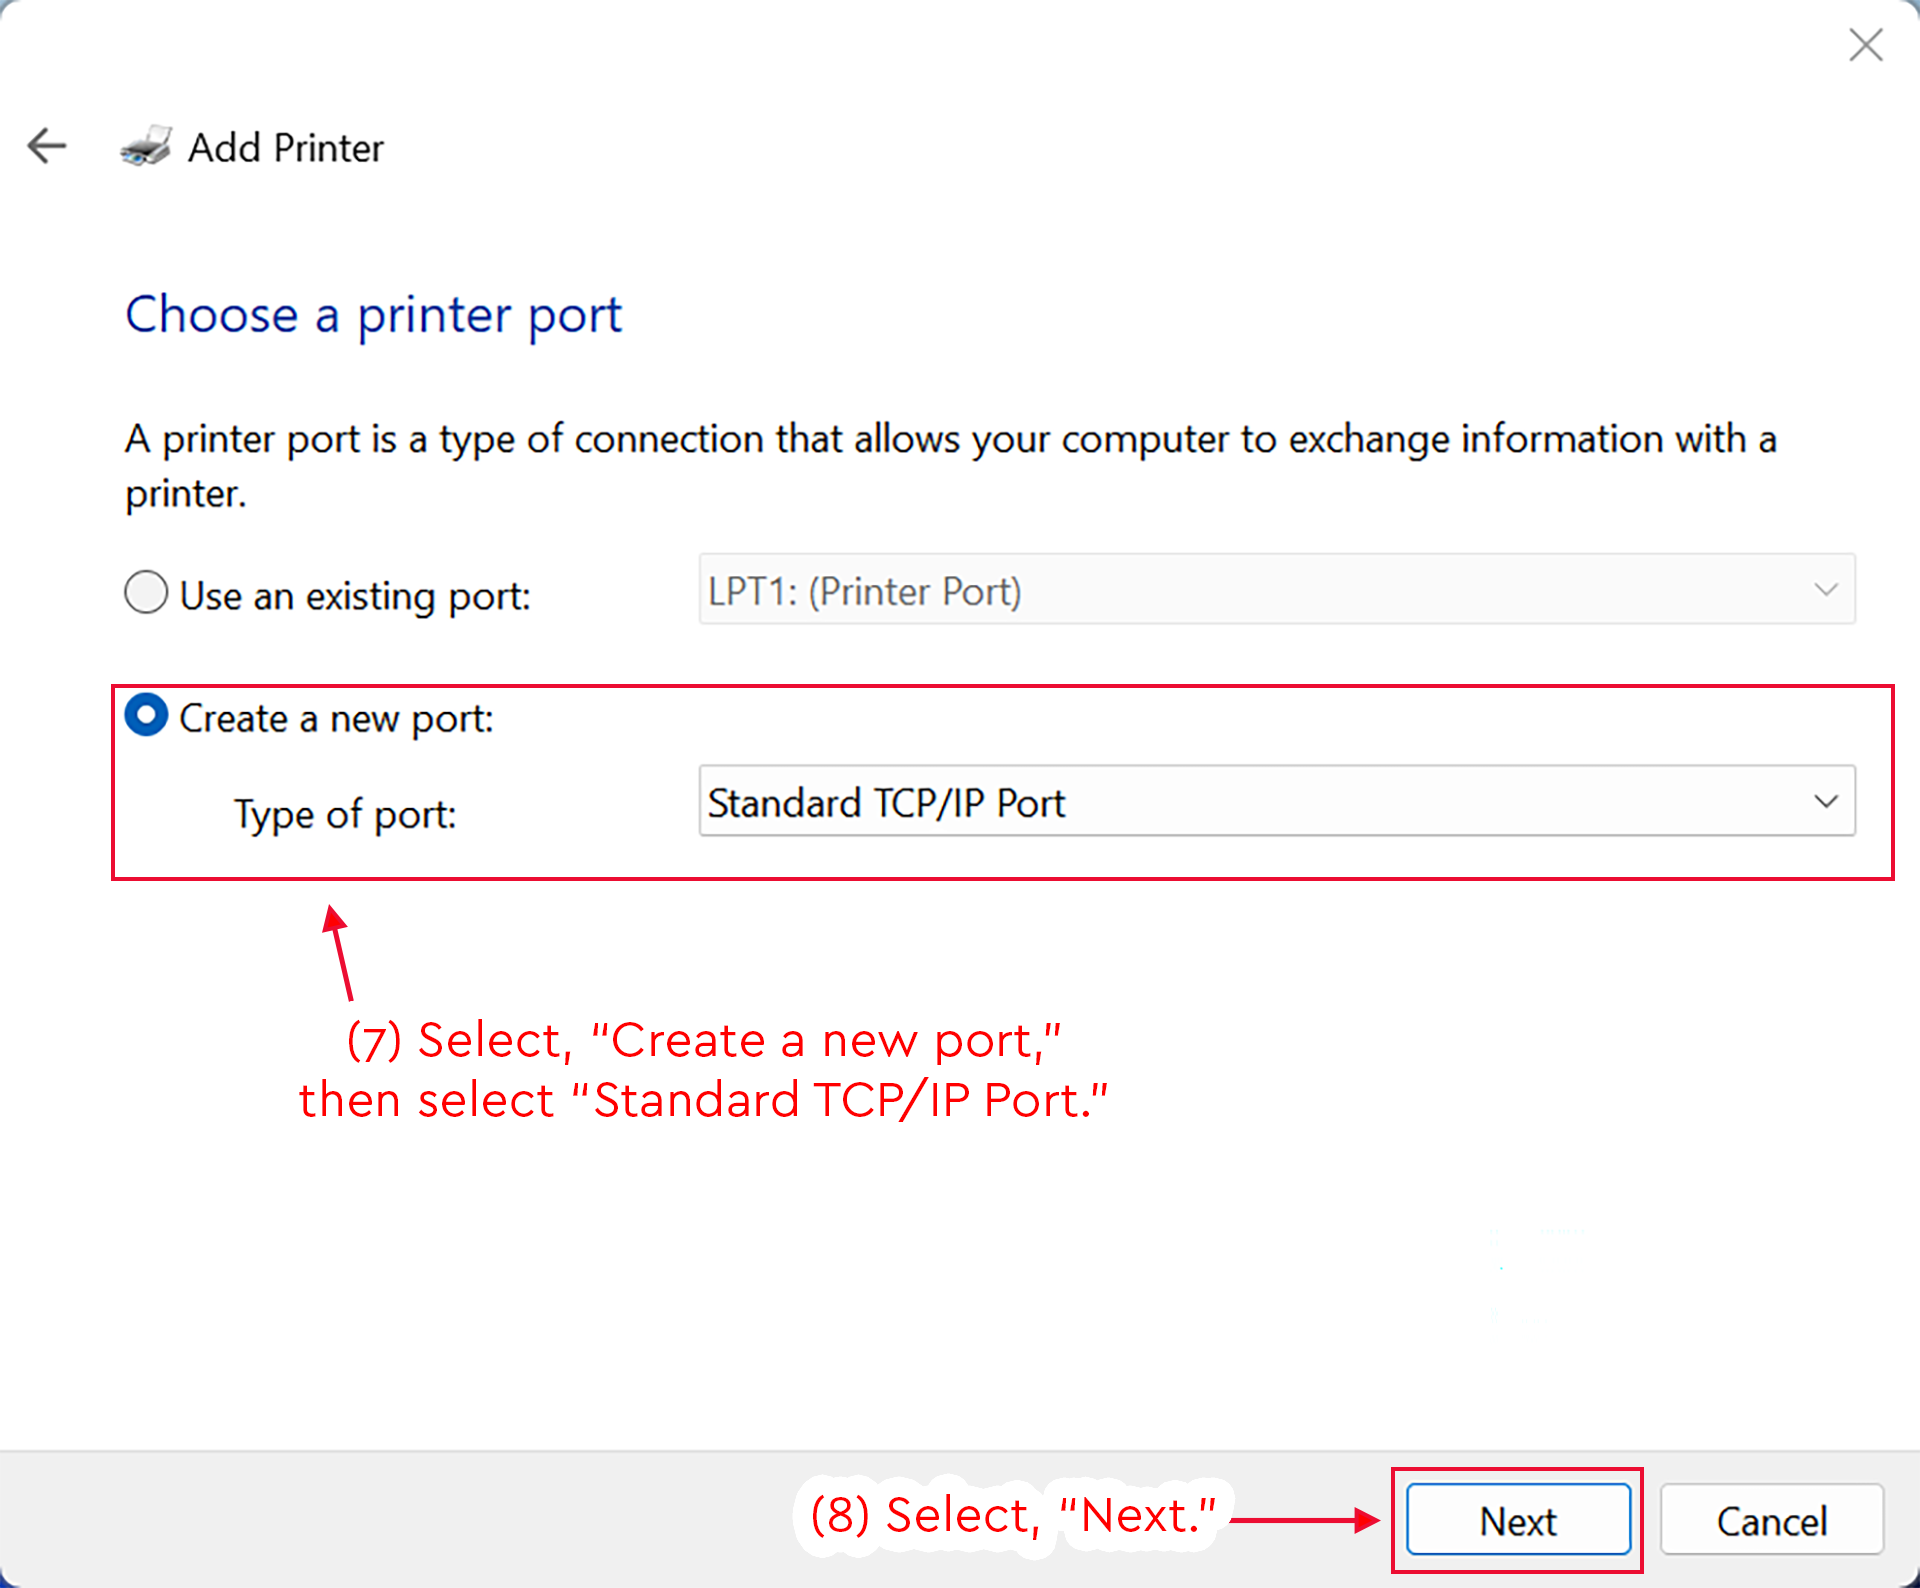
- Select, "Create a new port," then select, "Standard TCP/IP Port."
- Select, "Next."
Detailed Image Description
The figure shows the Windows Add Printer window on the “Choose a printer port” screen.
The page explains that a printer port is a type of connection that allows the computer to exchange information with a printer. Two port options are shown: “Use an existing port” and “Create a new port.”
The “Create a new port” radio button is selected. A red box surrounds this section, including the “Type of port” drop-down menu. The drop-down menu is set to “Standard TCP/IP Port.” A red arrow points to the selected section with the instruction “(7) Select, ‘Create a new port,’ then select ‘Standard TCP/IP Port.’”
At the bottom right of the window, the “Next” button is highlighted with a red box. A red arrow points to the button with the instruction “(8) Select, ‘Next.’” A “Cancel” button appears to the right of the “Next” button.
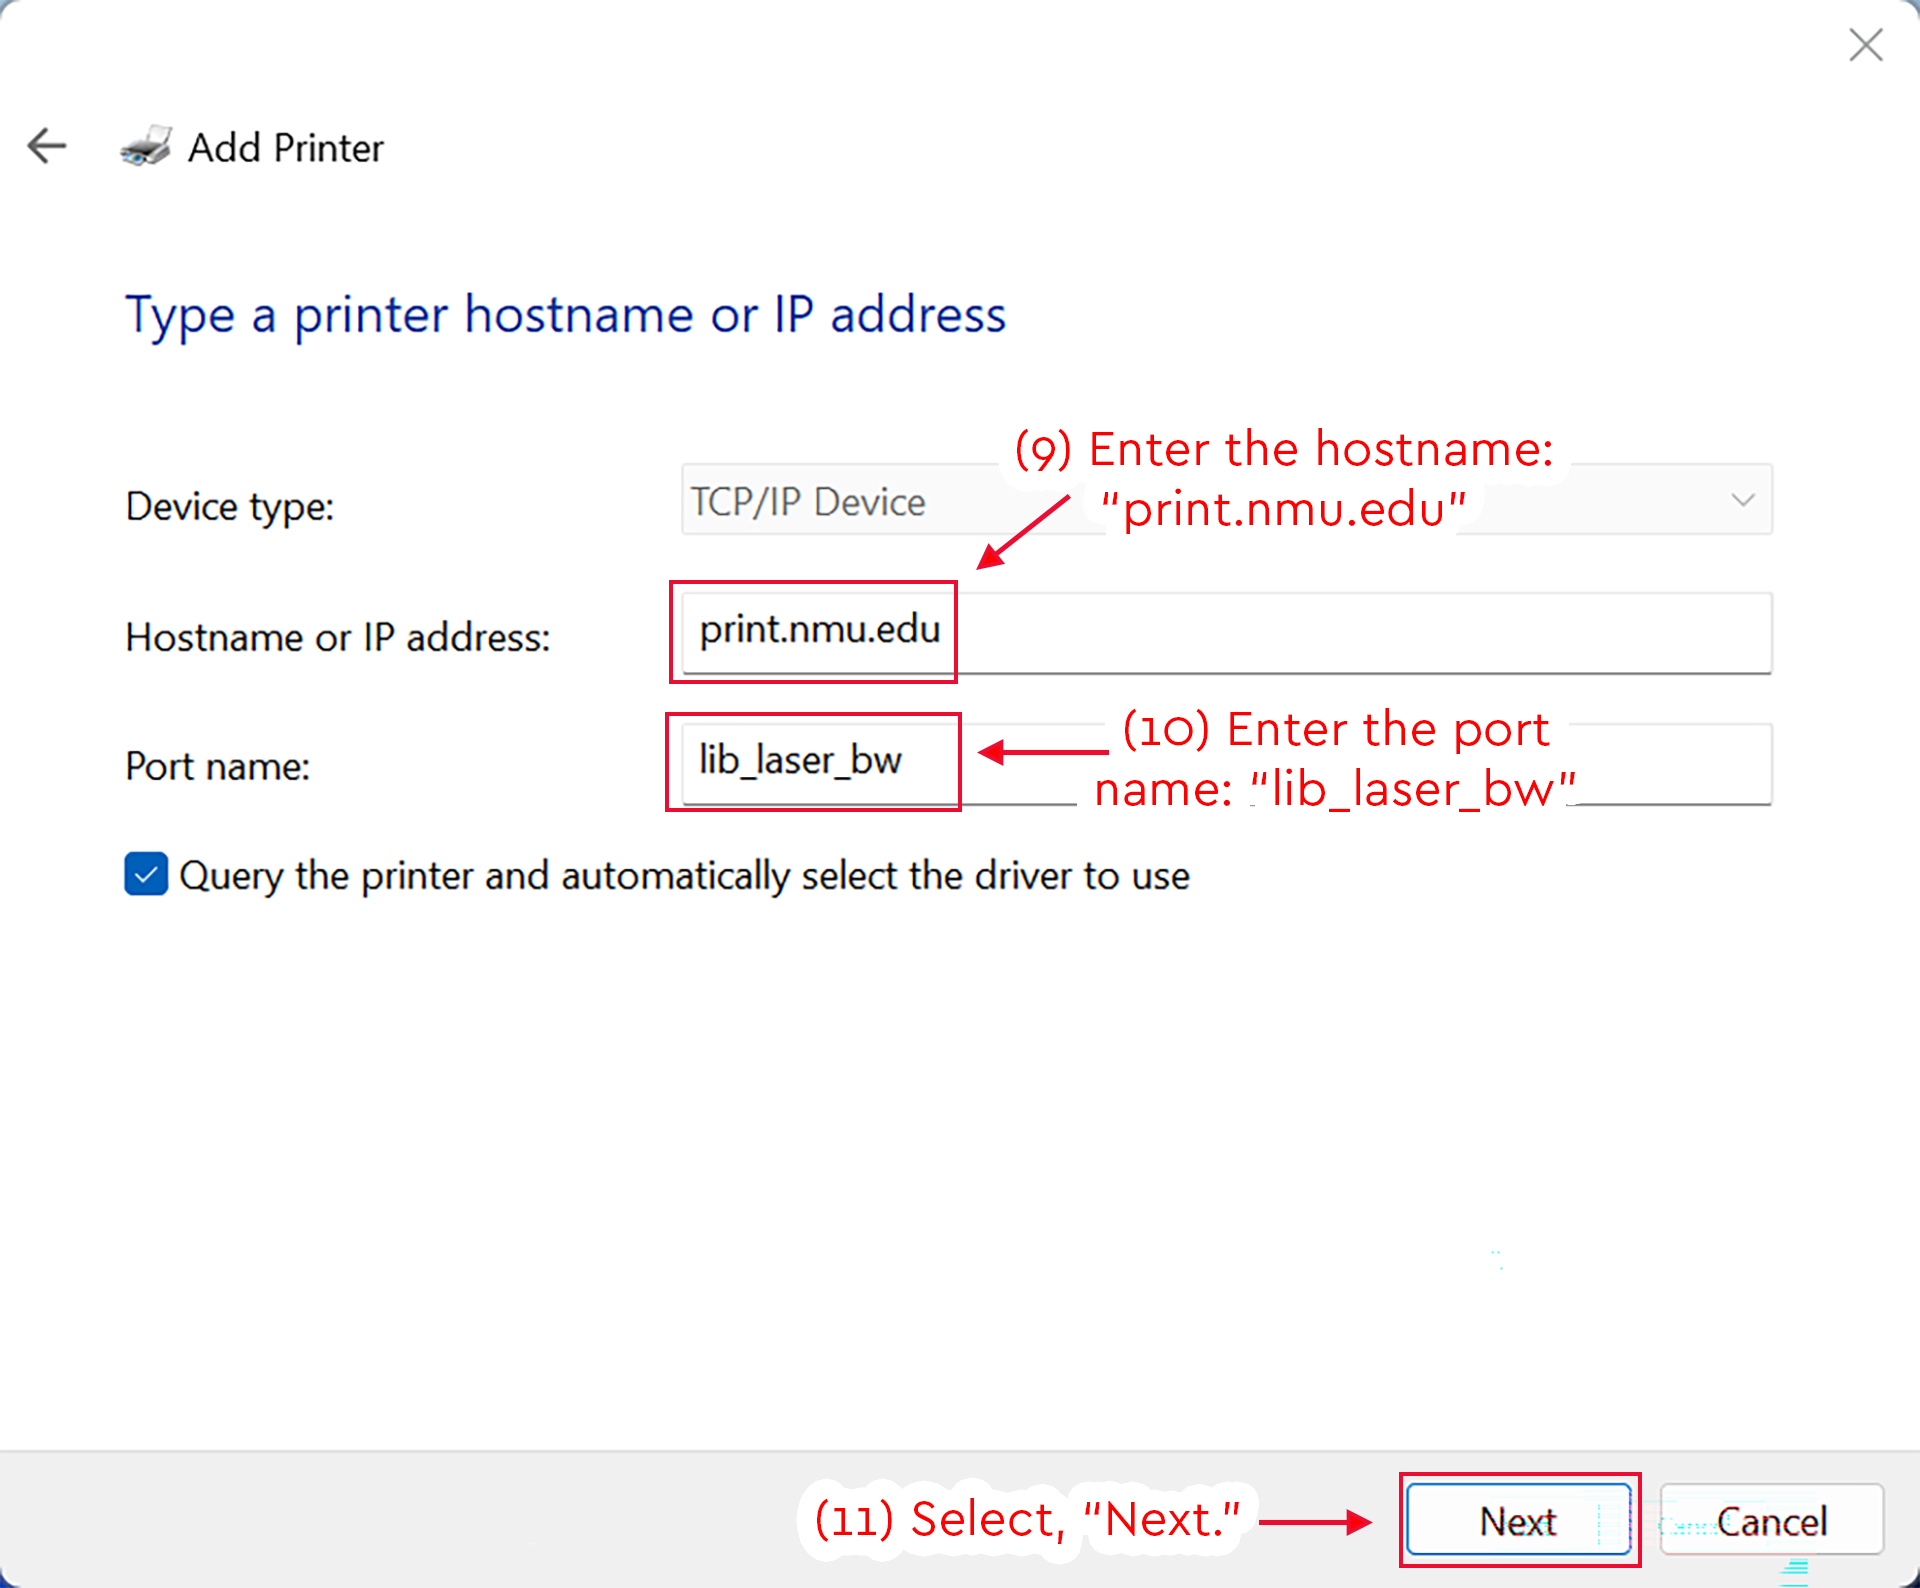
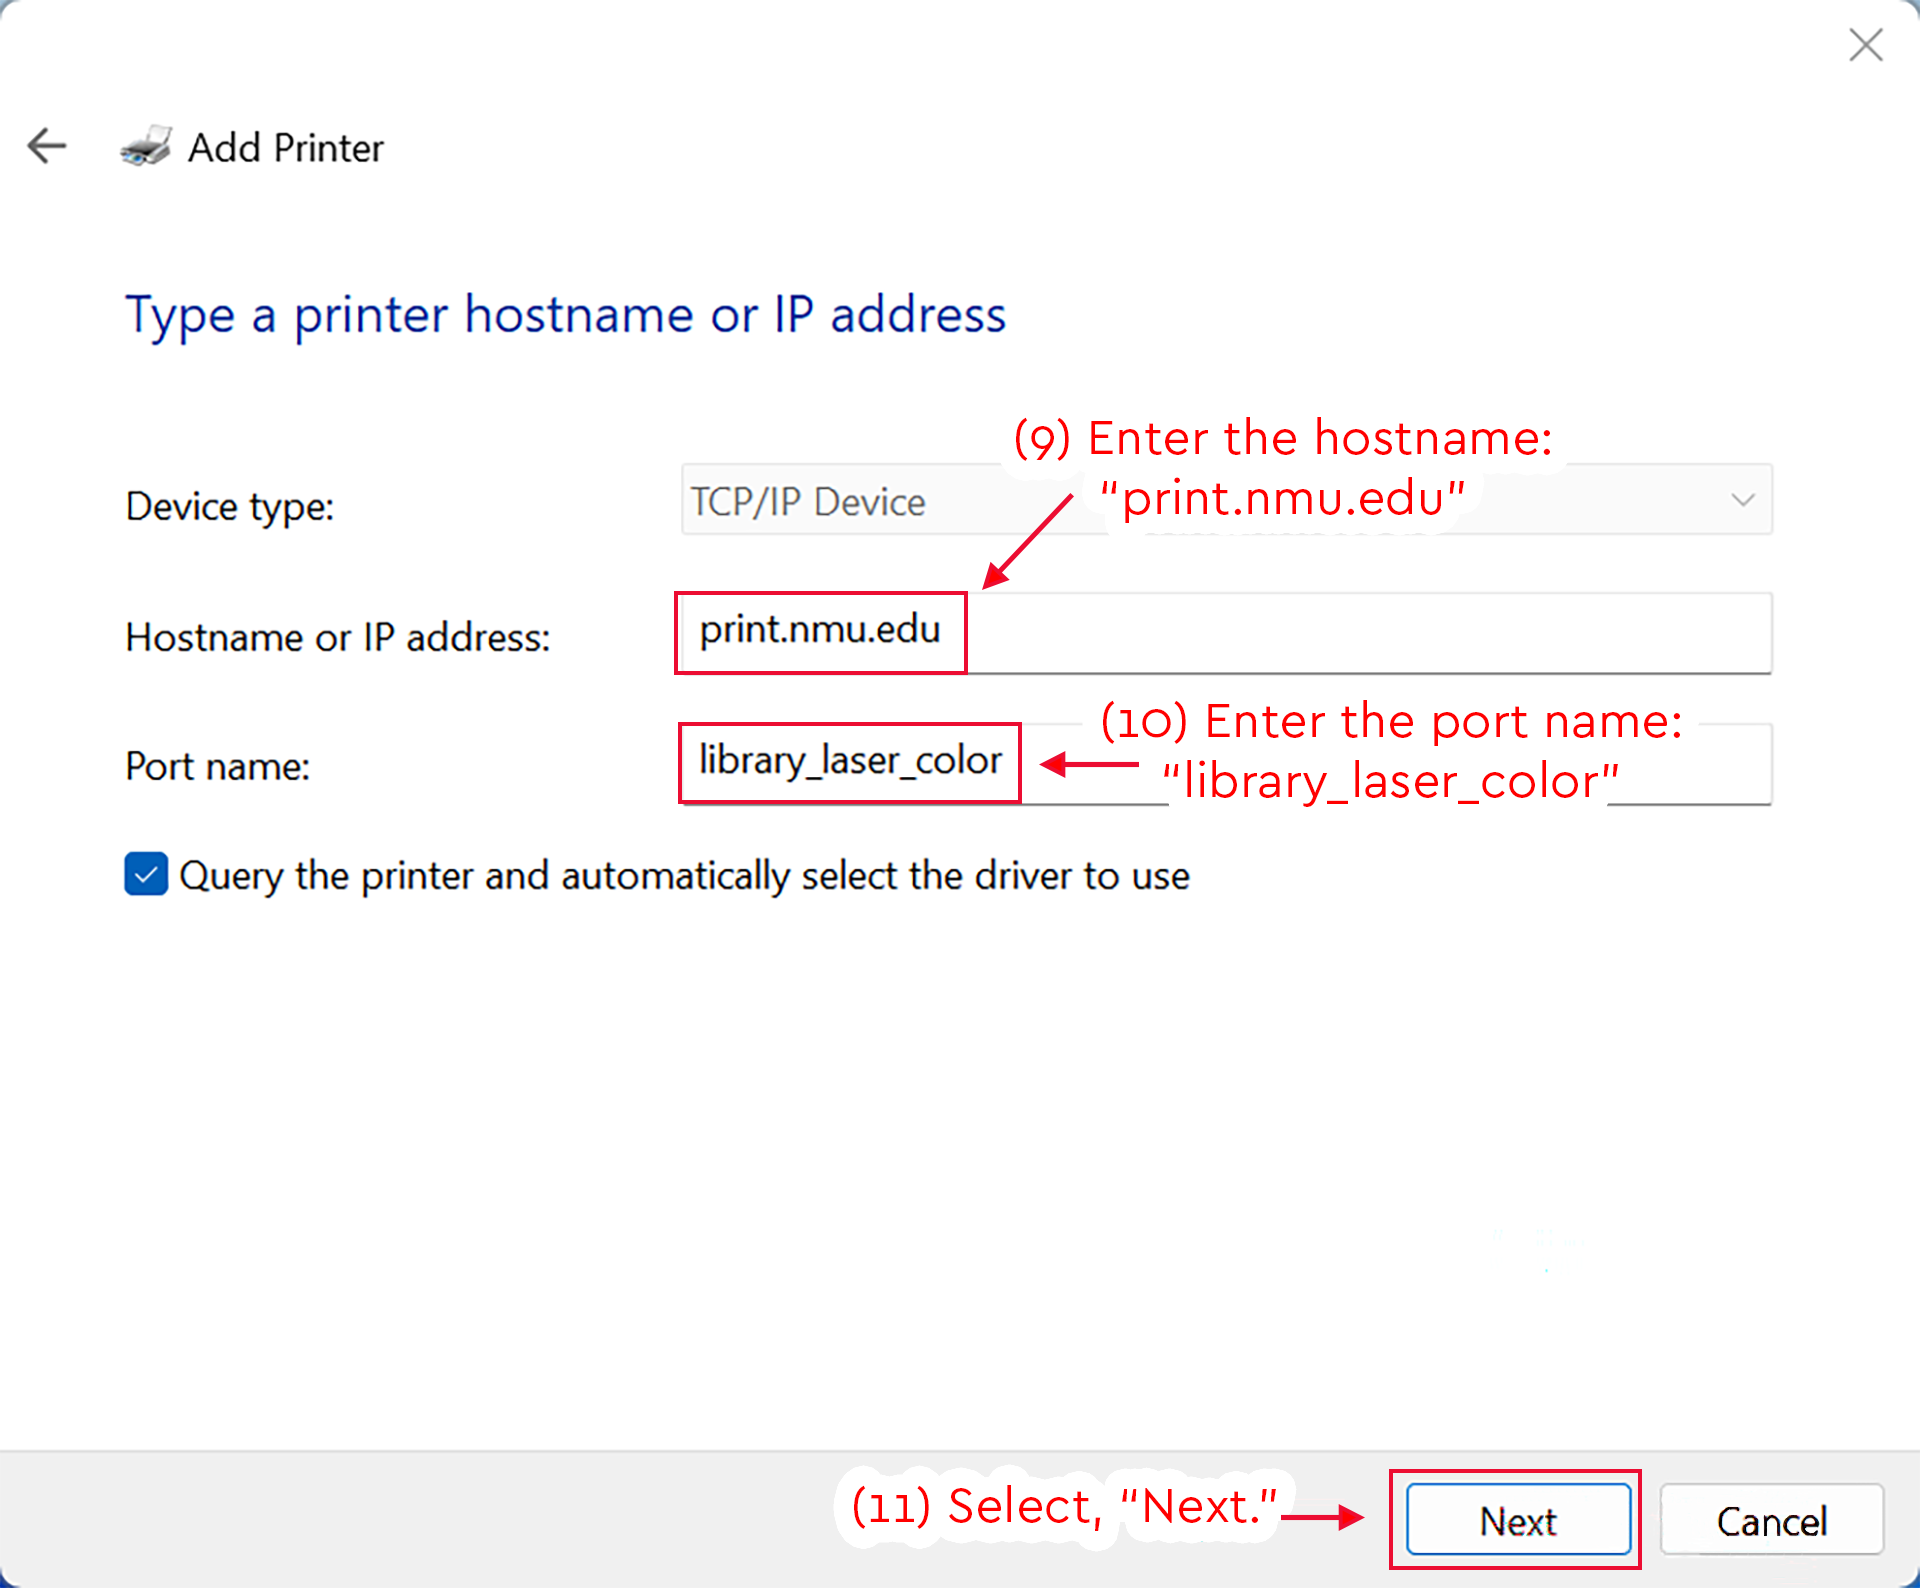
- Enter the hostname: "print.nmu.edu"
- Enter the port name: "library_laser_color"
- Select, "Next."
Detailed Image Description
The figure shows the Windows Add Printer window on the “Type a printer hostname or IP address” screen.
The “Device type” field is set to “TCP/IP Device.” The “Hostname or IP address” field contains “print.nmu.edu,” and a red box highlights this entry. A red arrow points to the field with the instruction “(9) Enter the hostname: ‘print.nmu.edu.’”
The “Port name” field contains “library_laser_color,” and a red box highlights this entry. A red arrow points to the field with the instruction “(10) Enter the port name: ‘library_laser_color.’”
Below the port name field, the checkbox for “Query the printer and automatically select the driver to use” is selected.
At the bottom right of the window, the “Next” button is highlighted with a red box. A red arrow points to the button with the instruction “(11) Select, ‘Next.’” A “Cancel” button appears to the right of the “Next” button.
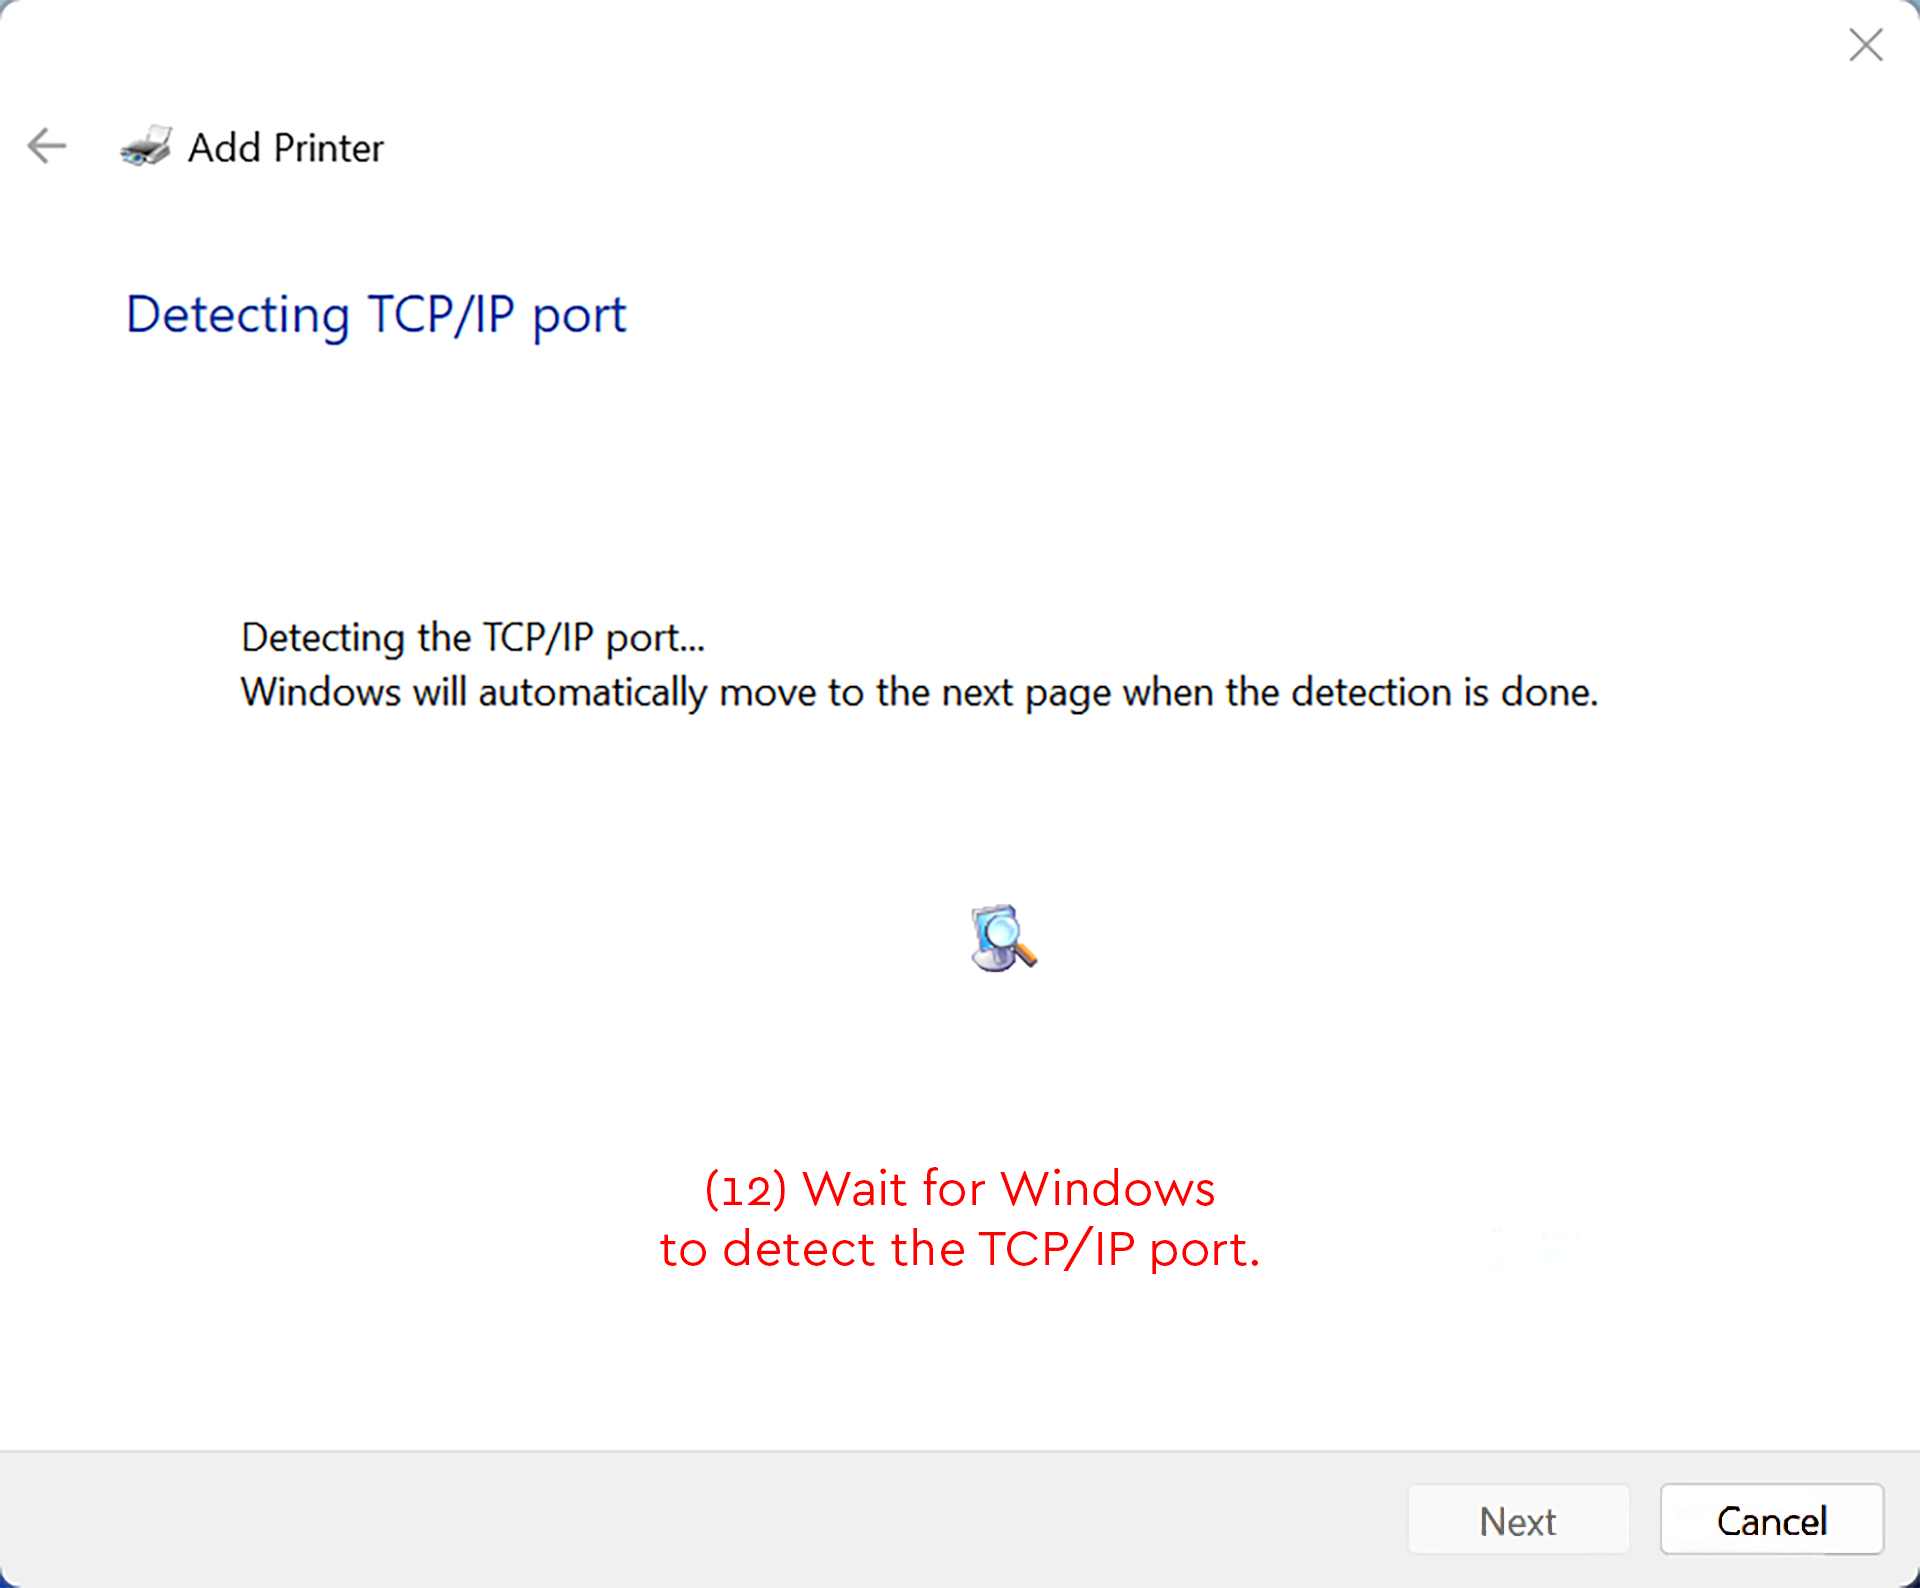
- Wait for Windows to detect the TCP/IP port.
Detailed Image Description
The figure shows the Windows Add Printer window on the “Detecting TCP/IP port” screen.
The main message reads “Detecting the TCP/IP port...” Below it, supporting text states that Windows will automatically move to the next page when detection is done.
A small printer search icon appears near the center of the window. Red instructional text near the bottom reads “(12) Wait for Windows to detect the TCP/IP port.”
At the bottom right of the window, the “Next” button is visible but disabled. The “Cancel” button is available to the right of it.
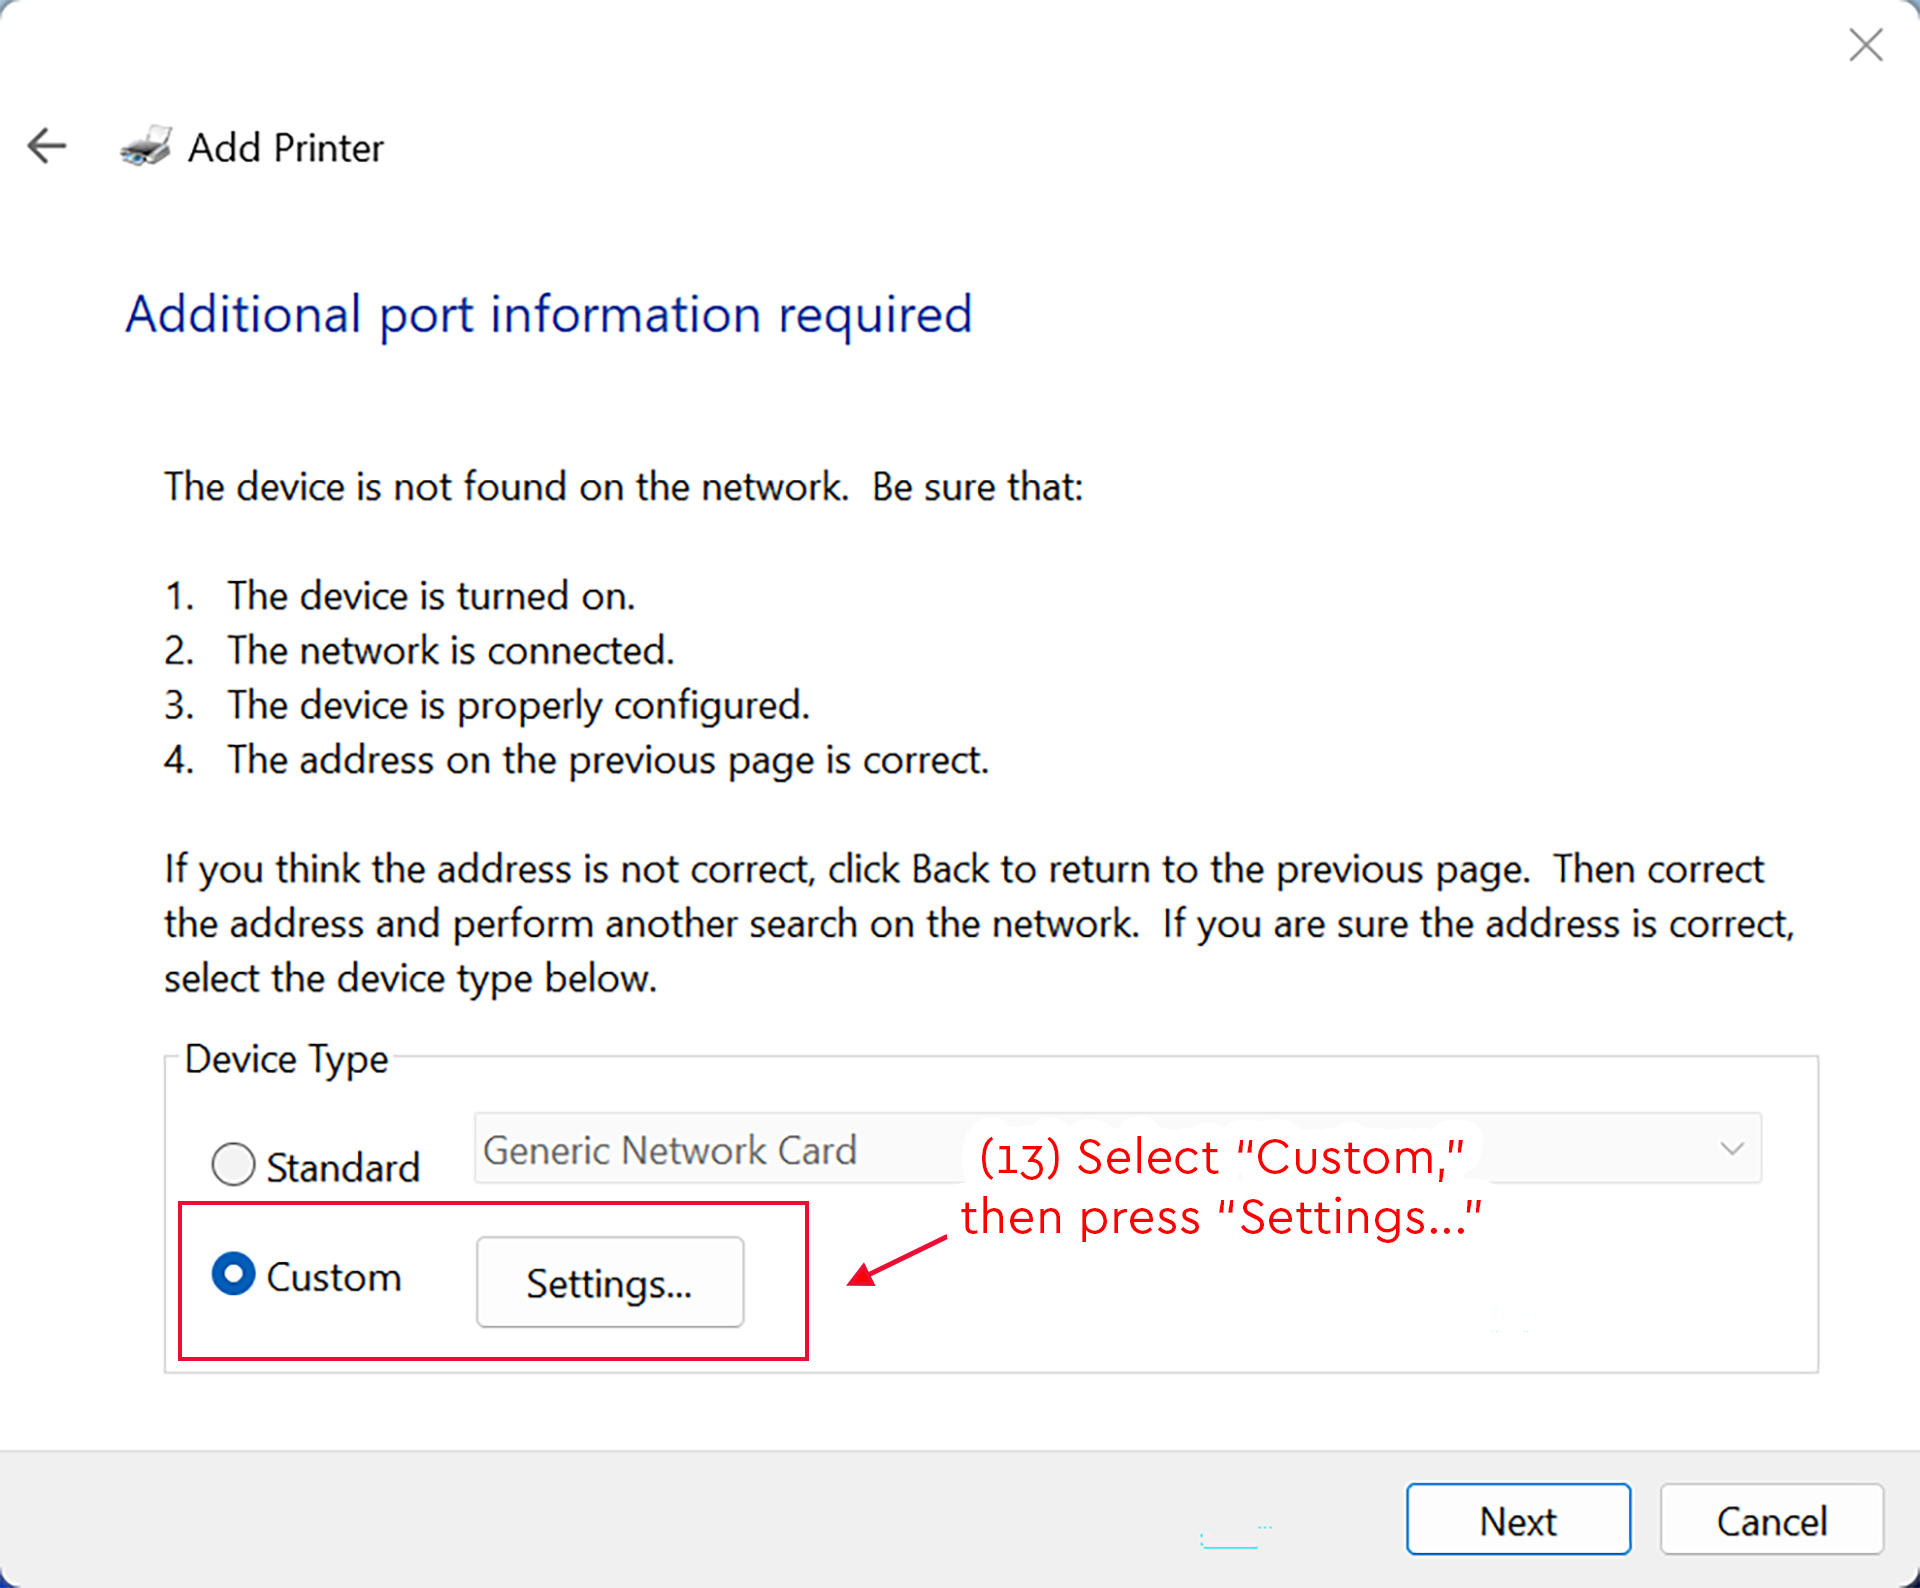
- Select, "Custom," and then press, "Settings...".
Detailed Image Description
The figure shows the Windows Add Printer window on the “Additional port information required” screen.
The page states that the device was not found on the network. It lists possible causes, including that the device may not be turned on, the network may not be connected, the device may not be properly configured, or the address entered on the previous page may not be correct.
In the “Device Type” section, two radio button options are shown: “Standard” and “Custom.” The “Custom” option is selected. A red box surrounds the selected “Custom” option and the “Settings...” button. A red arrow points to this area with the instruction “(13) Select ‘Custom,’ then press ‘Settings...’”
At the bottom right of the window, the “Next” and “Cancel” buttons are visible.
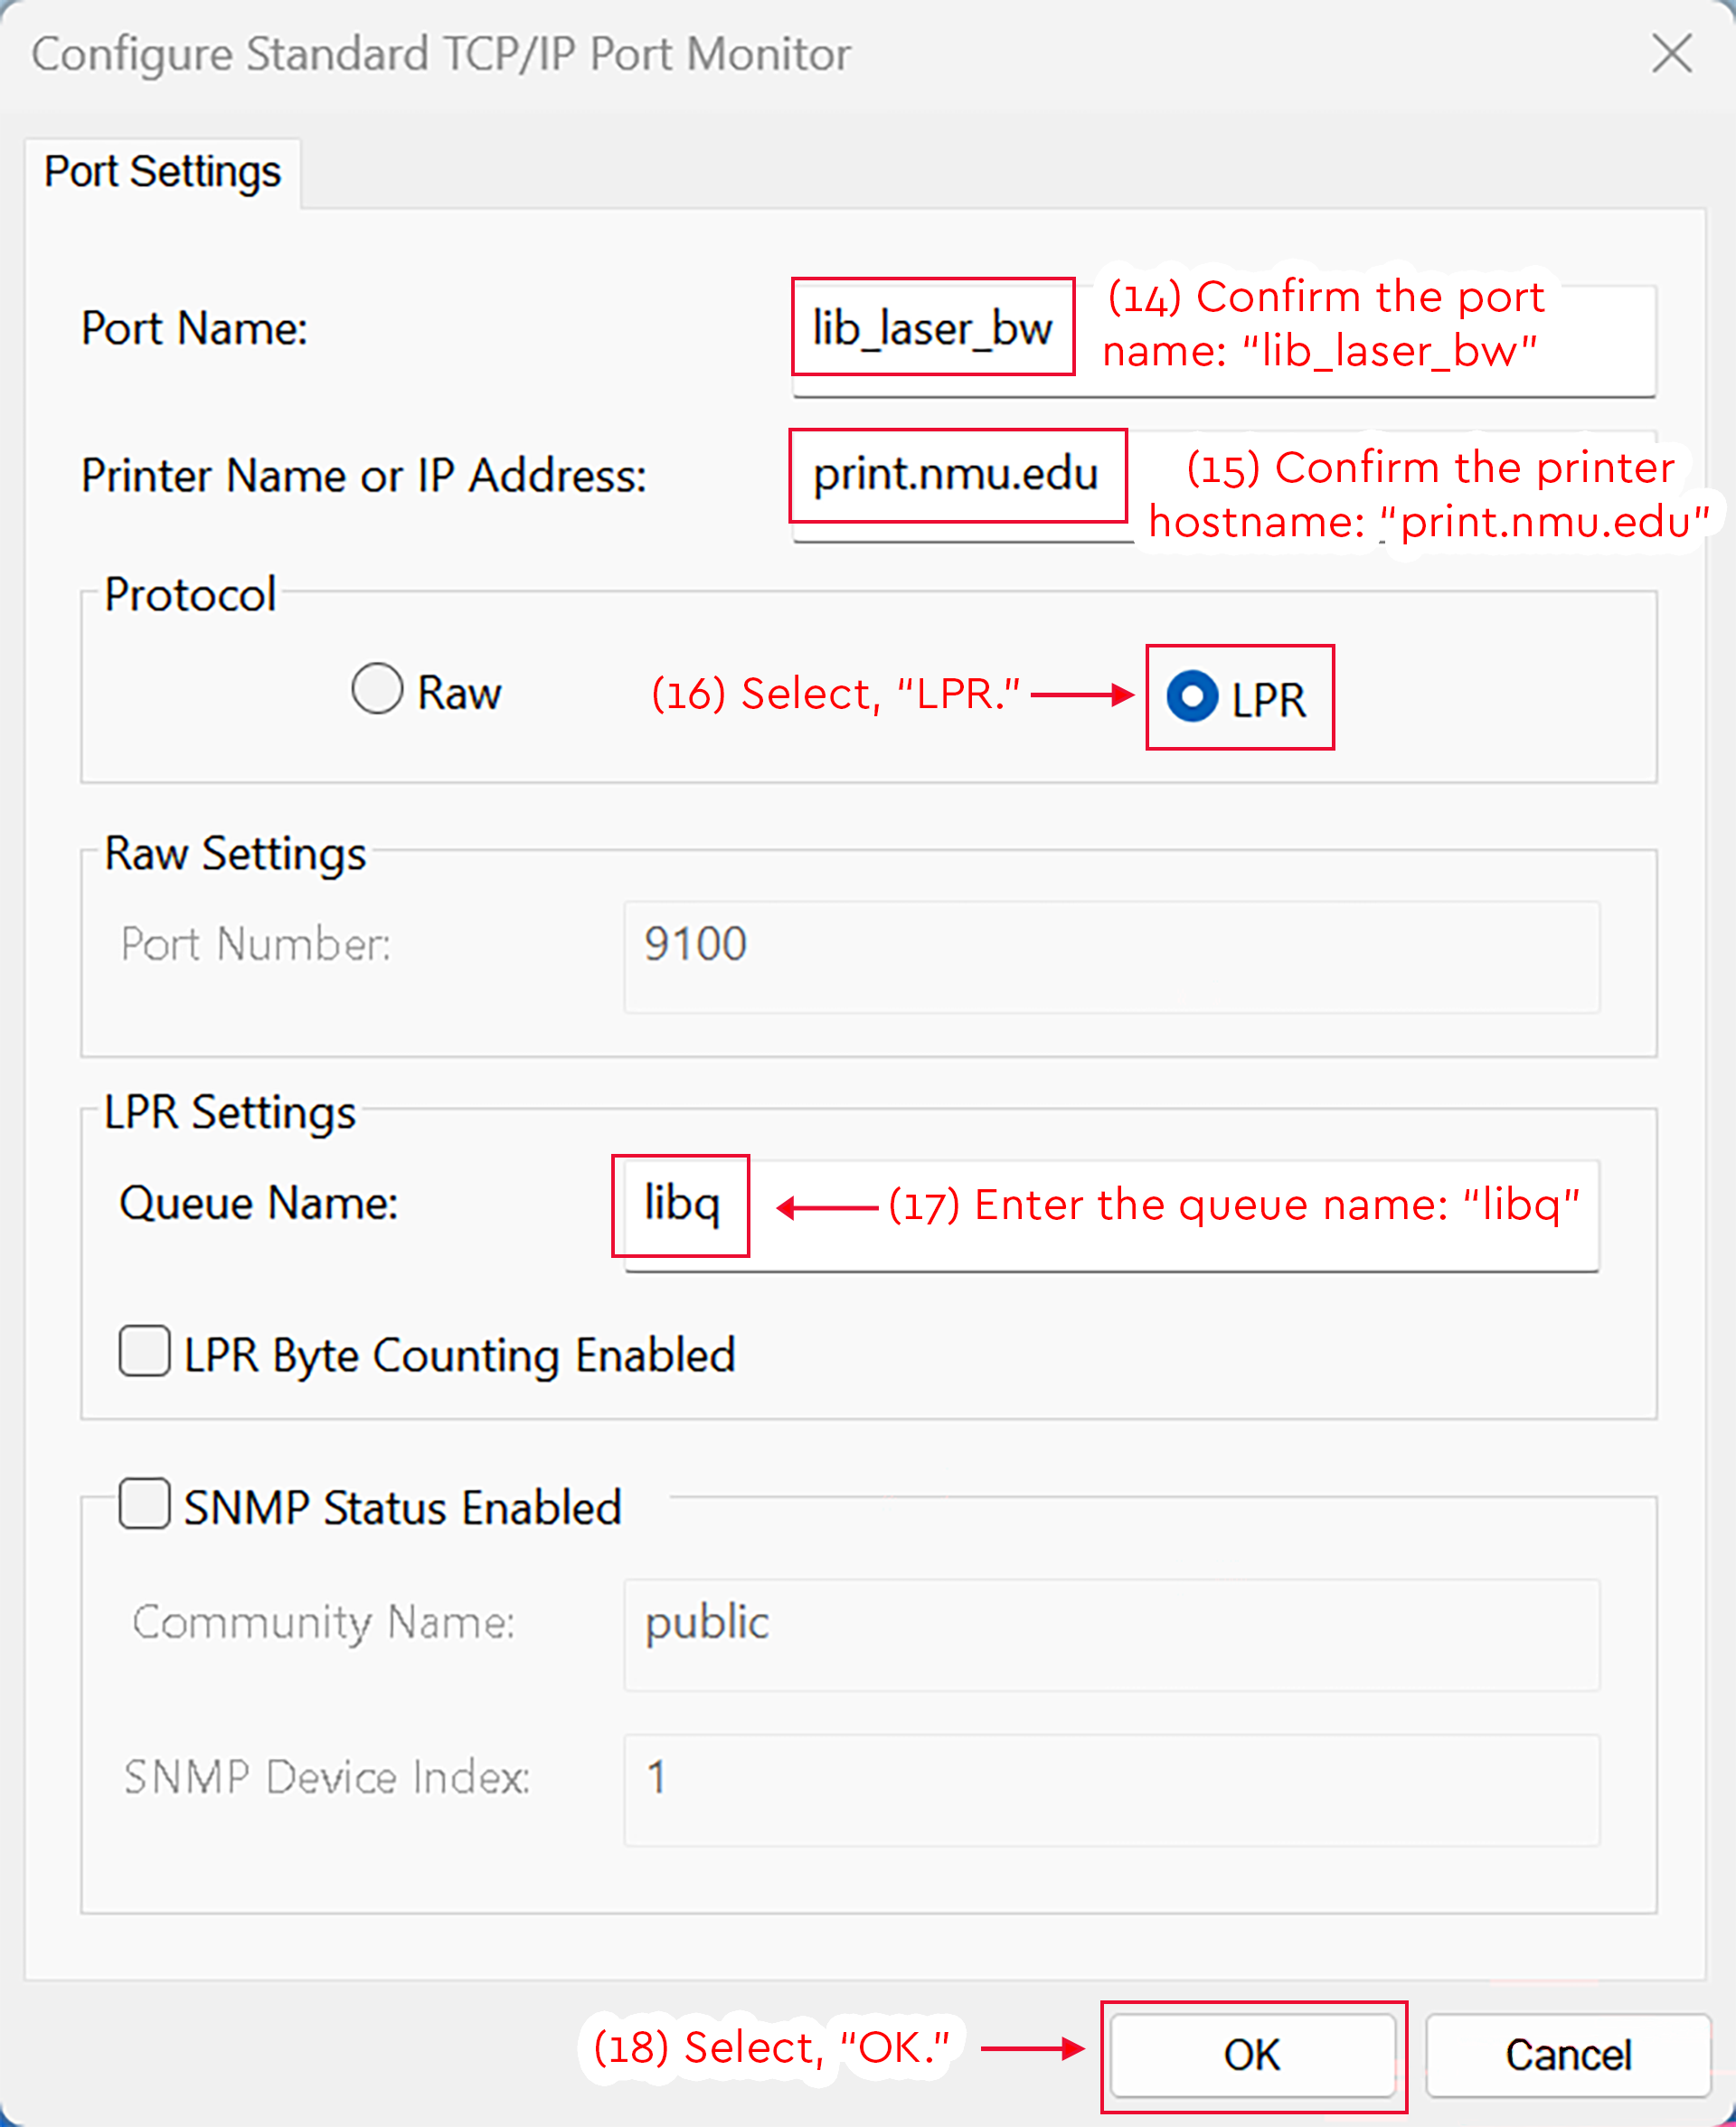
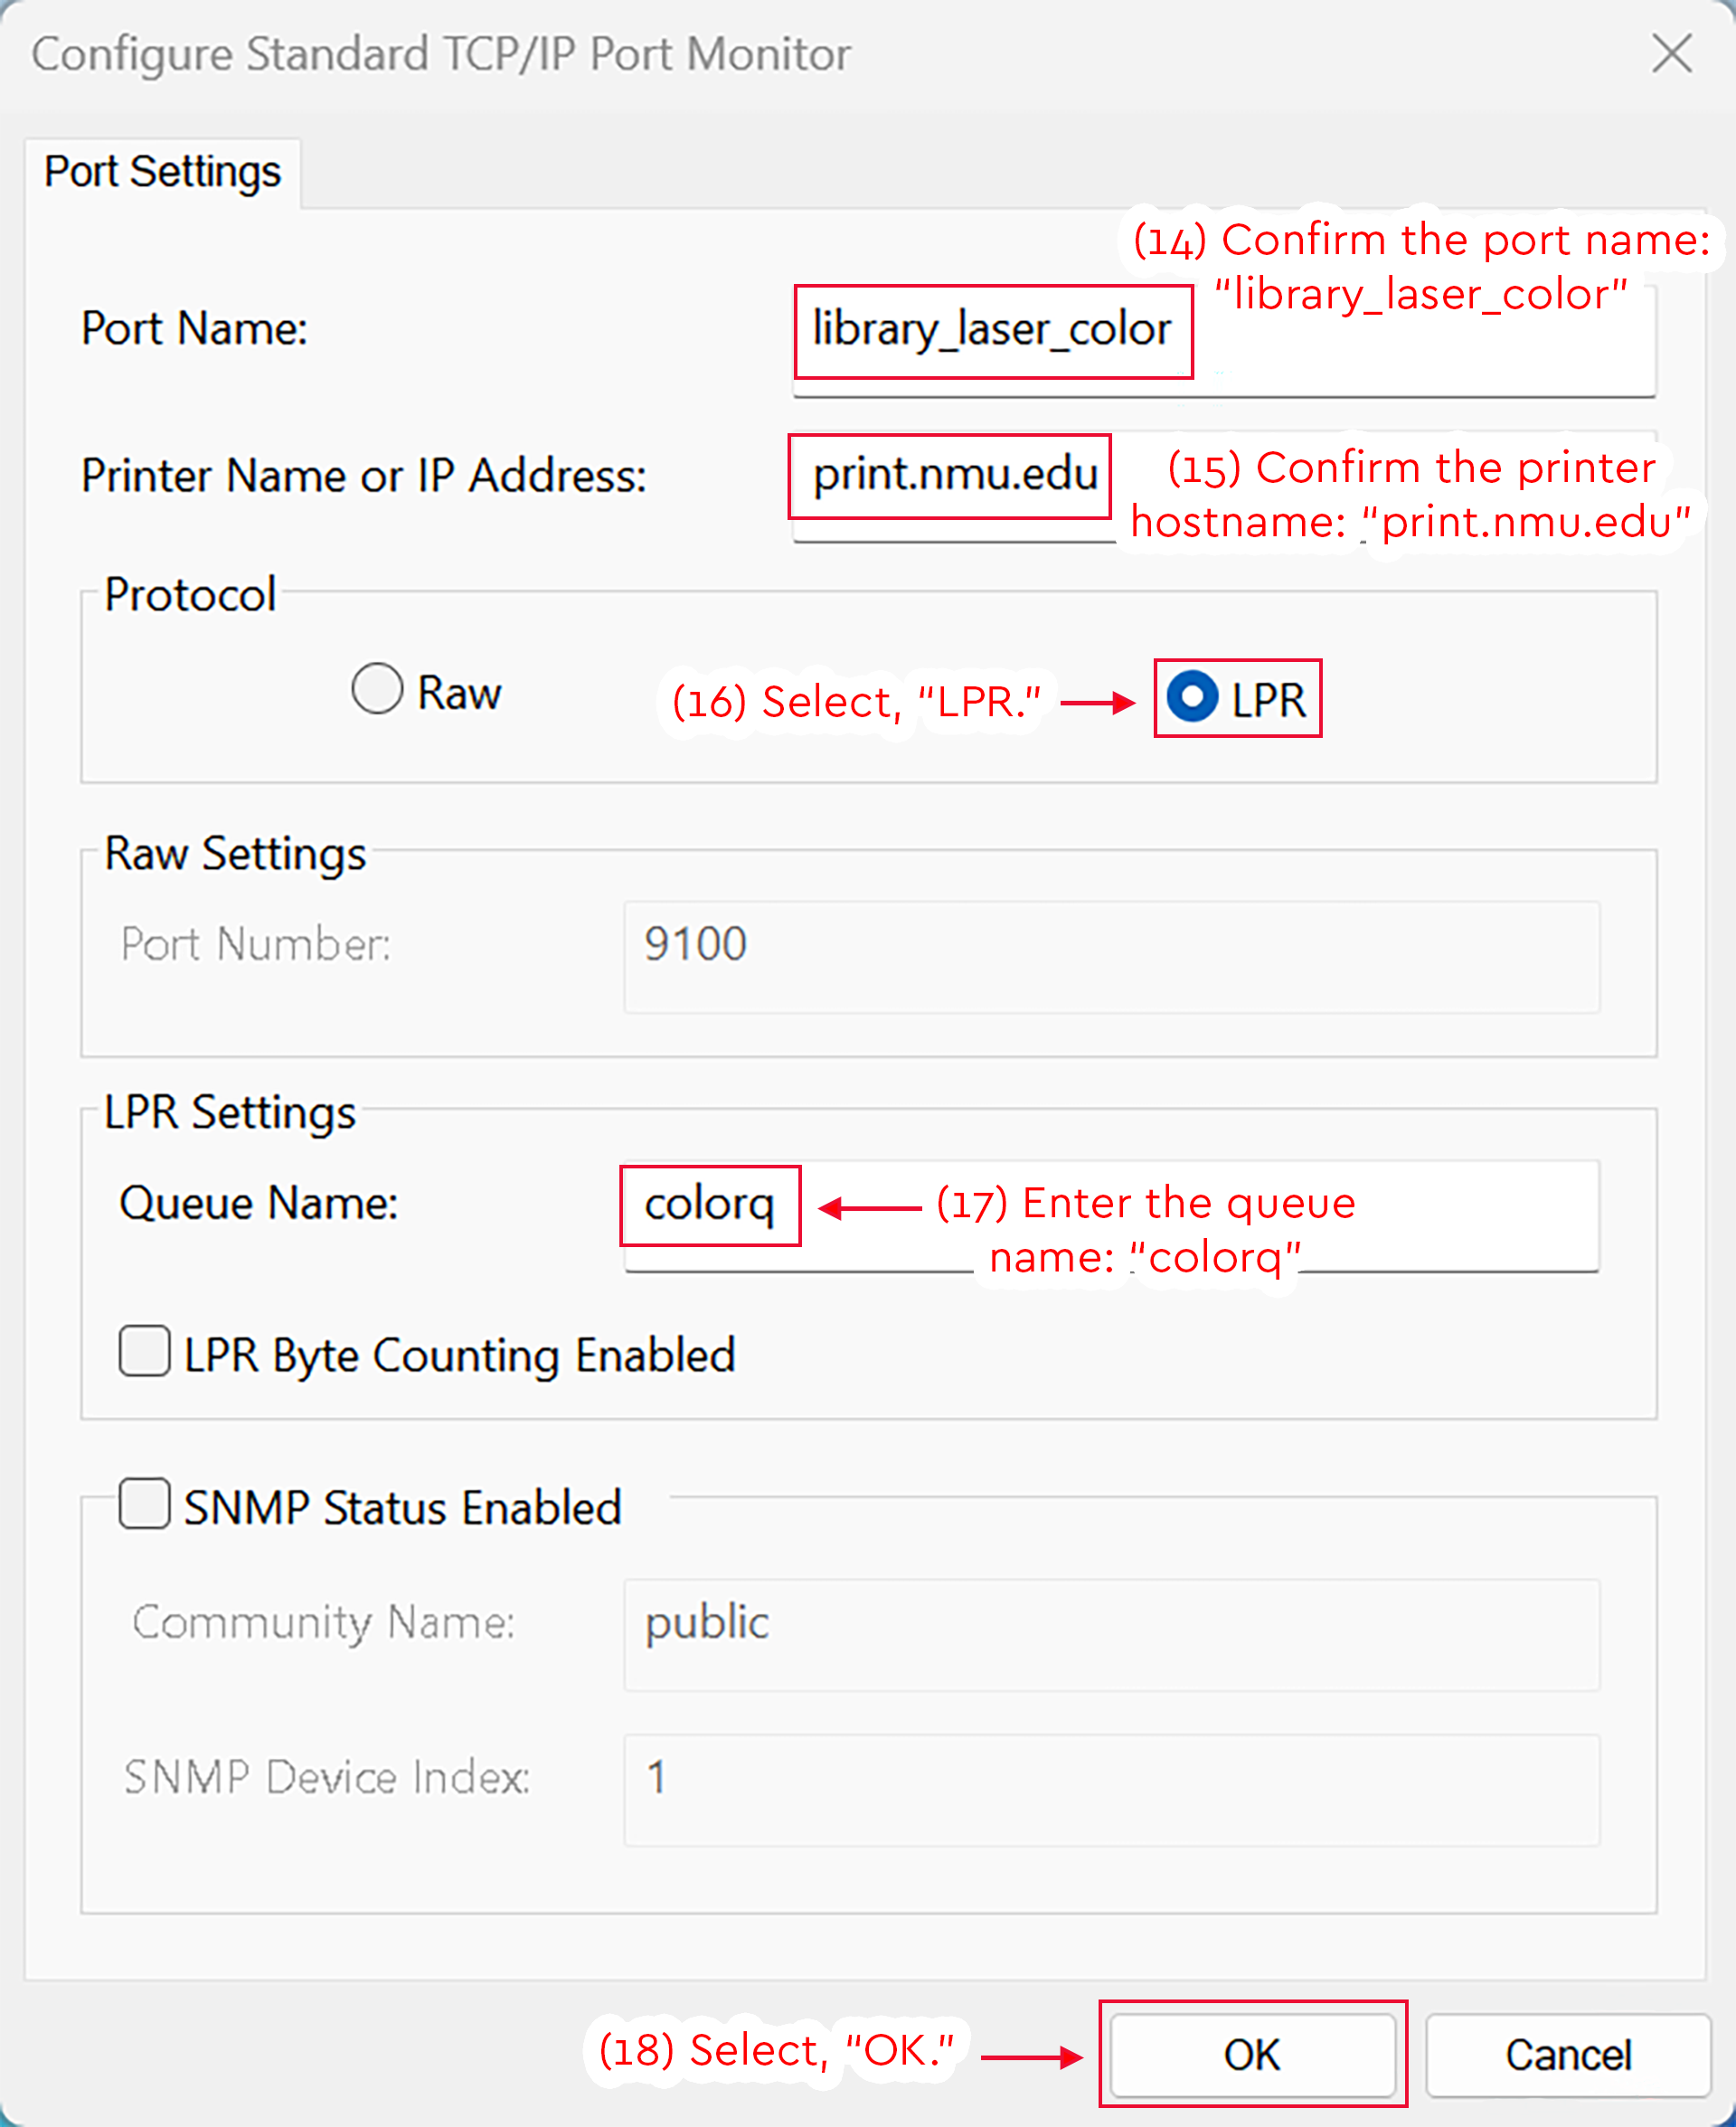
- Enter the port name, "library_laser_color"
- Enter the hostname, "print.nmu.edu"
- Select the "LPR," protocol
- Enter the Queue Name, "colorq"
- Select, "OK."
Detailed Image Description
The figure shows the Configure Standard TCP/IP Port Monitor window on the “Port Settings” tab.
The “Port Name” field contains “library_laser_color,” and a red box highlights the entry. A red annotation reads “(14) Confirm the port name: ‘library_laser_color.’”
The “Printer Name or IP Address” field contains “print.nmu.edu,” and a red box highlights the entry. A red annotation reads “(15) Confirm the printer hostname: ‘print.nmu.edu.’”
In the “Protocol” section, the “LPR” radio button is selected. A red box surrounds the selected “LPR” option, and a red arrow points to it with the instruction “(16) Select, ‘LPR.’”
In the “LPR Settings” section, the “Queue Name” field contains “colorq,” and a red box highlights the entry. A red arrow points to the field with the instruction “(17) Enter the queue name: ‘colorq.’”
The “LPR Byte Counting Enabled” checkbox is unchecked. The “SNMP Status Enabled” checkbox is also unchecked, and the related SNMP fields are disabled.
At the bottom right of the window, the “OK” button is highlighted with a red box. A red arrow points to the button with the instruction “(18) Select, ‘OK.’” A “Cancel” button appears to the right of the “OK” button.
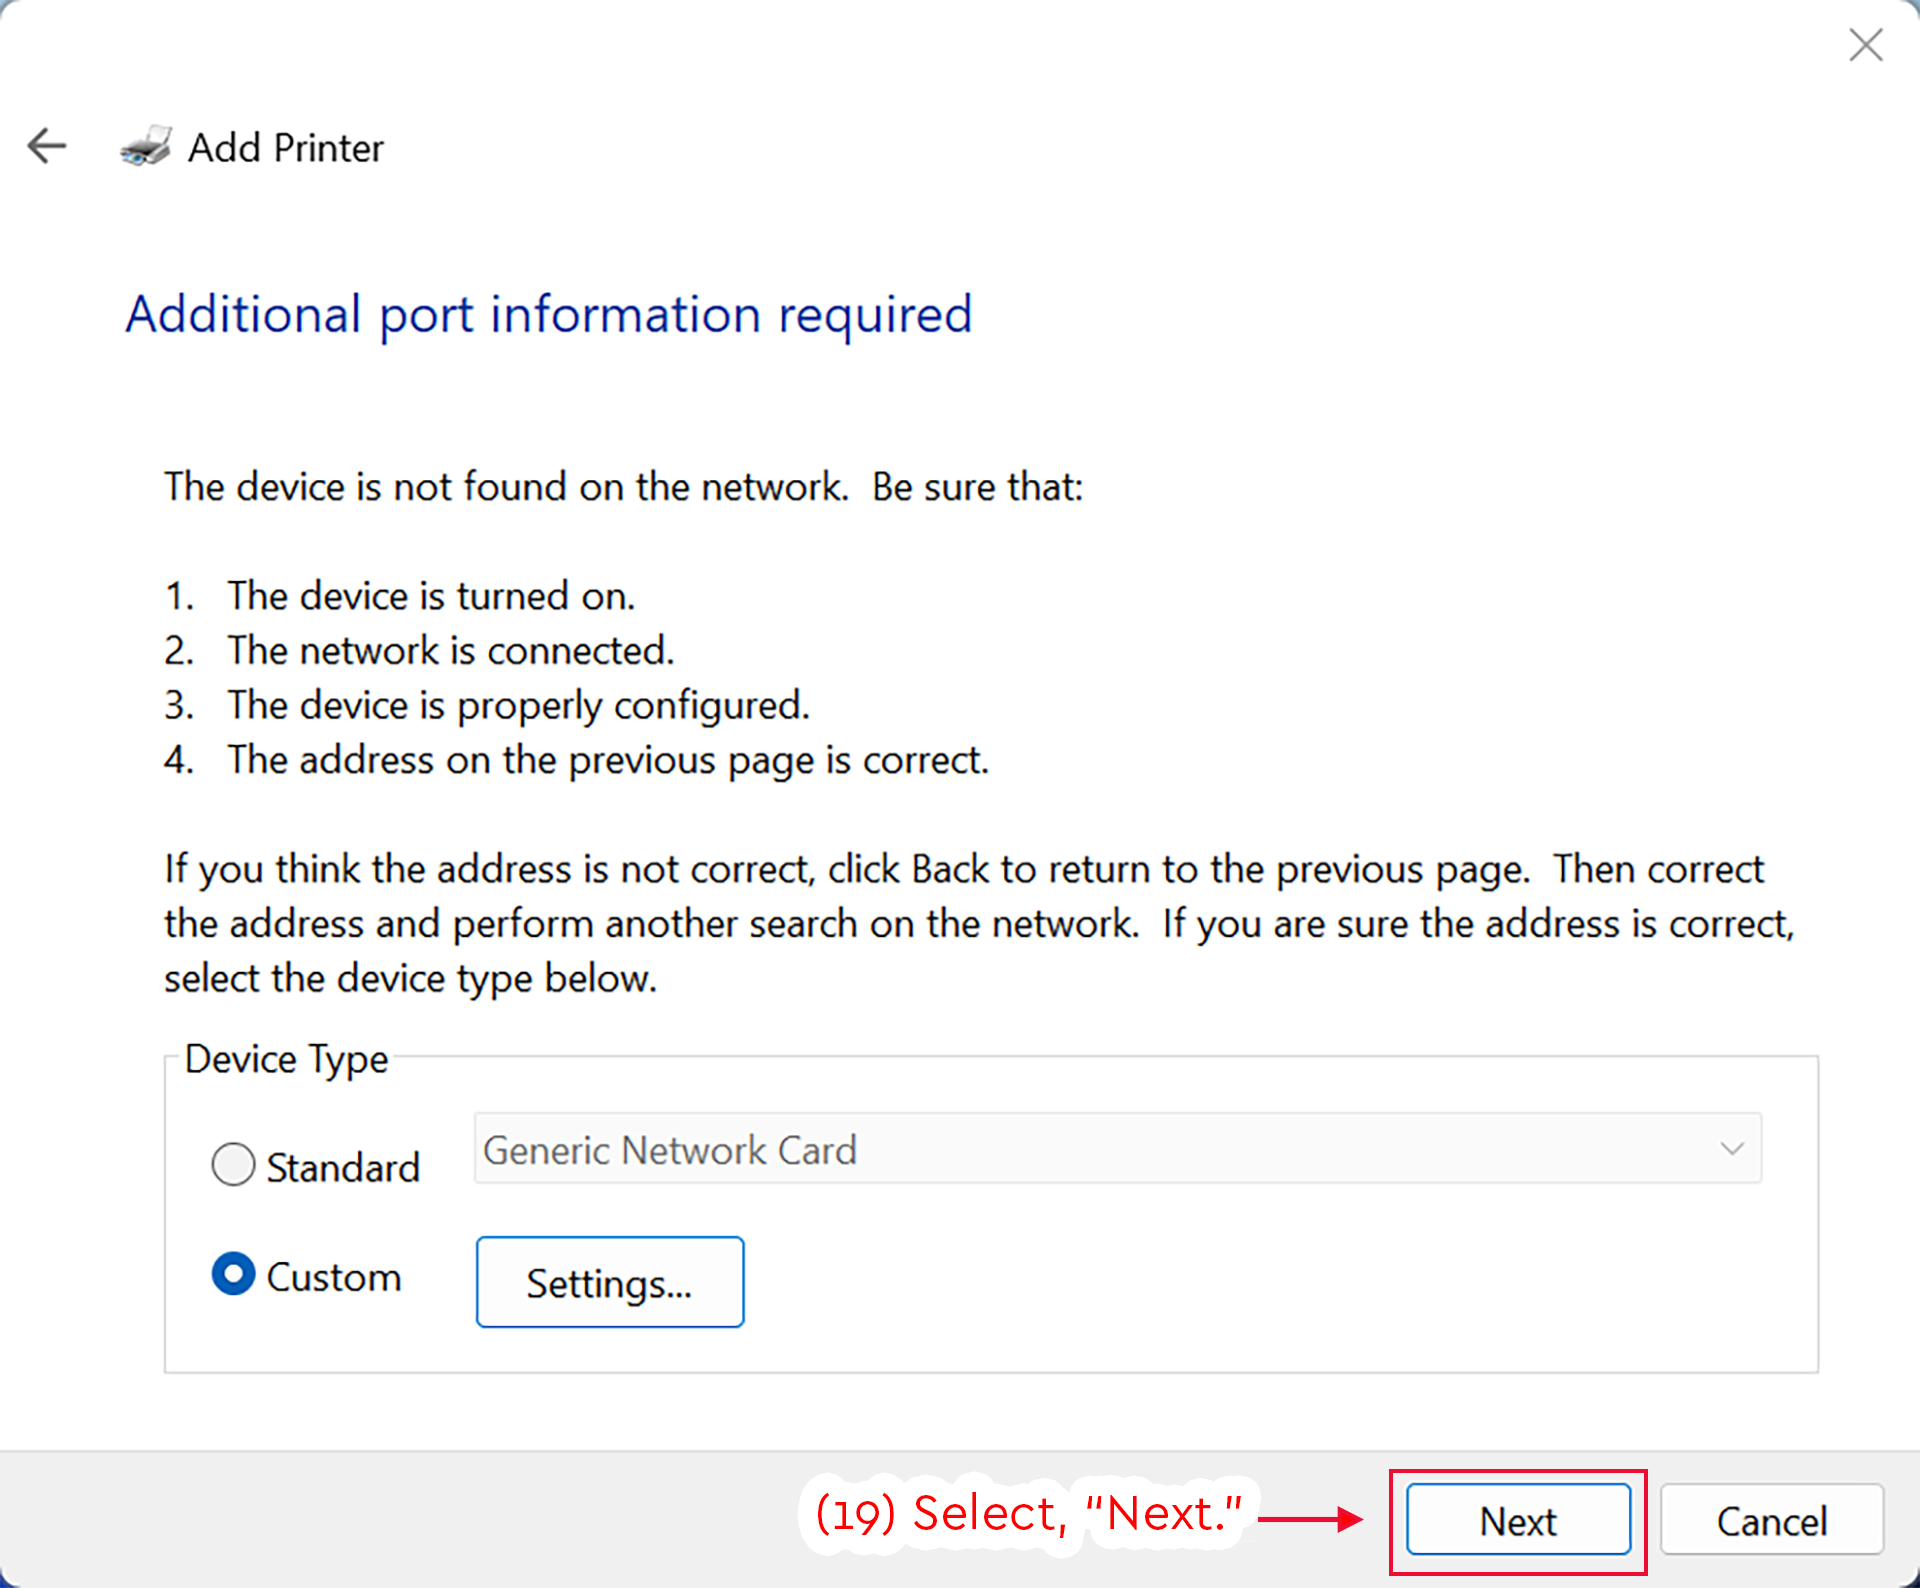
- Select, "Next."
Detailed Image Description
The figure shows the Windows Add Printer window on the “Additional port information required” screen.
The page states that the device was not found on the network and lists possible causes, including that the device may not be turned on, the network may not be connected, the device may not be properly configured, or the address entered on the previous page may not be correct.
In the “Device Type” section, the “Custom” radio button is selected. The “Settings...” button is visible next to it.
At the bottom right of the window, the “Next” button is highlighted with a red box. A red arrow points to the button with the instruction “(19) Select, ‘Next.’” A “Cancel” button appears to the right of the “Next” button.
- Allow Windows to detect the printer's driver.
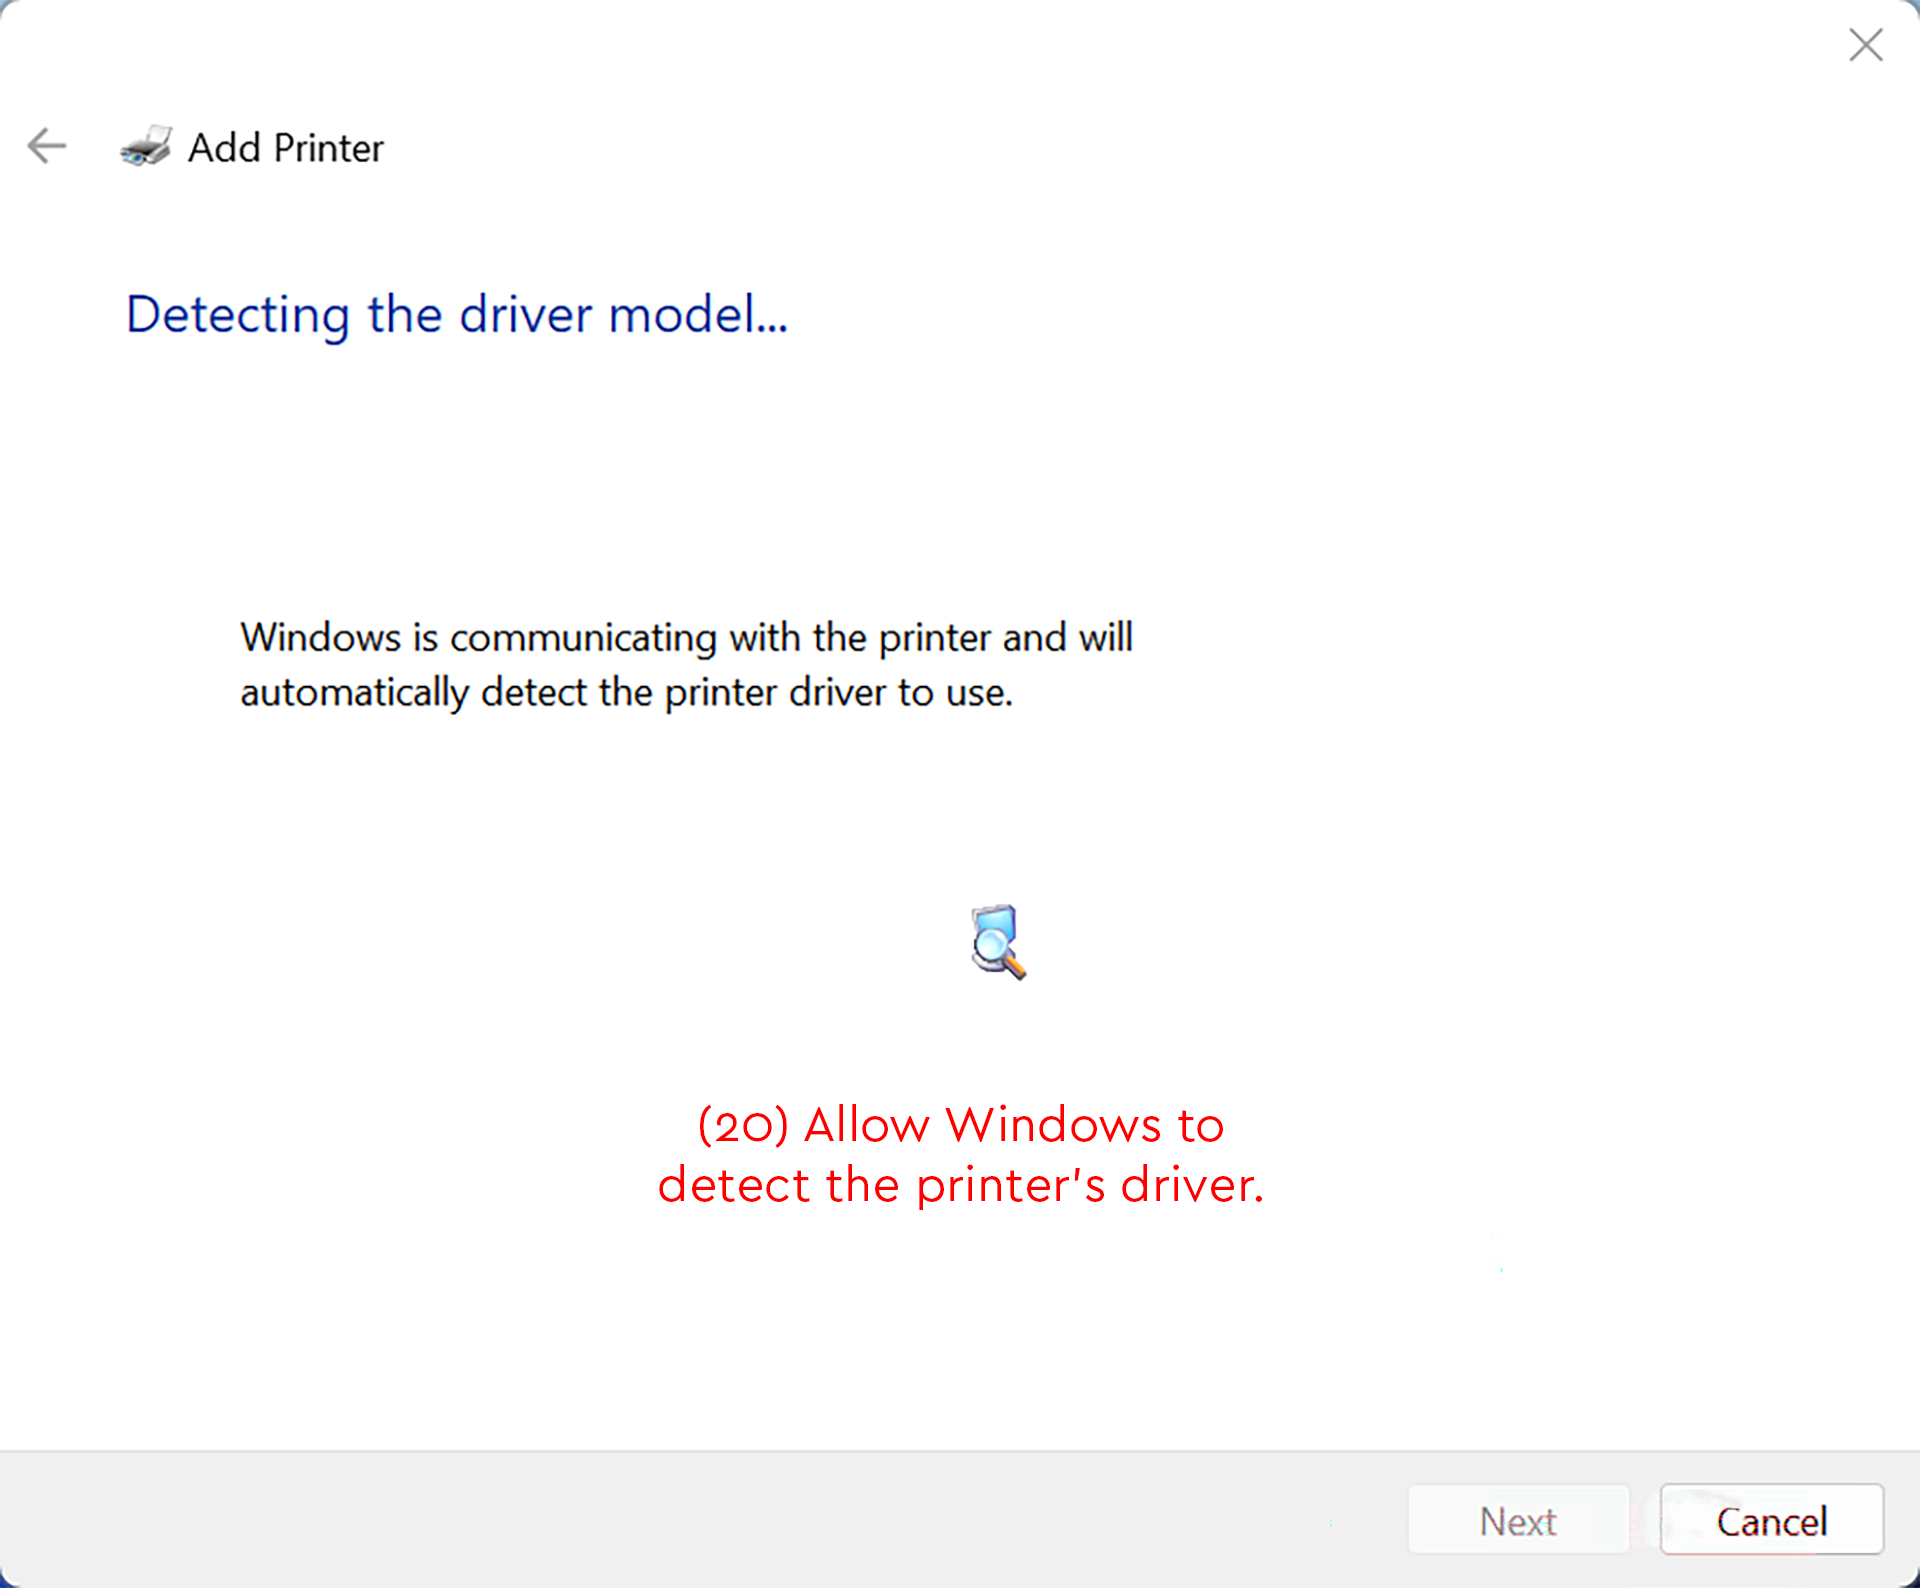
Detailed Image Description
The figure shows the Windows Add Printer window on the “Detecting the driver model...” screen.
The page states that Windows is communicating with the printer and will automatically detect the printer driver to use. A small printer search icon appears near the center of the window.
Red instructional text near the bottom reads “(20) Allow Windows to detect the printer’s driver.”
At the bottom right of the window, the “Next” button is visible but disabled. The “Cancel” button is available to the right of it.
- Select, "Xerox," as the manufacturer.
- Select, "Xerox AltaLink C8135 V4 PCL6," as the printer.
- Select, "Next."
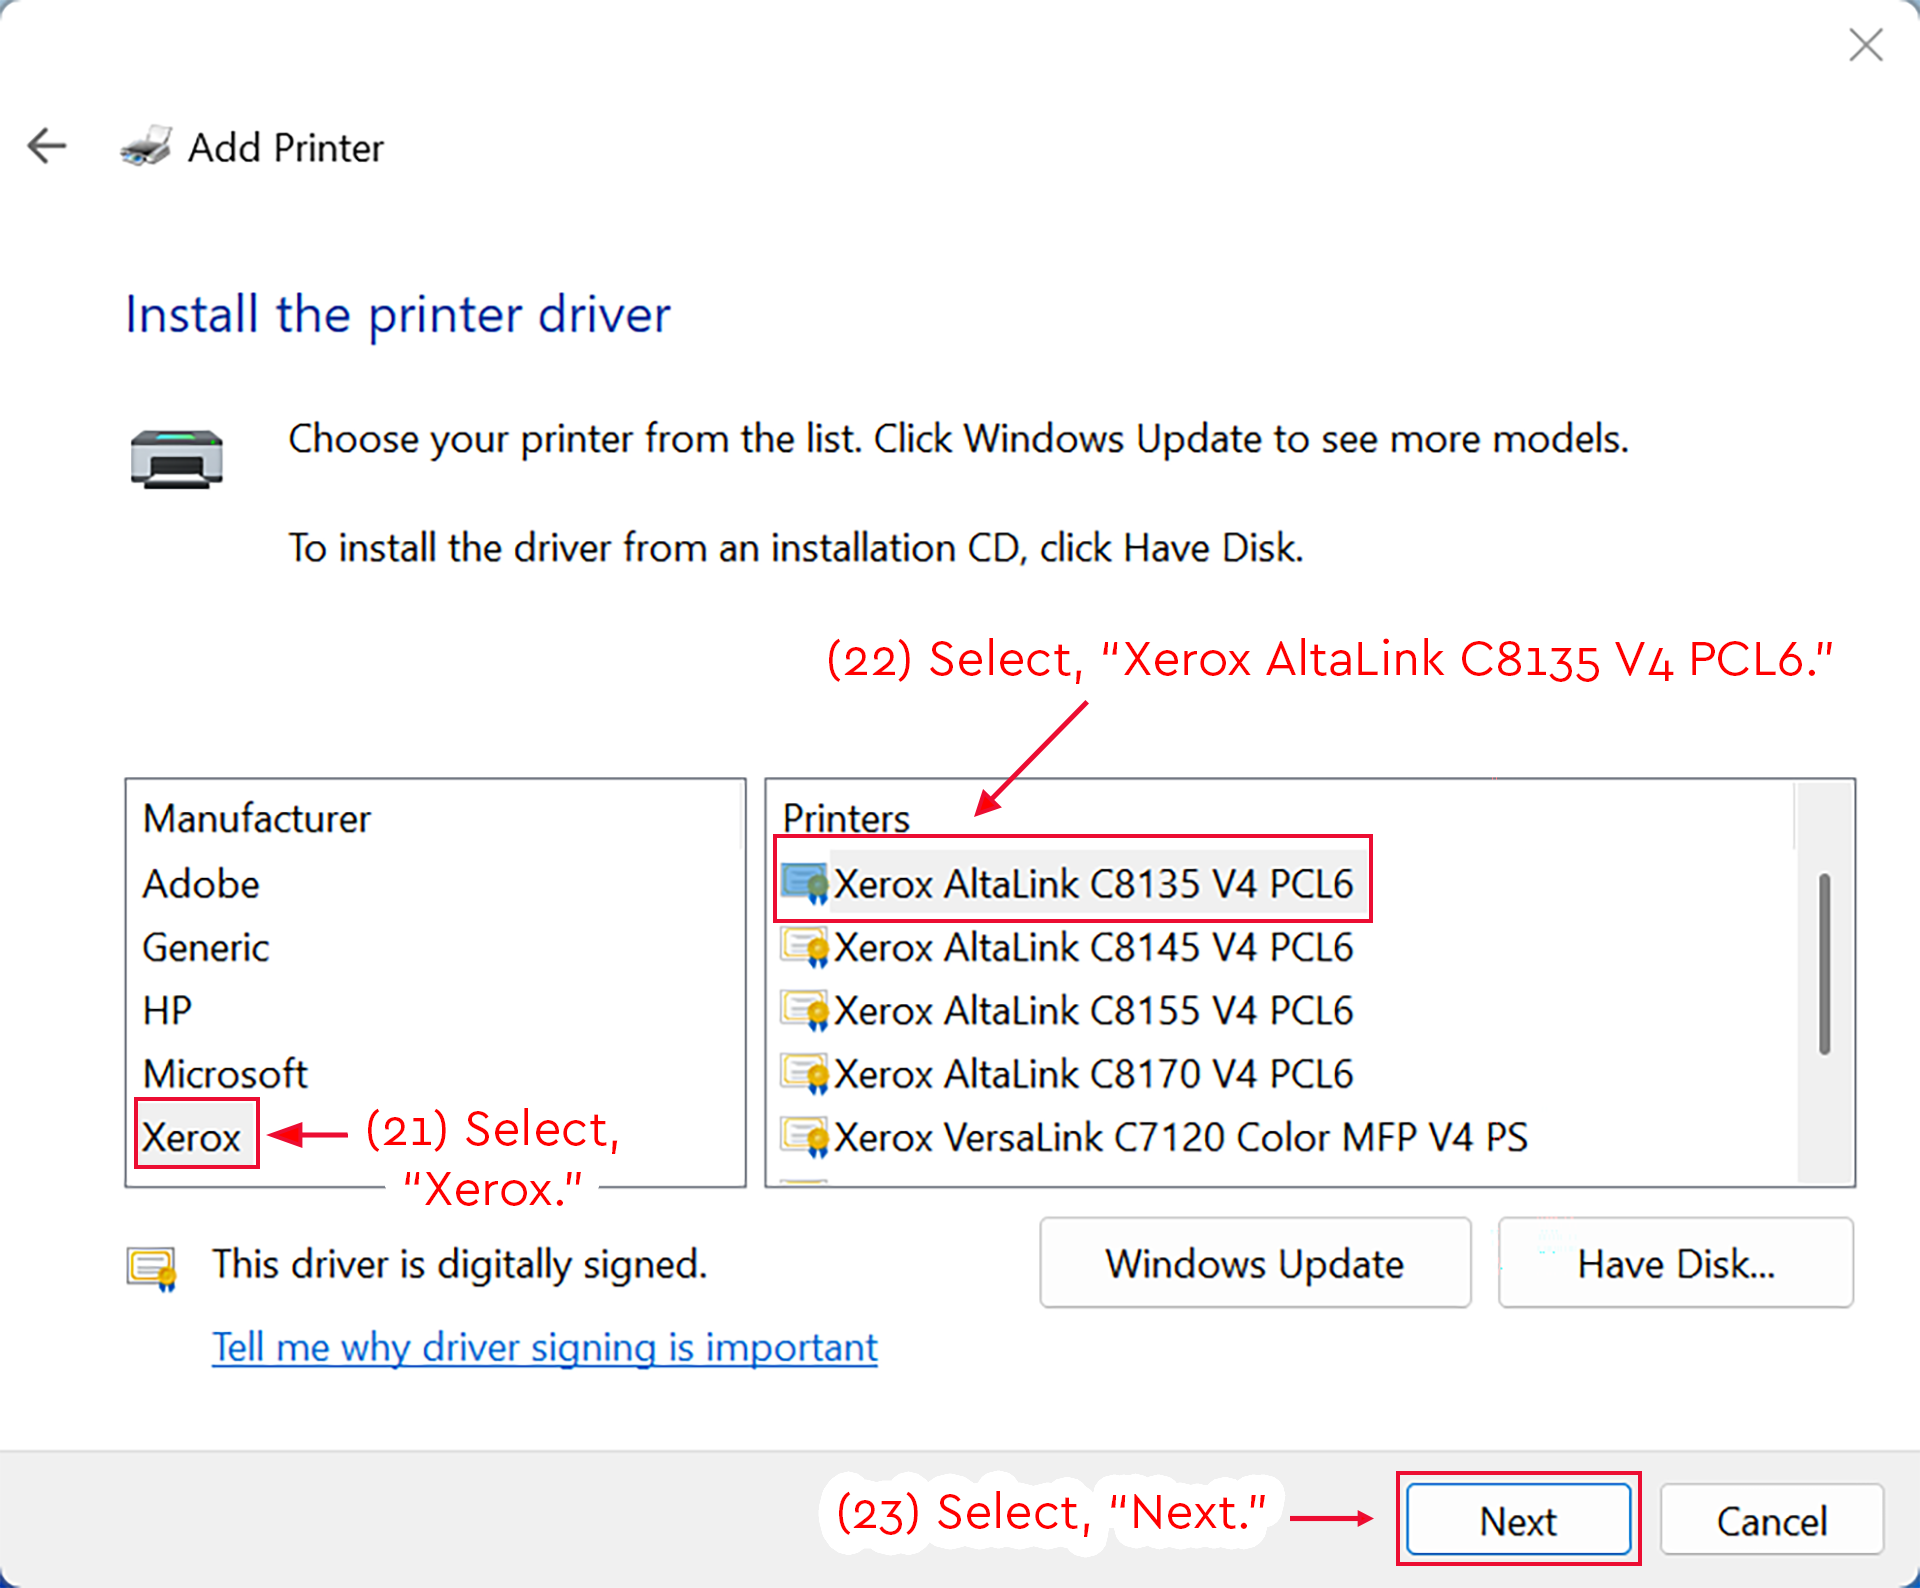
Detailed Image Description
The figure shows the Windows Add Printer window on the “Install the printer driver” screen.
The page instructs the user to choose a printer from the list. It also notes that Windows Update can show more models and that “Have Disk...” can be used to install a driver from an installation CD.
Two selection lists are shown. In the “Manufacturer” list, “Xerox” is selected and highlighted with a red box. A red arrow points to it with the instruction “(21) Select, ‘Xerox.’”
In the “Printers” list, “Xerox AltaLink C8135 V4 PCL6” is selected and highlighted with a red box. A red arrow points to it with the instruction “(22) Select, ‘Xerox AltaLink C8135 V4 PCL6.’”
Below the lists, the message “This driver is digitally signed” appears with a link labeled “Tell me why driver signing is important.” The “Windows Update” and “Have Disk...” buttons are visible.
At the bottom right of the window, the “Next” button is highlighted with a red box. A red arrow points to the button with the instruction “(23) Select, ‘Next.’” A “Cancel” button appears to the right of the “Next” button.
- Select, "Use the driver that is currently installed."
- Select, "Next."
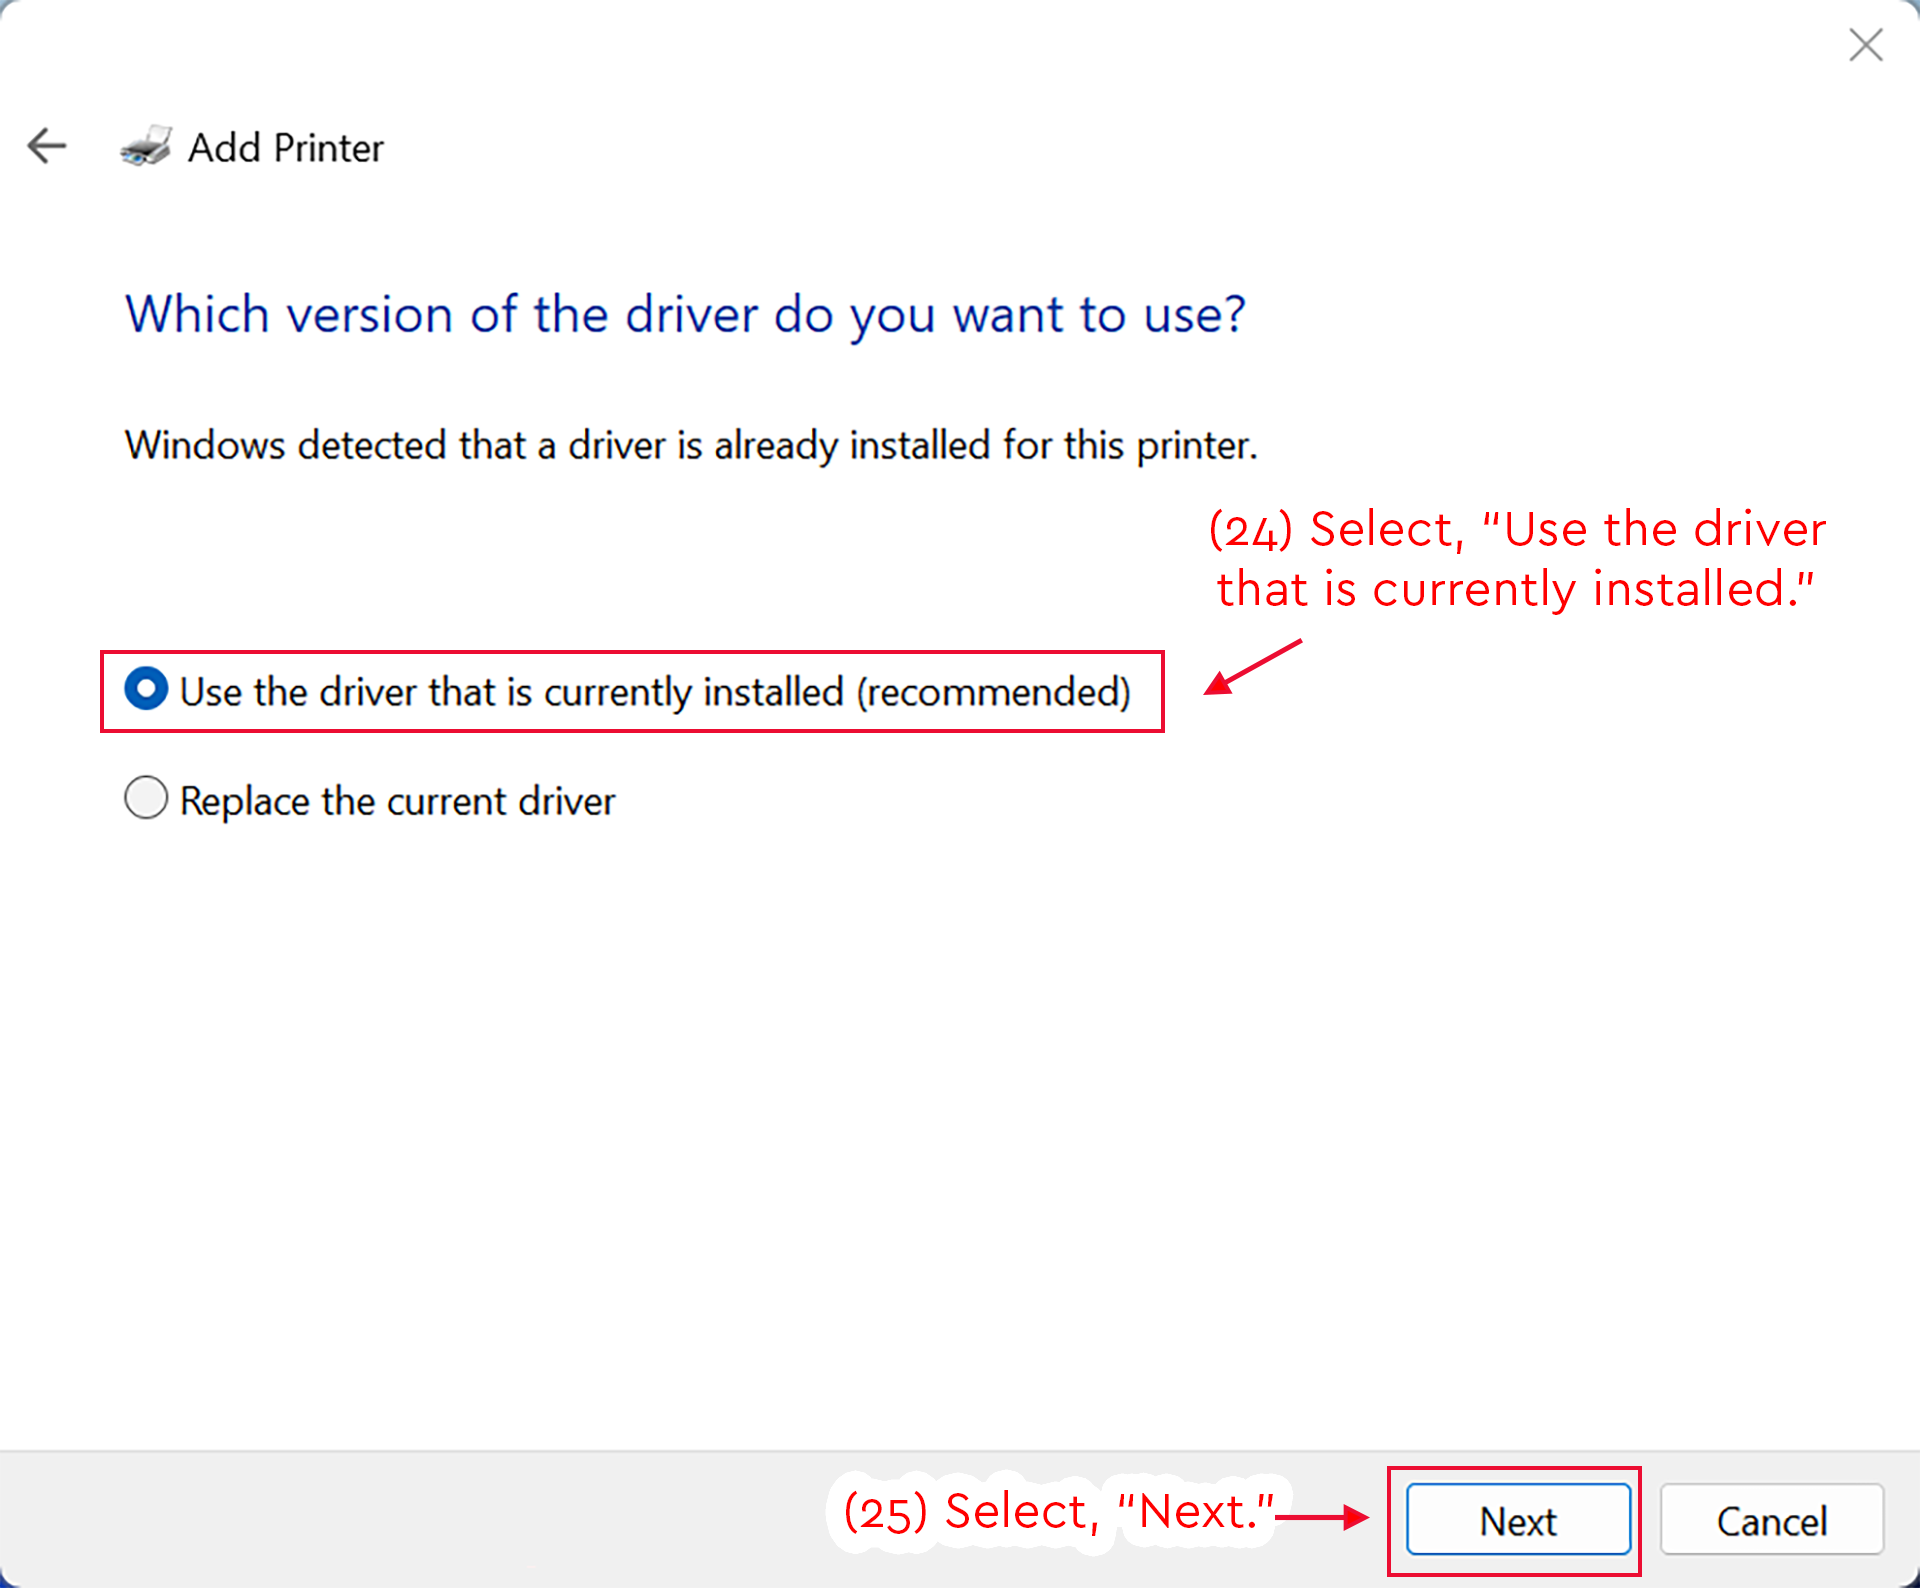
Detailed Image Description
The figure shows the Windows Add Printer window on the “Which version of the driver do you want to use?” screen.
The page states that Windows detected a driver is already installed for this printer. Two radio button options are shown: “Use the driver that is currently installed (recommended)” and “Replace the current driver.”
The “Use the driver that is currently installed (recommended)” option is selected and highlighted with a red box. A red arrow points to it with the instruction “(24) Select, ‘Use the driver that is currently installed.’”
At the bottom right of the window, the “Next” button is highlighted with a red box. A red arrow points to the button with the instruction “(25) Select, ‘Next.’” A “Cancel” button appears to the right of the “Next” button.
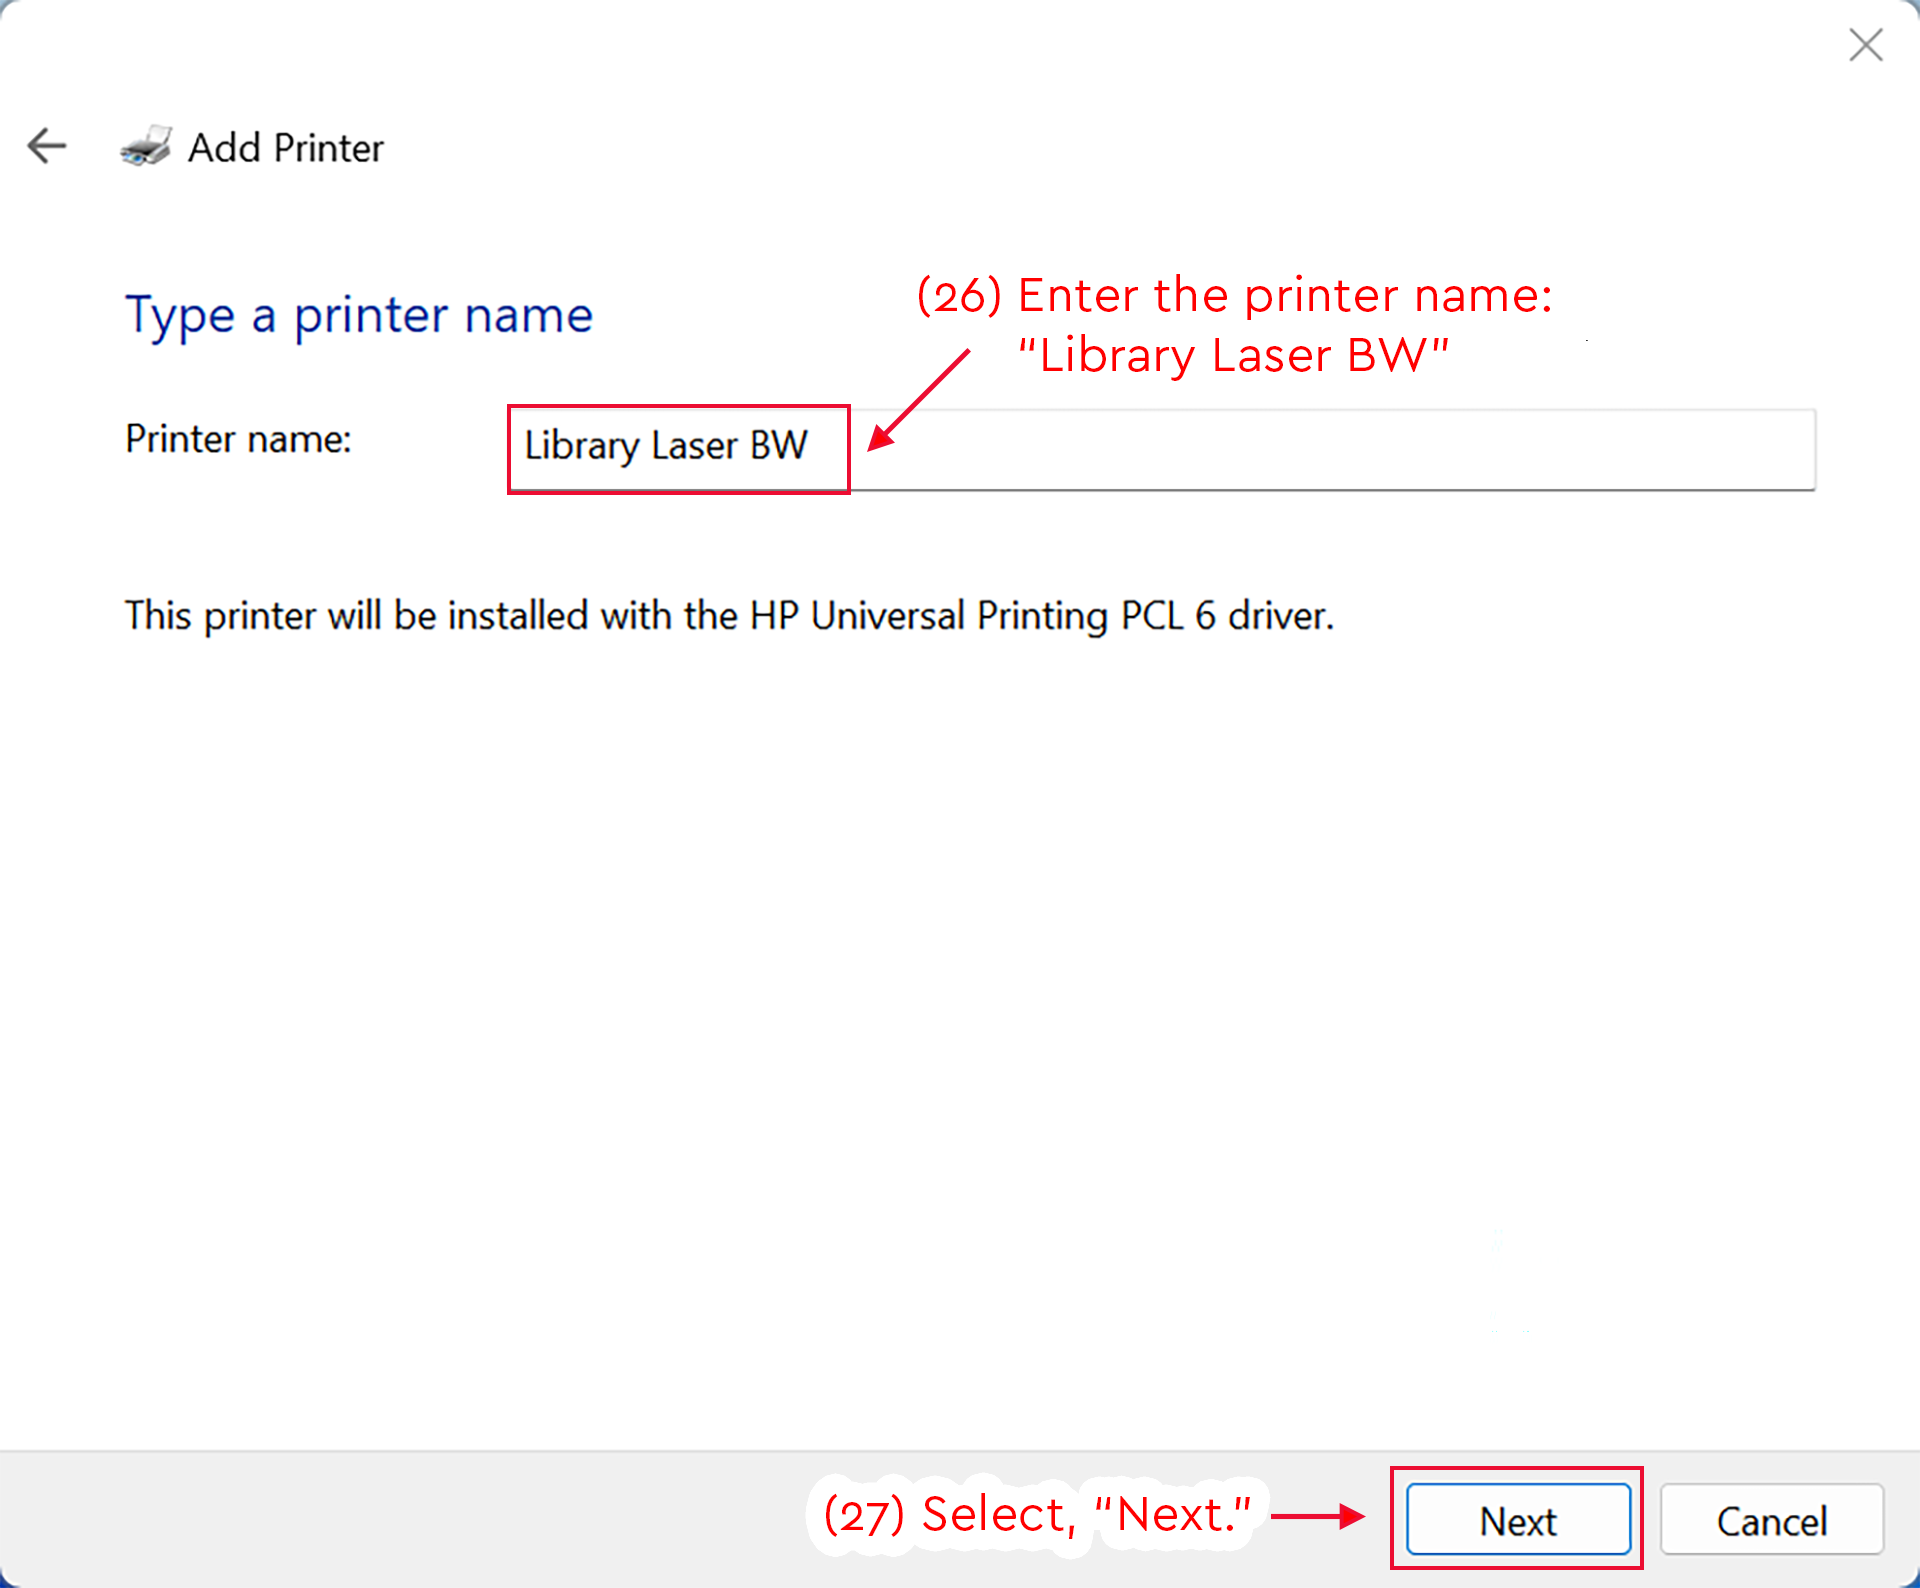
- Enter the printer name: "Library Laser Color"
- Select, "Next"
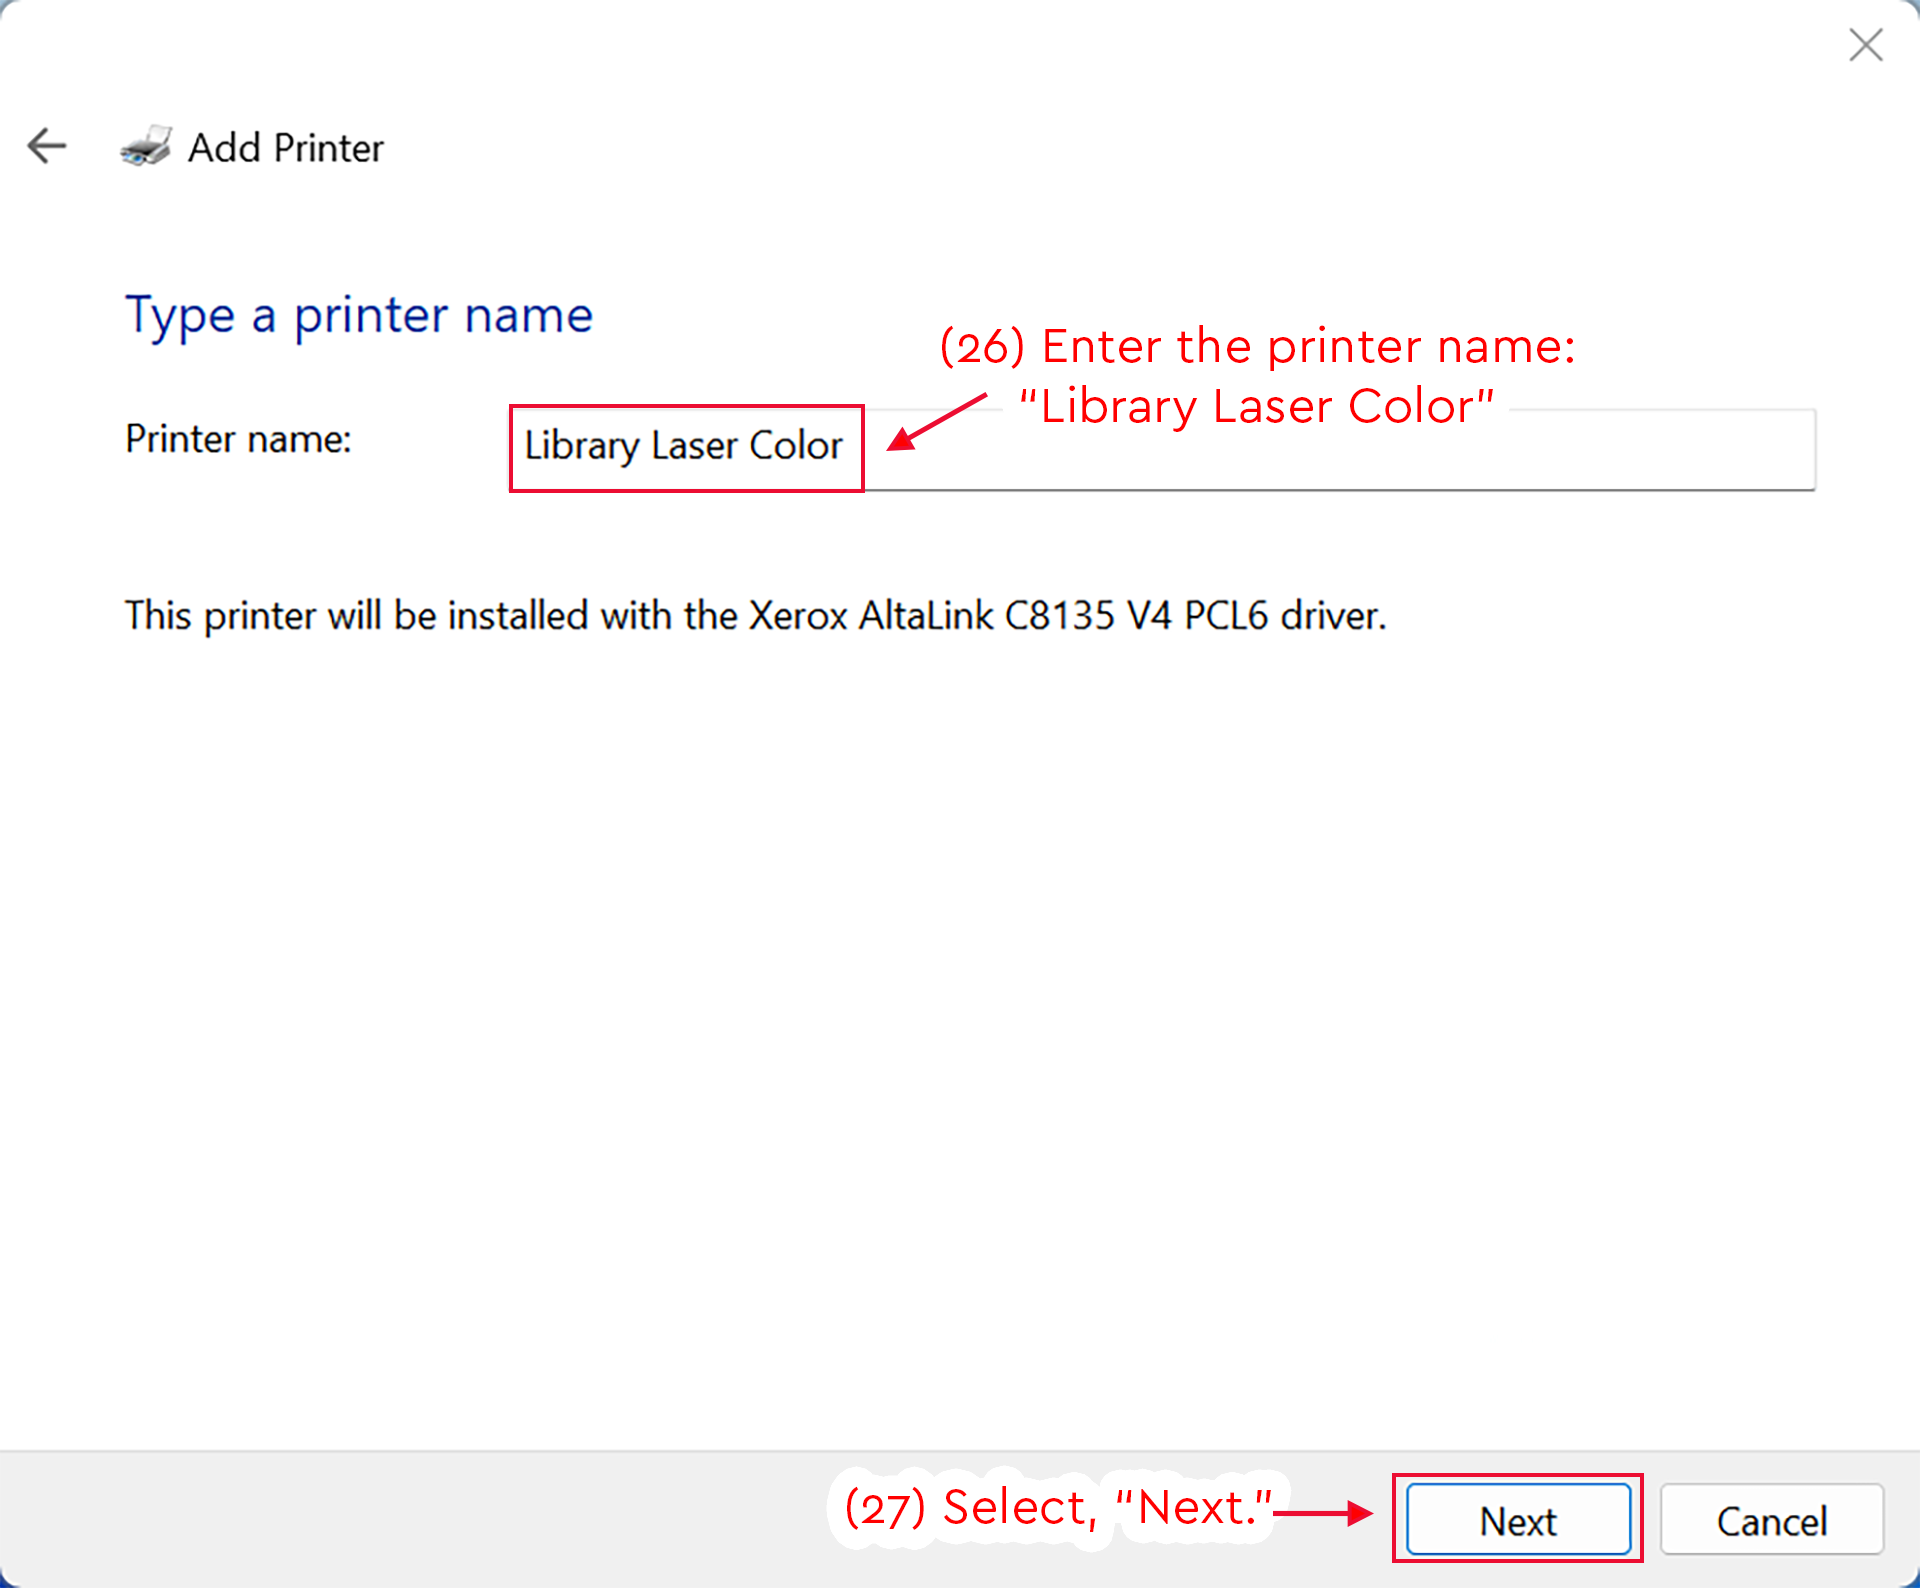
Detailed Image Description
The figure shows the Windows Add Printer window on the “Type a printer name” screen.
The “Printer name” field contains “Library Laser Color,” and a red box highlights the entry. A red arrow points to the field with the instruction “(26) Enter the printer name: ‘Library Laser Color.’”
Below the field, the page states that the printer will be installed with the Xerox AltaLink C8135 V4 PCL6 driver.
At the bottom right of the window, the “Next” button is highlighted with a red box. A red arrow points to the button with the instruction “(27) Select, ‘Next.’” A “Cancel” button appears to the right of the “Next” button.
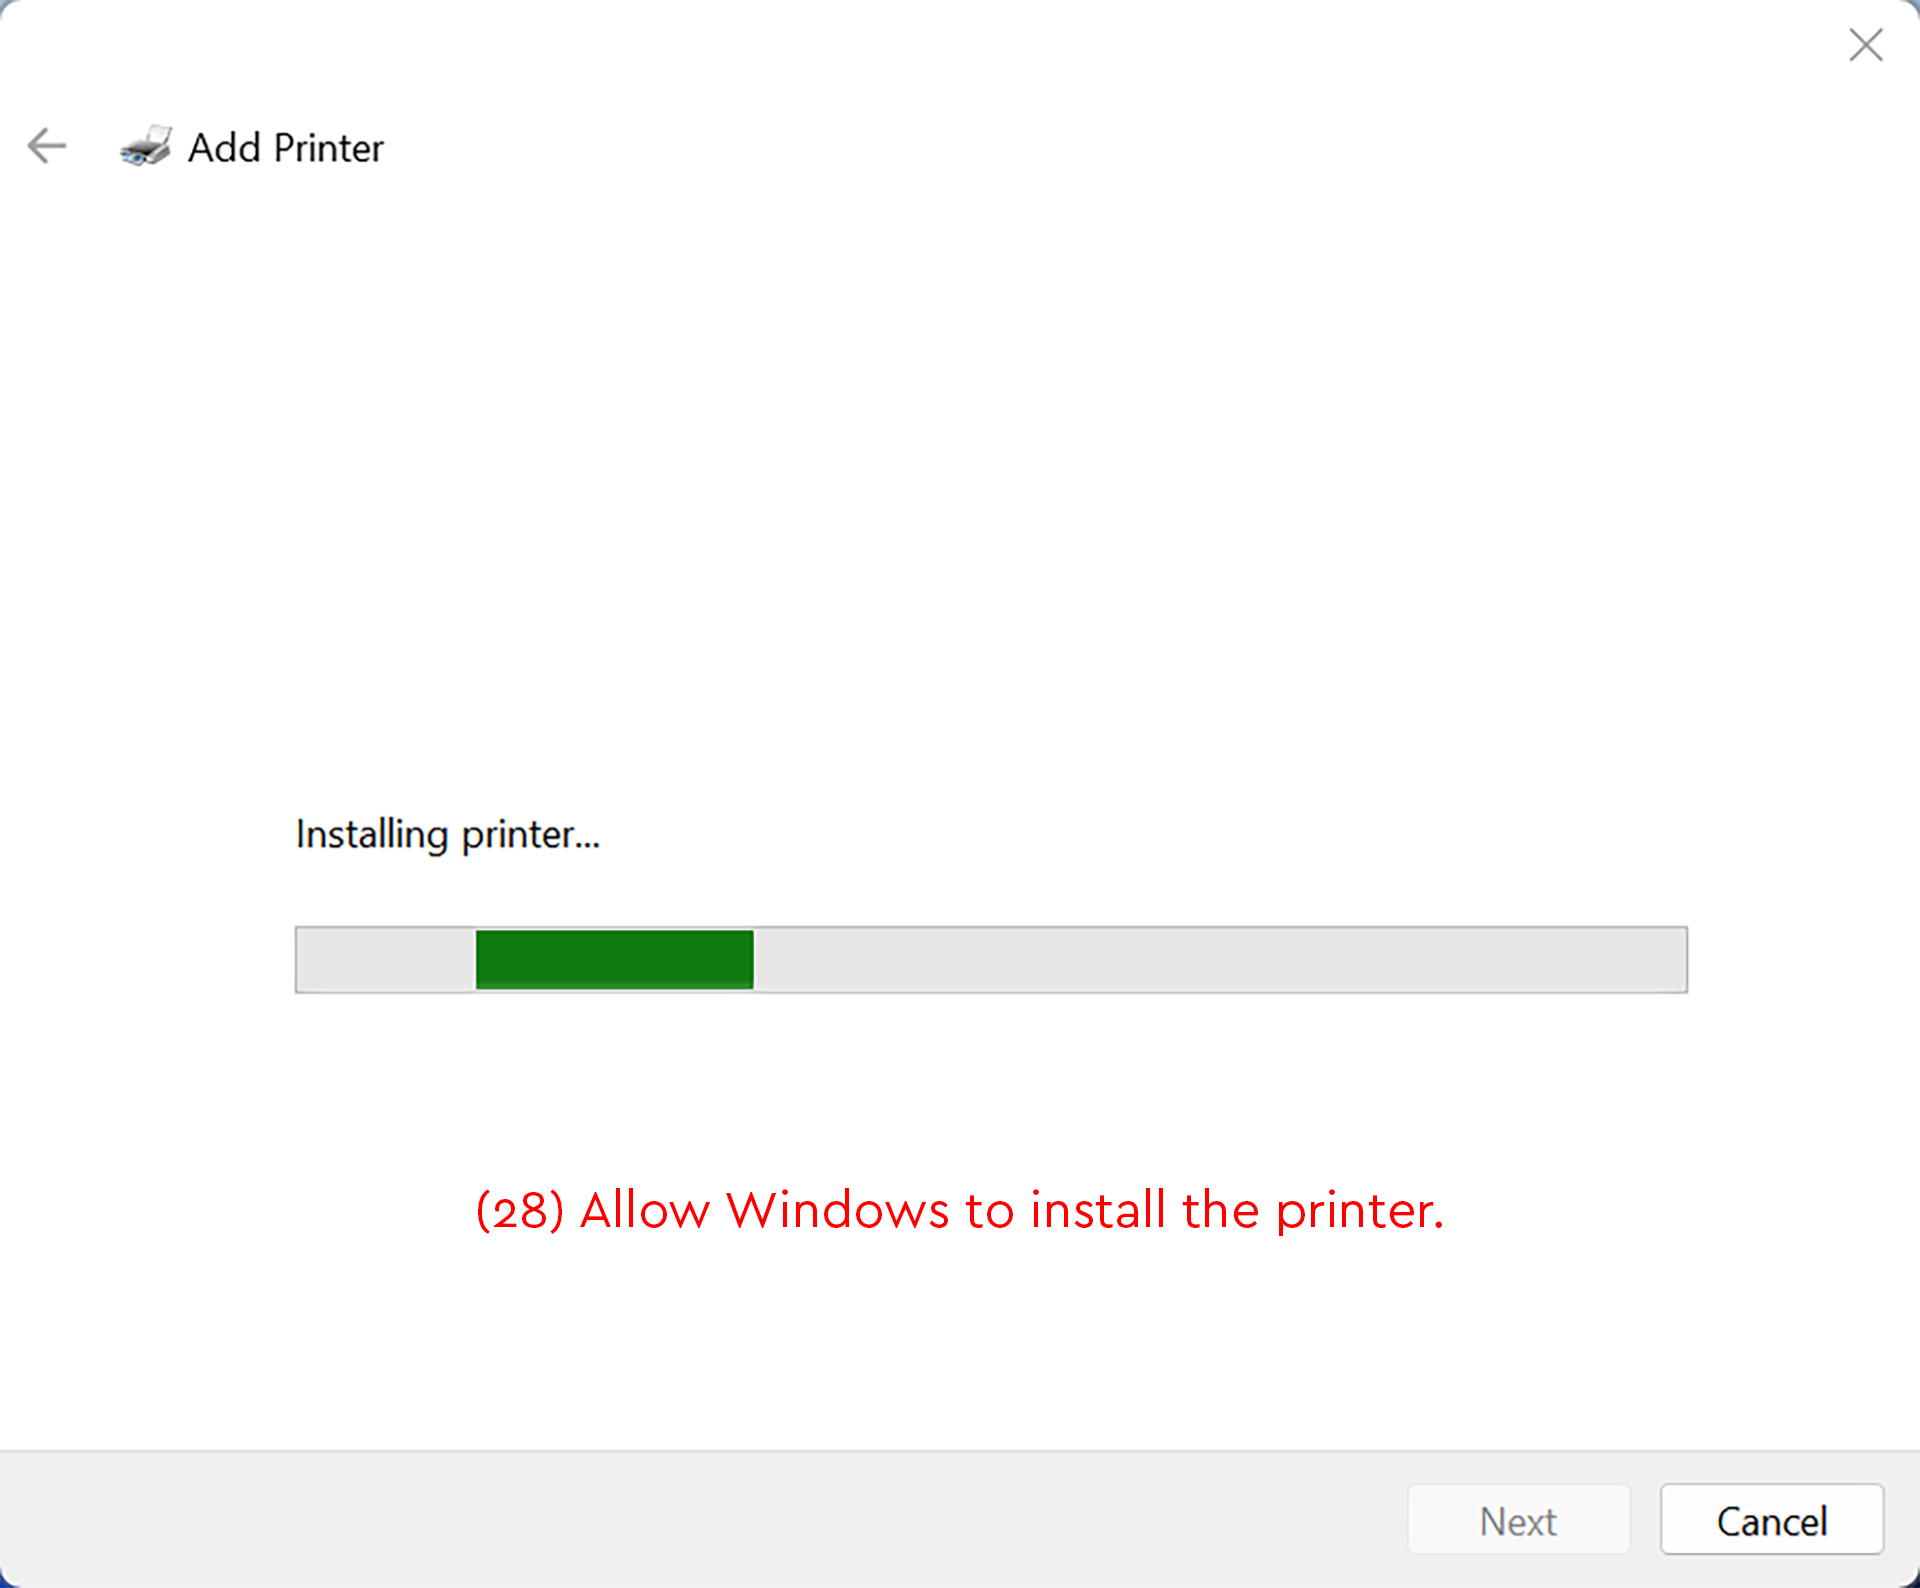
- Allow Windows to install the printer.
Detailed Image Description
The figure shows the Windows Add Printer window during the printer installation step.
Near the center of the window, the message “Installing printer...” appears above a horizontal progress bar. The progress bar is partially filled, indicating that Windows is still installing the printer.
Red instructional text below the progress bar reads “(28) Allow Windows to install the printer.”
At the bottom right of the window, the “Next” button is visible but disabled. The “Cancel” button is available to the right of it.
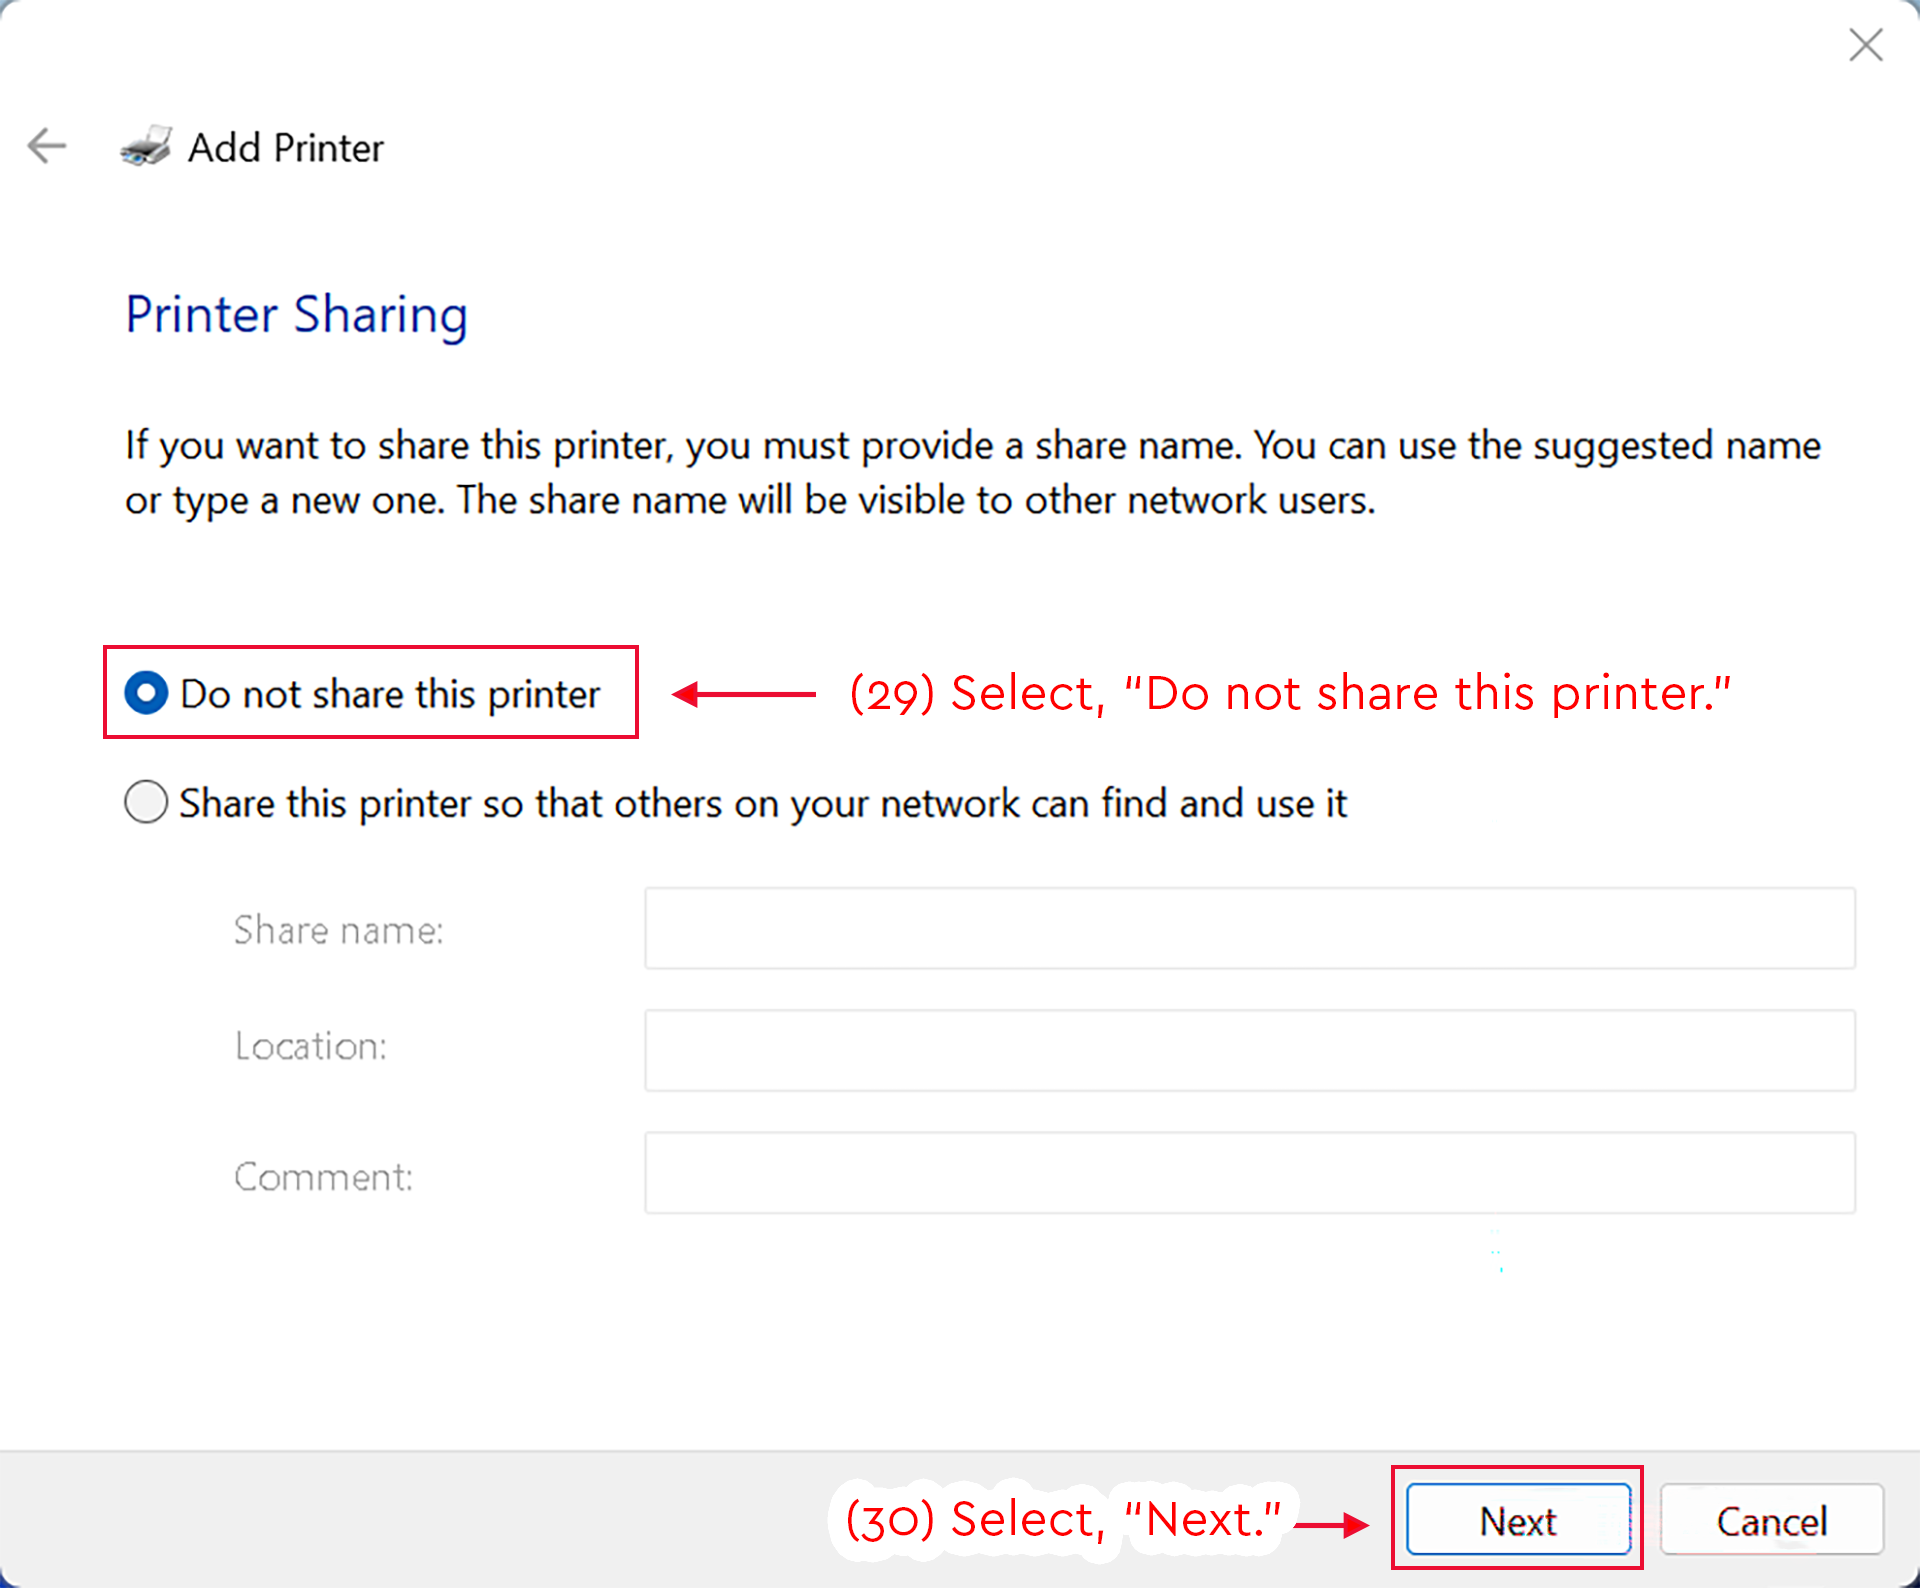
- Select, "Do not share this printer."
- Select, "Next."
Detailed Image Description
The figure shows the Windows Add Printer window on the “Printer Sharing” screen.
The page explains that if the user wants to share the printer, they must provide a share name. It also states that the share name will be visible to other network users.
Two radio button options are shown: “Do not share this printer” and “Share this printer so that others on your network can find and use it.” The “Do not share this printer” option is selected and highlighted with a red box. A red arrow points to it with the instruction “(29) Select, ‘Do not share this printer.’”
The share name, location, and comment fields are visible below the sharing option, but they are disabled because printer sharing is not selected.
At the bottom right of the window, the “Next” button is highlighted with a red box. A red arrow points to the button with the instruction “(30) Select, ‘Next.’” A “Cancel” button appears to the right of the “Next” button.
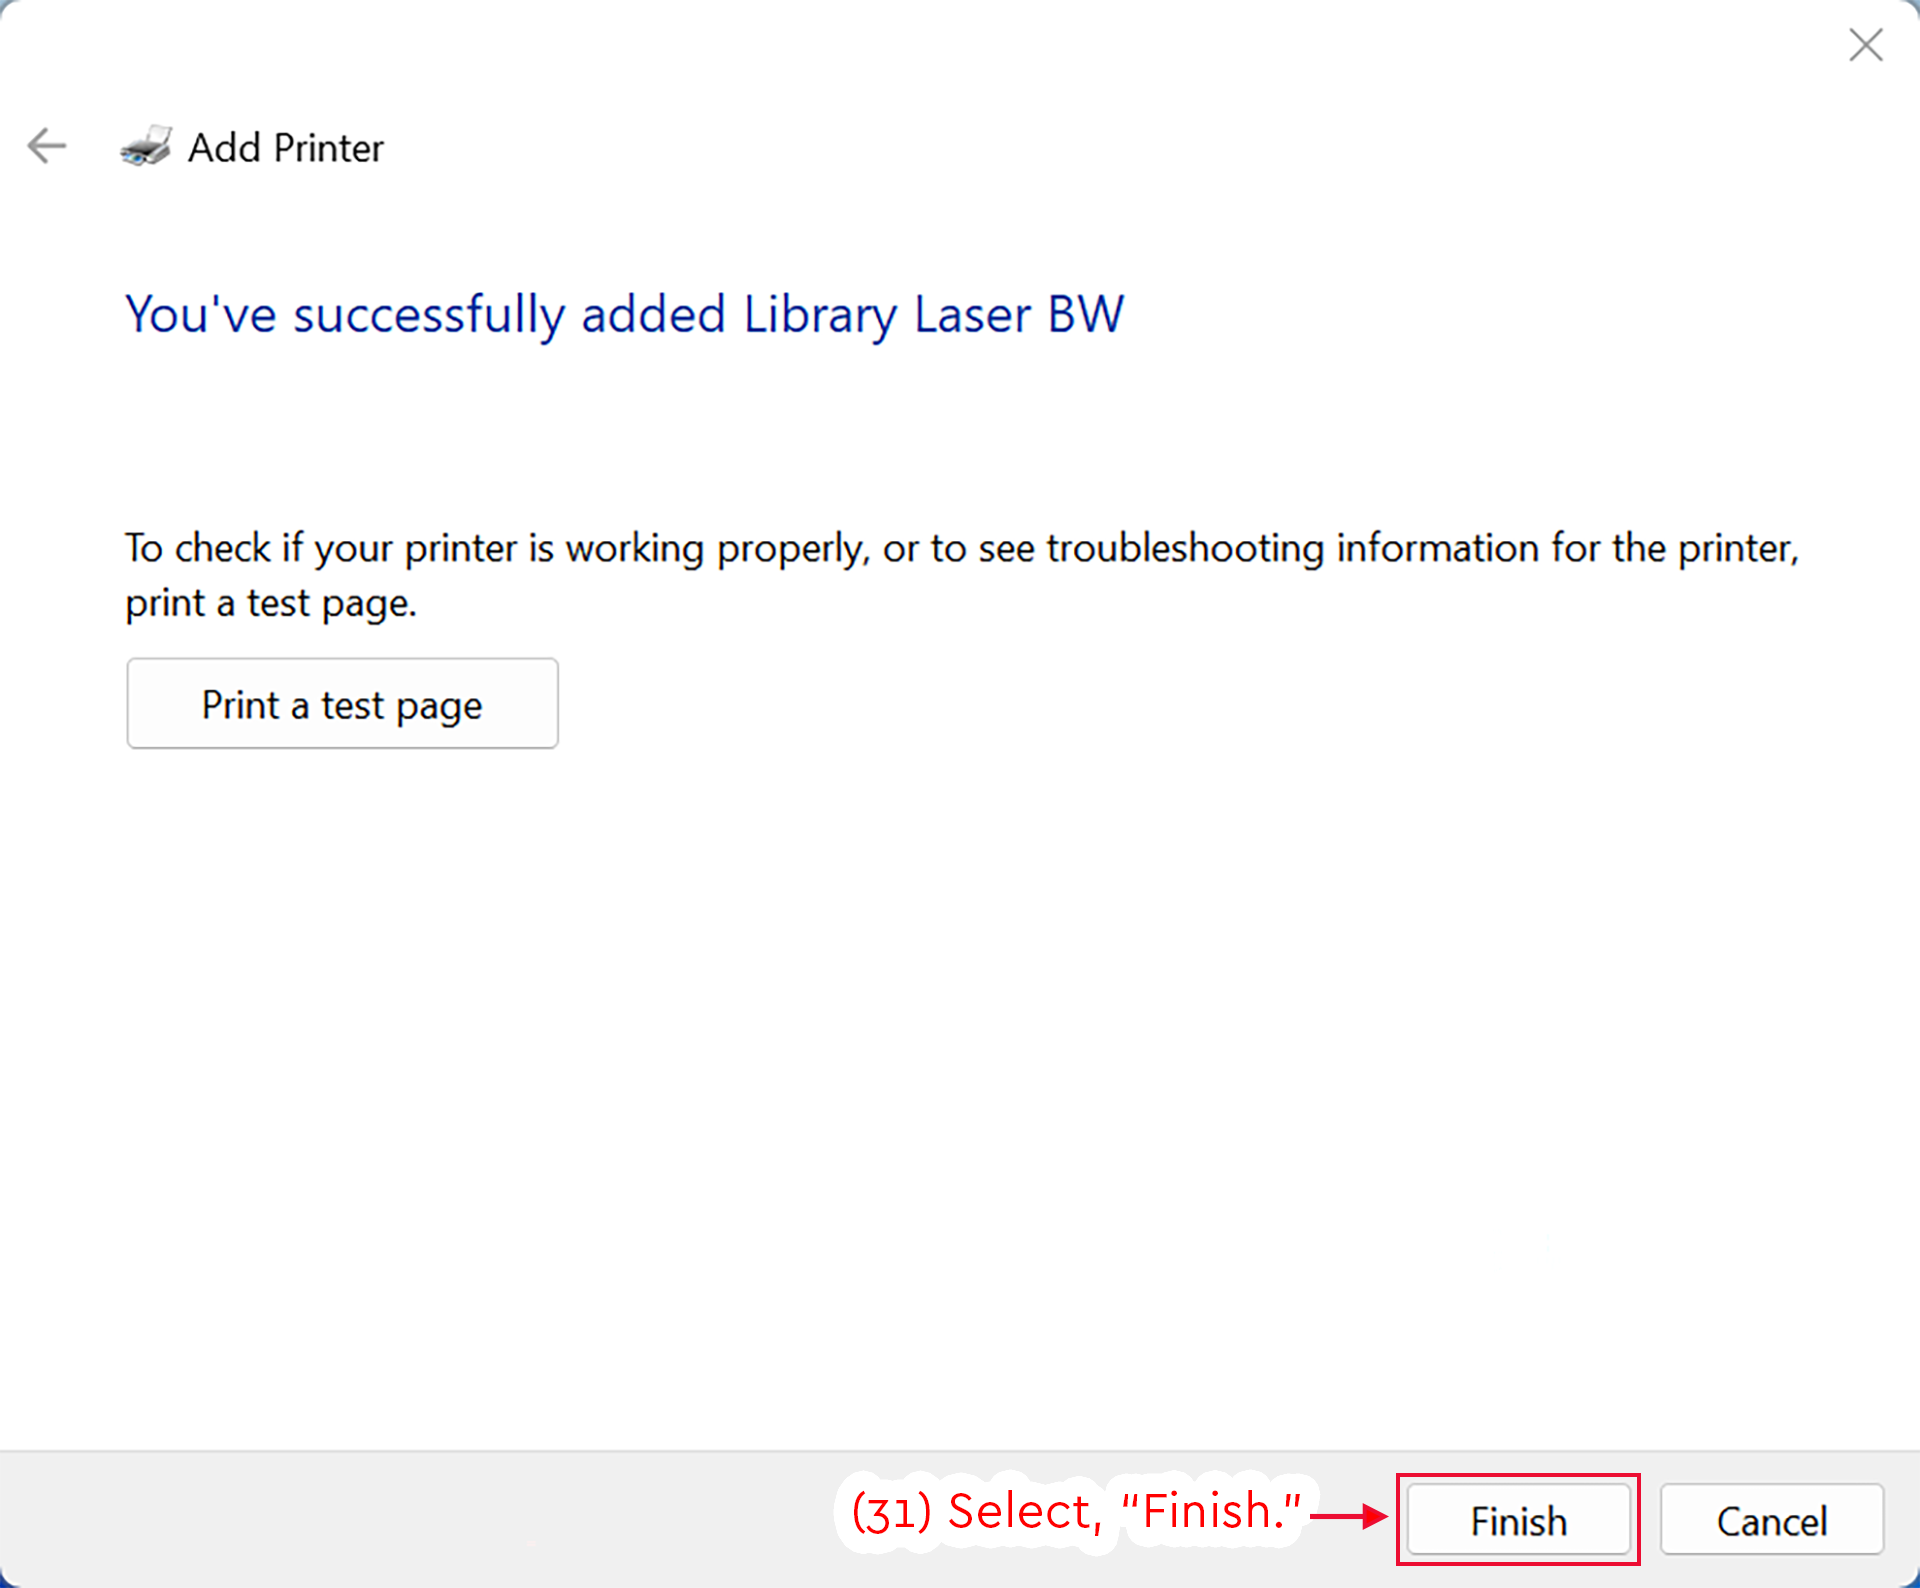
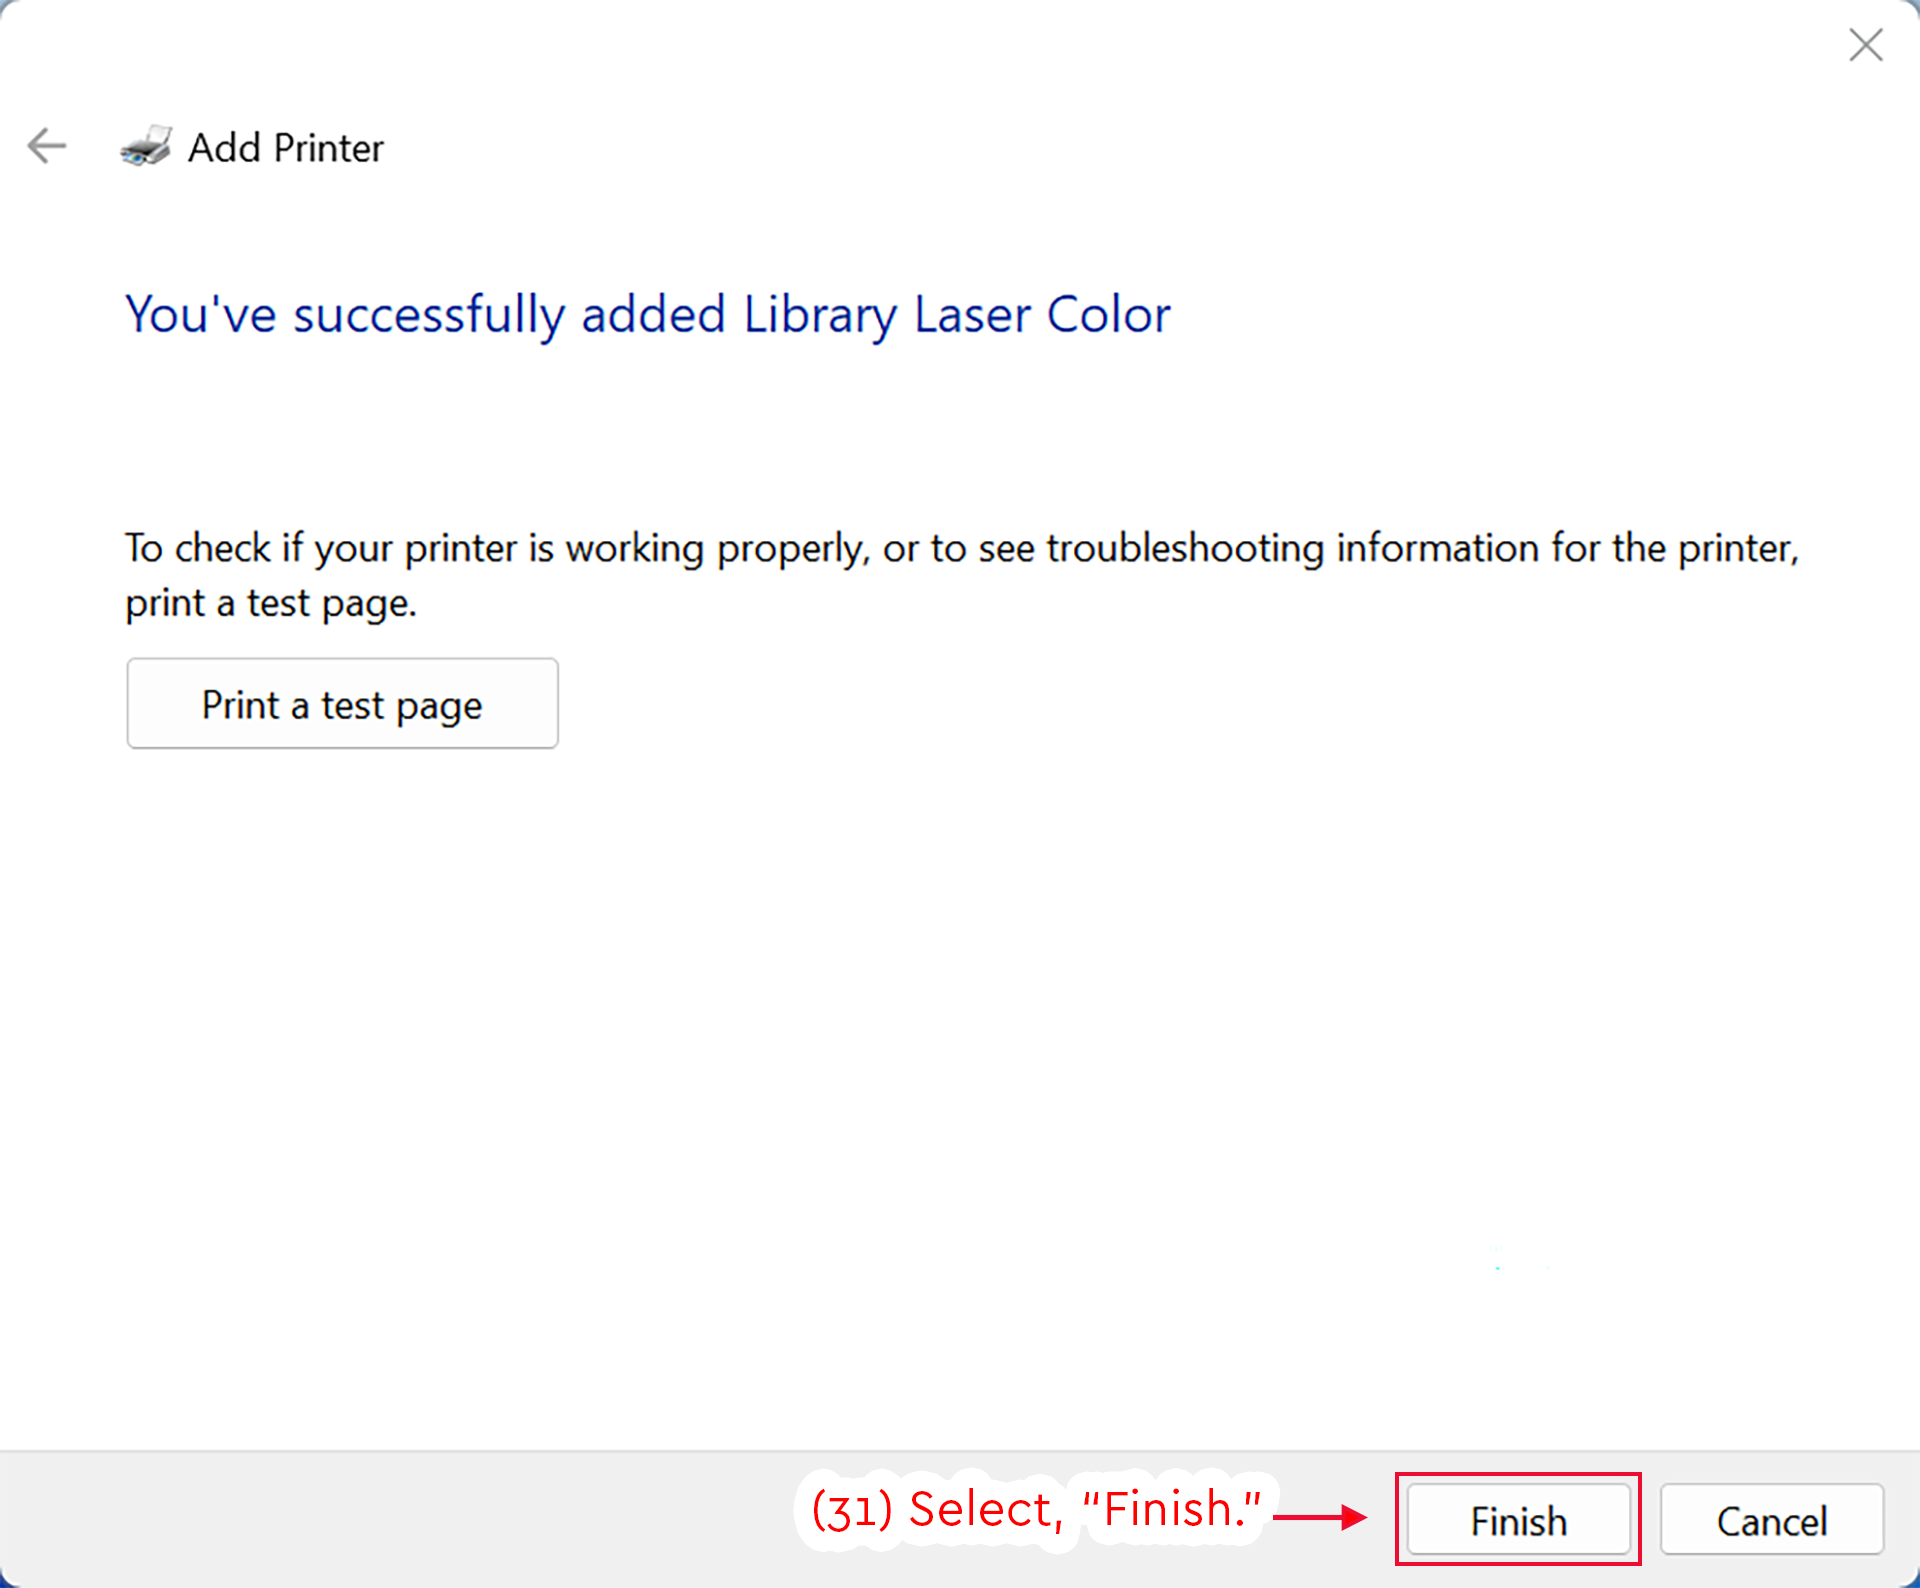
- Select, "Finish."
Detailed Image Description
The figure shows the Windows Add Printer window after the printer has been installed.
The main message reads “You’ve successfully added Library Laser Color.” Below it, the page explains that the user can print a test page to check whether the printer is working properly or to view troubleshooting information. A “Print a test page” button is visible below this message.
At the bottom right of the window, the “Finish” button is highlighted with a red box. A red arrow points to the button with the instruction “(31) Select, ‘Finish.’” A “Cancel” button appears to the right of the “Finish” button.