Library printers are available on the second floor of Harden Hall, next to the Information Services Desk.
All NMU students, faculty, and staff must have money (CatCa$h) in their NMU ID (WildCat Express Card) account to print on campus. The printers on campus are networked, so NMU students, faculty, and staff can print from almost any computer to a printer on campus.
- Two HP Black & white printers along with the Xerox copier / scanner / color printer, are located on the second floor of Harden Hall.
- The CatCa$h machine, for adding money to your WildCat Express Card, is also located on the second floor of Harden Hall.
- The Jacobetti Center maintains a black & white printer in the commons area near room #123.
- The Physical Education and Instructional Facility (PEIF) maintains a black & white printer in the commons area near the classrooms on the second floor.
- Copies are paid for using CatCa$h on your WildCat Express Card.
Print Release Stations
Using the Release Stations
After you print from any application, your print job is sent to one of the print release stations that control each printer. Our different printers have different capabilities.
Picking a Printer
If you print to the Library Laser you can release your print job on either HP printer, but be mindful of the paper size. Printing to the Library Color printer only goes to the xerox color printer.
HP Right
- Black & White prints
- Letter size only (8.5 x 11 inches)
HP Left
- Black & White prints
- Letter Size (8.5 x 11 inches)
- Legal Size (8.5 x 14 inches)
Xerox Color Printer
- Color prints
- Letter Size (8.5 x 11 inches)
- Legal Size (8.5 x 14 inches)
- Tabloid Size (11 x 17 inches) - incurs extra costs
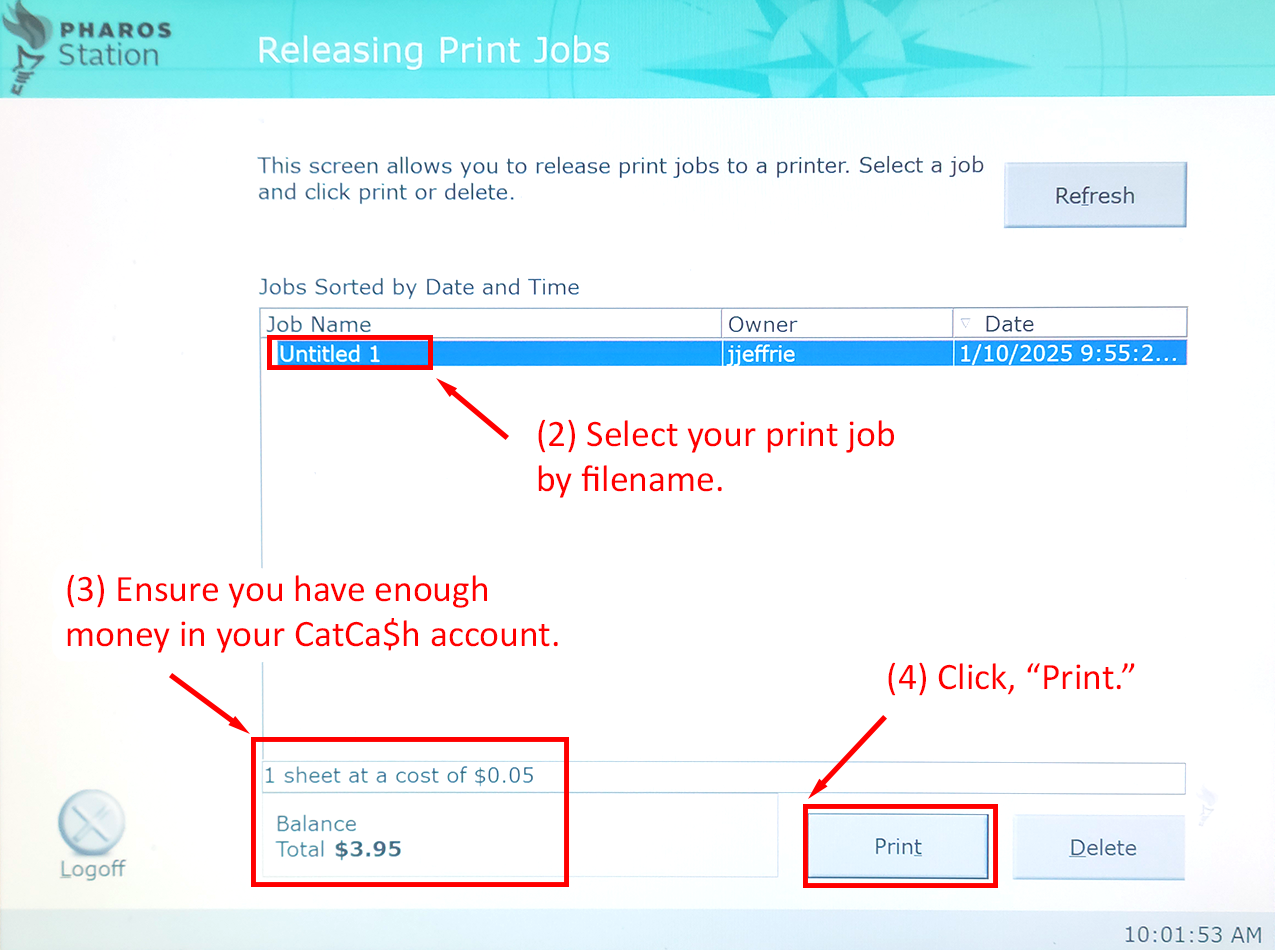
Releasing a Print Job
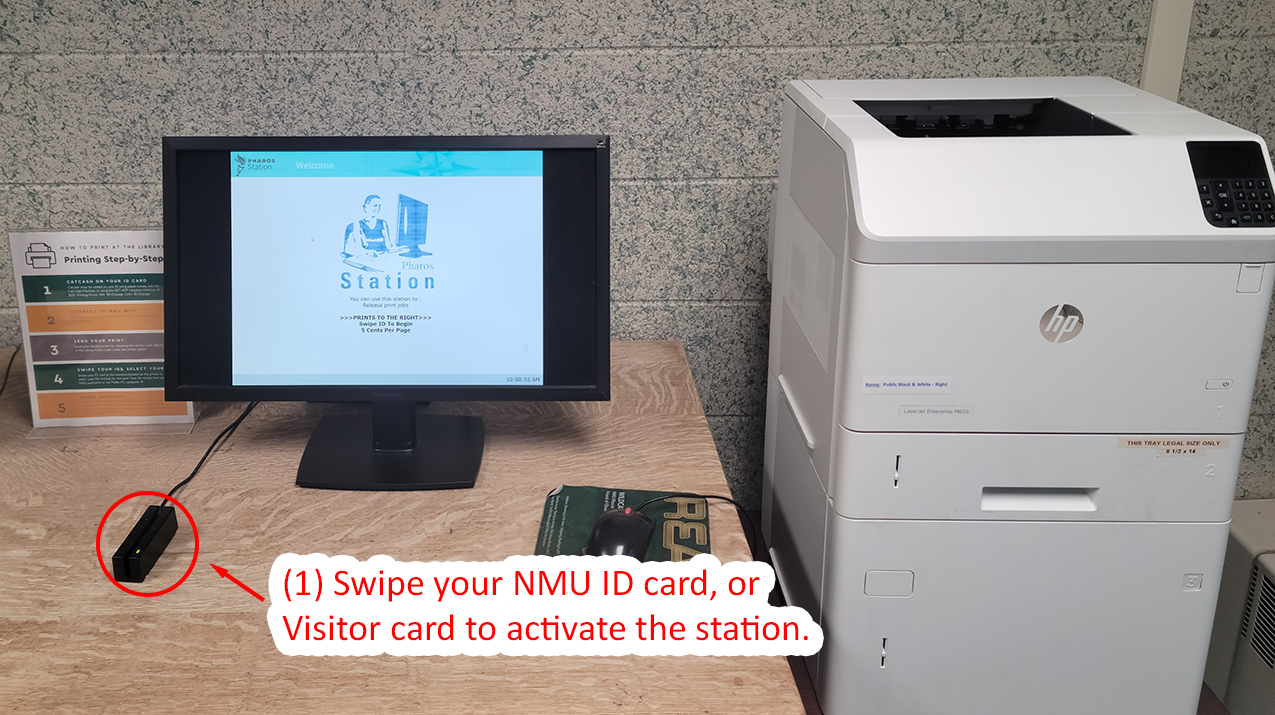
- Swipe your NMU ID or Wildcat Visitor Card to unlock the print release station.
- Select your print job by filename.
- Ensure you have enough money in your CatCa$h account to print your file. Refer to our pricing guide in the next tab.
- Click, "Print," to release your file to the printer. Make sure to check for all your pages, contact one of the library staff if a printer runs out of paper or ink.
Printing with Windows 11
Printing a Black & White Document form Word
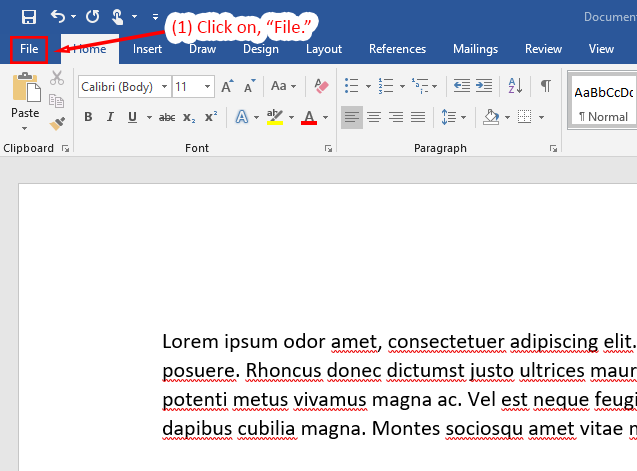
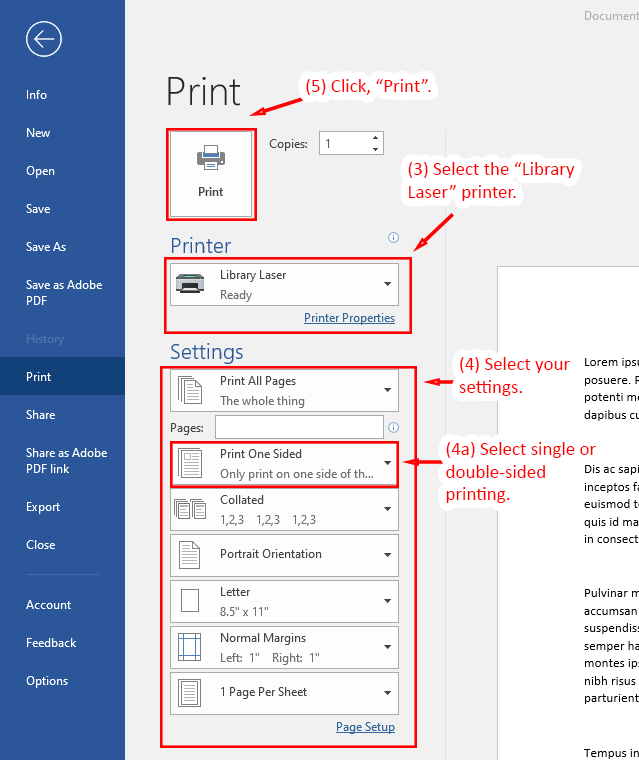
- To begin printing a document, click on, "File," generally in the upper left-hand corner of most applications.
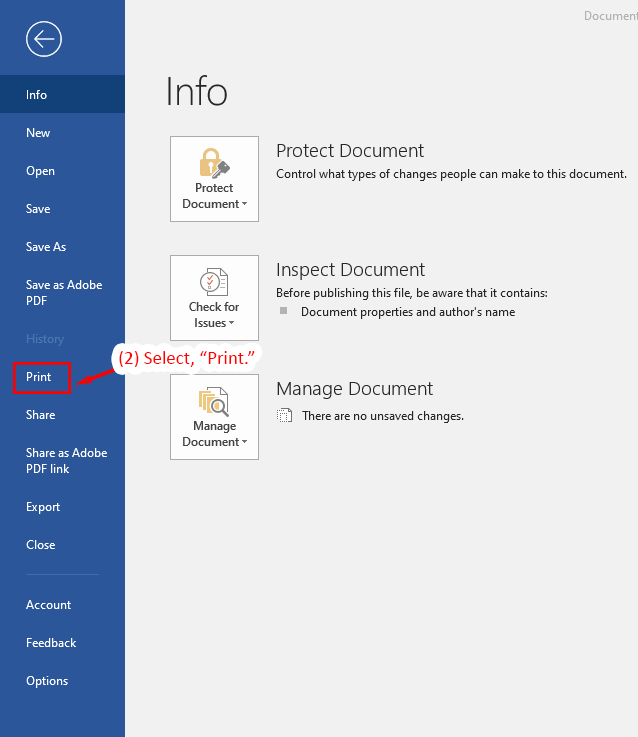
- Select, "Print," to open the print dialogue.
- Select the "Library Laser," printer.
- Select your desired settings for printing.
- Select single-sided or double-sided printing. If printing double-sided, use 'Flip pages on long edge' for portrait prints or 'Flip pages on short edge' for landscape prints (ex. tri-fold brochures).
- Click, "Print," to send your print job to the printer release stations next to each printer.
Printing a Color Document from Word
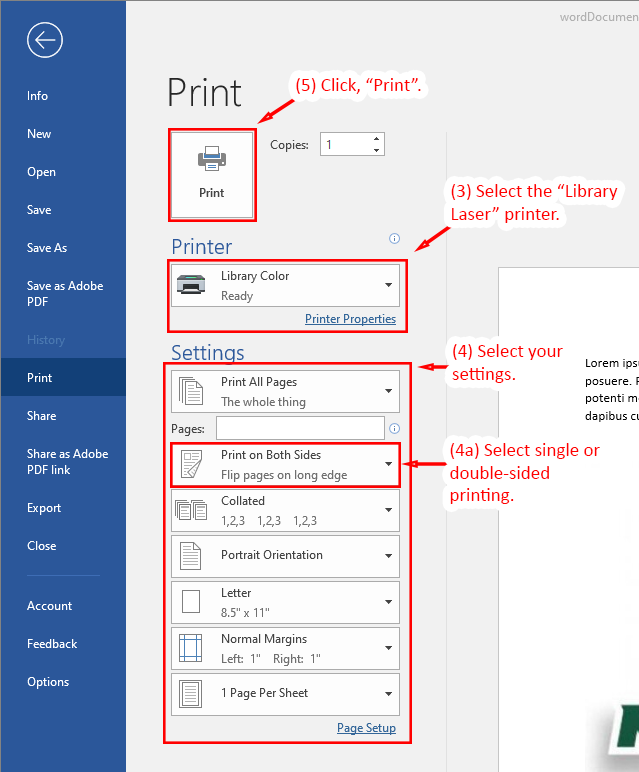
- To begin printing a document, click on, "File," generally in the upper left-hand corner of most applications.
- Select, "Print," to open the print dialogue.
- Select the "Library Color," printer.
- Select your desired settings for printing.
- Select single-sided or double-sided printing. If printing double-sided, use 'Flip pages on long edge' for portrait prints or 'Flip pages on short edge' for landscape prints (ex. tri-fold brochures).
- Click, "Print," to send your print job to the printer release stations next to each printer.
1. Select Print
2. Select Microsoft XPS Document Writer from the list of printers, then click 'Print'.
3. The printer dialog will ask you to save the file as an OpenXPS Document (*.oxps)
4. Right-click on the saved file and select Open with..XPS Viewer
5. Review the file to make sure it saved correctly
6. Select File-> Print and send to the appropriate library printer and release station.
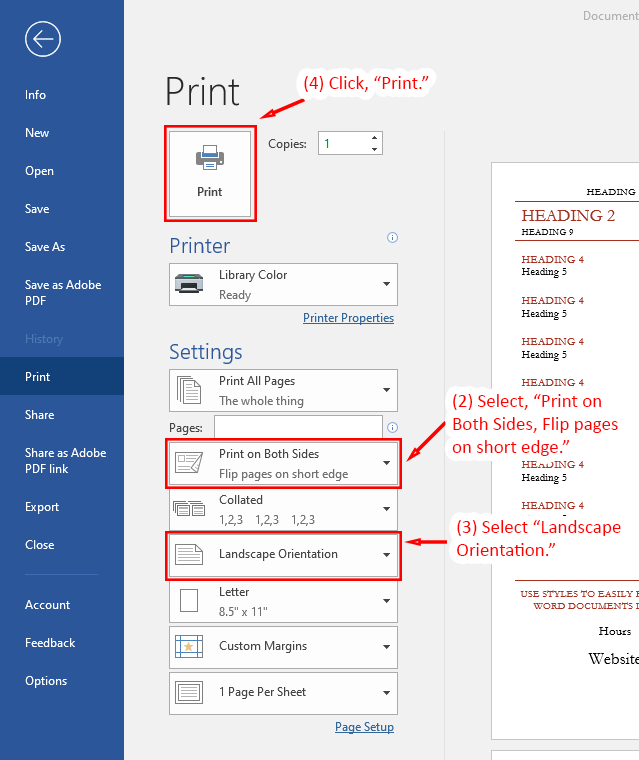
- Open the print dialog as shown in the previous steps. Depending on your color needs, select 'Library Laser' or 'Library Color Laser'.
- Select, "Print on Both Sides, Flip pages on short Edge."
- Set the Portrait Orientation to 'Landscape'.
- Click, "Print," to send your file to the print release station and then follow the steps above to release your print job to a printer.
Printing with Mac OS
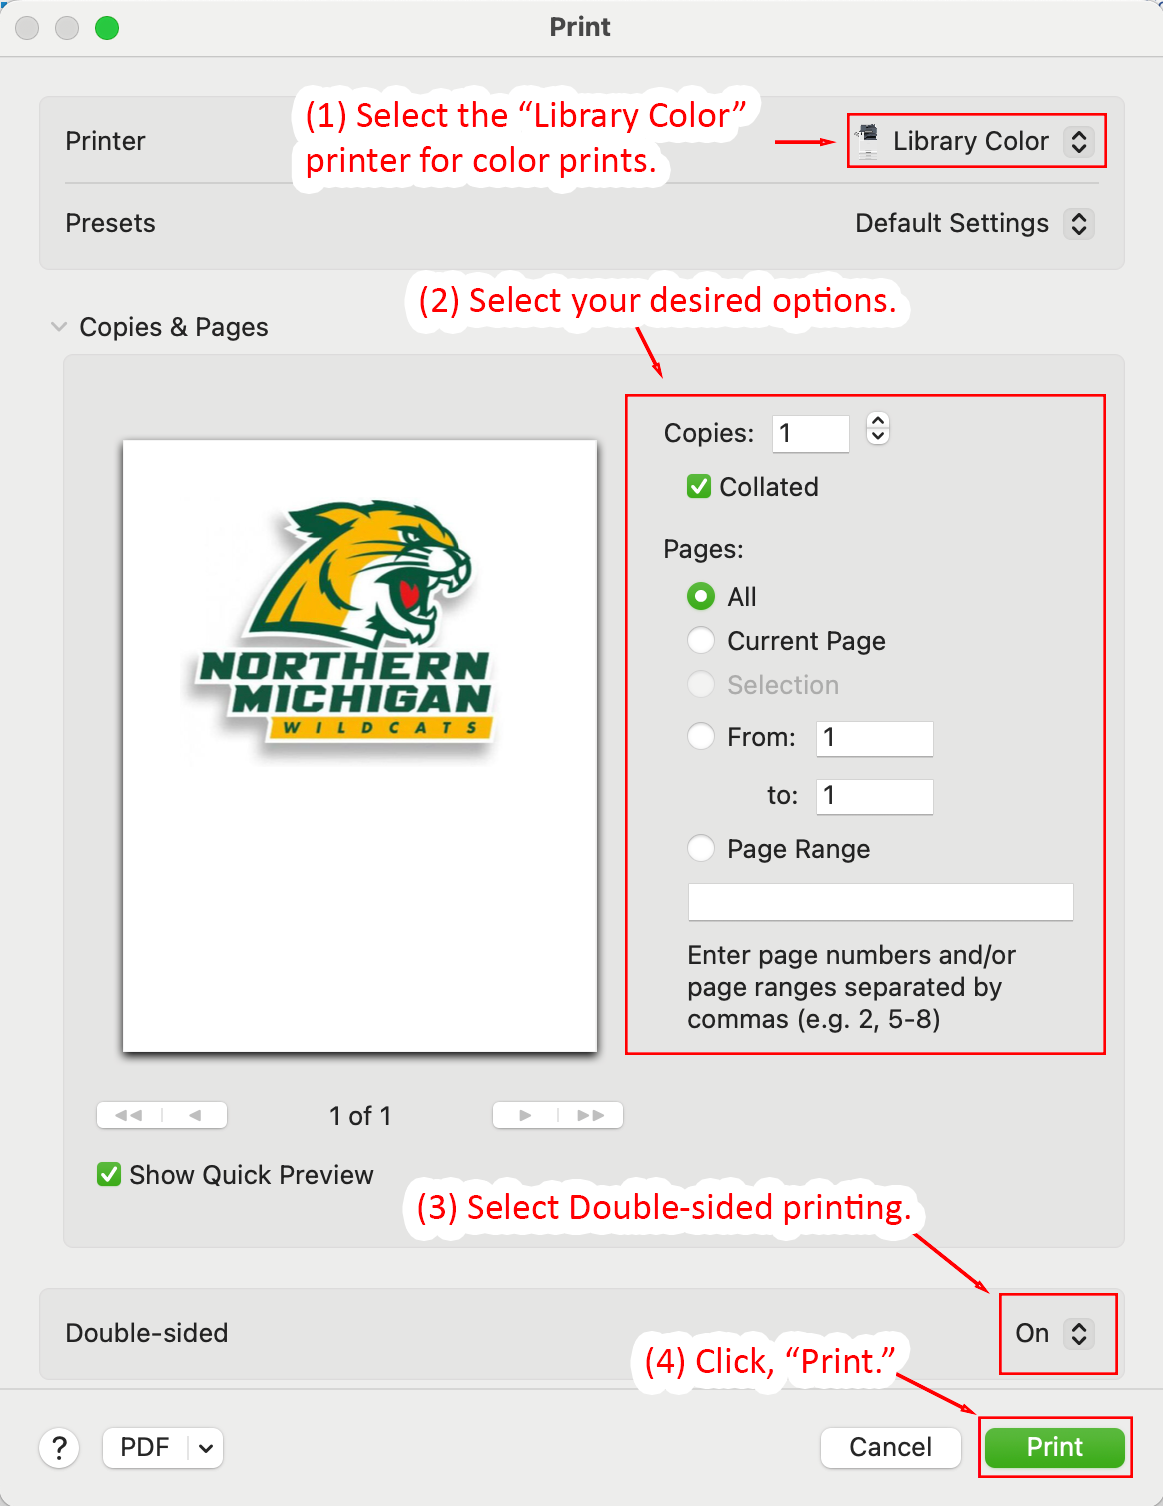
- Open the print dialog and select the "Library Laser" printer for black & white prints.
- Select your desired print options.
- Select Double-sided printing.
- Click, "Print," to send your print job to a release station.

- Open the print dialog and select the "Library Color" printer for color prints.
- Select your desired print options.
- Select Double-sided printing.
- Click, "Print," to send your print job to a release station.
| COLOR | PRICE PER PAGE | METHOD OF PAYMENT | PAPER SIZE | |
|---|---|---|---|---|
| Printing | Black & White | $0.05 | CatCa$h (NMU ID or guest print card) | Letter: (8½ X 11) Legal: (8 ½ X 14) |
| Color | $0.15 | CatCa$h (NMU ID or guest print card) | Letter: (8½ X 11) Legal: (8 ½ X 14) Tabloid* (11 x 17) | |
| Copying | Black & White | $0.10 | Cash CatCa$h (NMU ID or guest print card) | Letter: (8½ X 11) Legal: (8 ½ X 14) Tabloid* (11 x 17) |
| Color | $0.15 | Cash CatCa$h (NMU ID or guest print card) | Letter: (8½ X 11) Legal: (8 ½ X 14) Tabloid* (11 x 17) |
* Printing or Copying on tabloid size paper costs $0.30 per page.
The printer default setting is double-sided. This can be changed for each print job on your own device.
If you need bills made into coins or coins made into bills, Information Services Desk staff can help.
Understanding the difference between CatCa$h & Dining Dollars.
The machine for adding CatCa$h to a Wildcat Express Card is located on the second floor of Harden Hall just outside the Printer and Scanner area.
Adding CatCa$h to Wildcat Express Card
You can add CatCa$h to your NMU ID (Wildcat Express Card) via the machine located in the lobby of the library ($1 minimum). Additionally, you can add CatCa$h online with a credit card. There is a $10.00 minimum deposit when using a credit card. See the instructions below.
- Login to GET with your NMU id/password.
- First-time users will need to provide an NMU email address and a phone number.
- Once logged in, click the "Add CatCa$h" link and follow the directions. You have the option at the end to save your credit card information for future use.
- You can also have family or friends add CatCa$h to your WildCat Express Card. From the main Accounts menu, fill out the "Ask for Funds" section. The system will send an email to whomever you designate, allowing them to add CatCa$h to your account.
- In the event that you lose your WildCat Express card, use GET to report it lost. Your WildCat Express Card will then become inactive, preventing unauthorized use.
- Be sure to logout when you have completed your transactions.
Installing on Windows 11
The following set of instructions will guide you in installing the Library Black & White printer on a Windows 11 computer. This process may vary slightly on different versions of Windows, however the printer configuration options will remain the same (e.g. hostname and port configuration in steps 7-19). If you run into problems installing the printer, please contact the NMU Help Desk for alternative instructions.
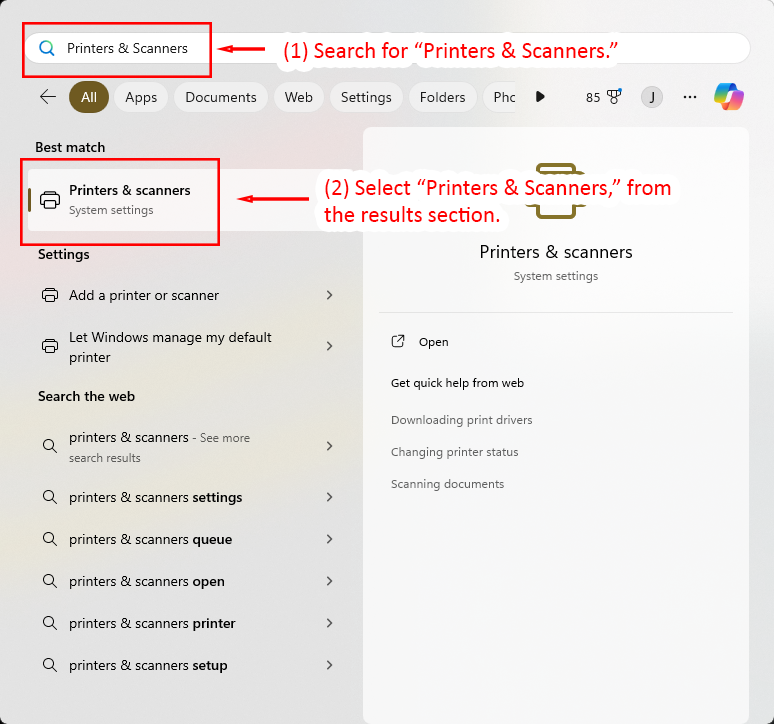
- Click the Start icon, or press the Windows Key, and search for "Printers & Scanners."
- Select "Printers & Scanners," from the results section.
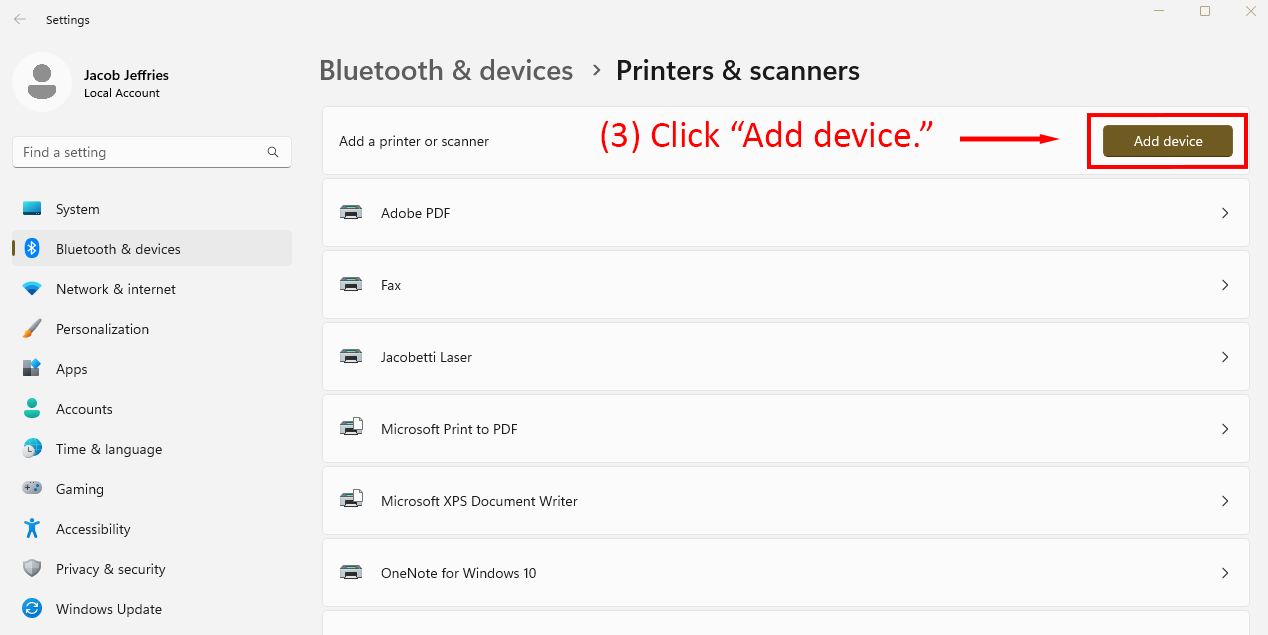
- Once the Settings panel loads, click on, "Add Device."
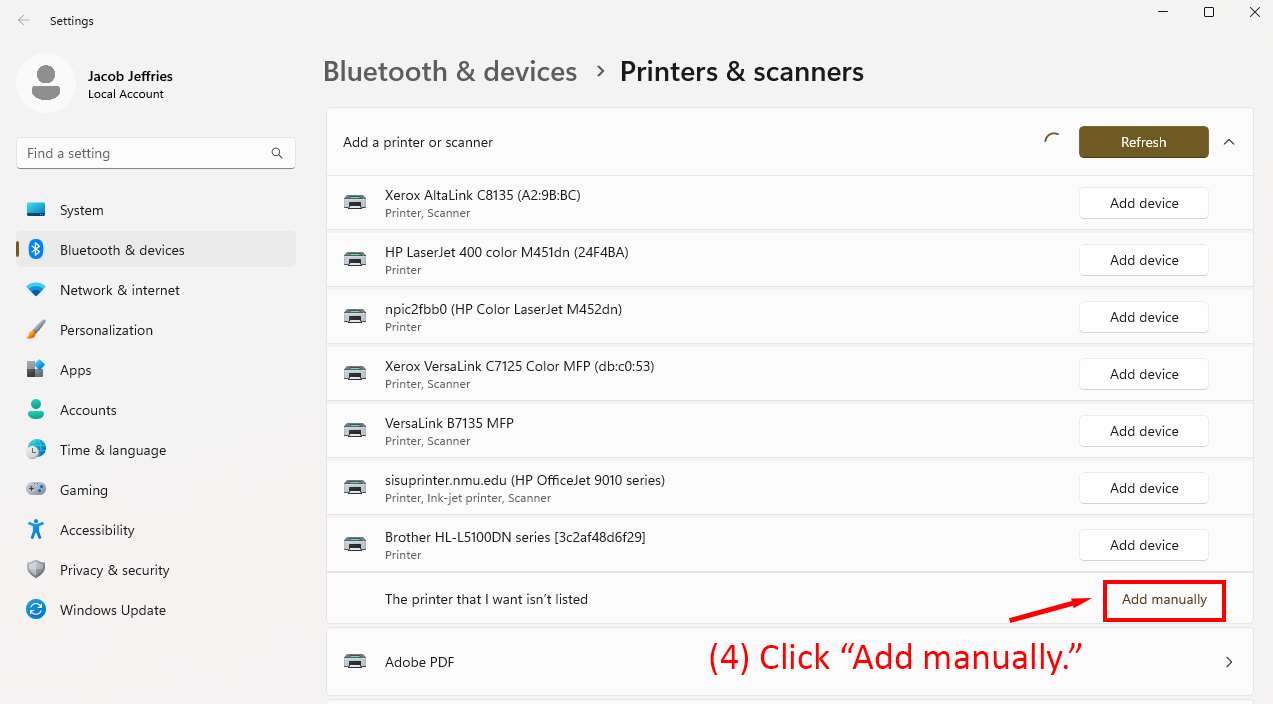
- After Windows scans for devices, click on, "Add manually."
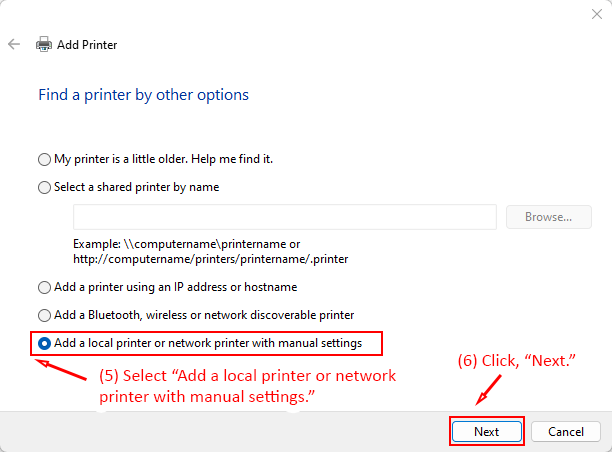
- On the Add Printer interface, select, "Add a local printer or network printer with manual settings," then click, "Next."
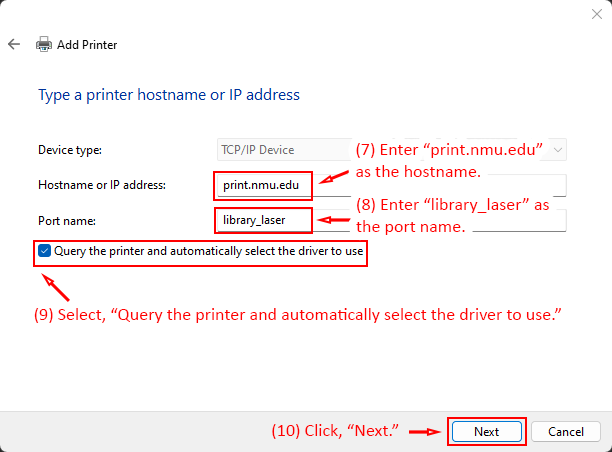
- Enter "print.nmu.edu" as the hostname.
- Enter "library_laser" as the port name.
- Select, "Query the printer and automatically select the driver to use."
- Click, "Next."
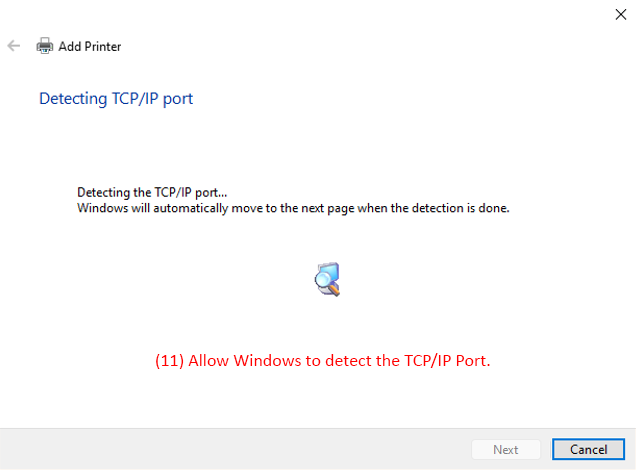
- Allow Windows to detect the TCP/IP port.
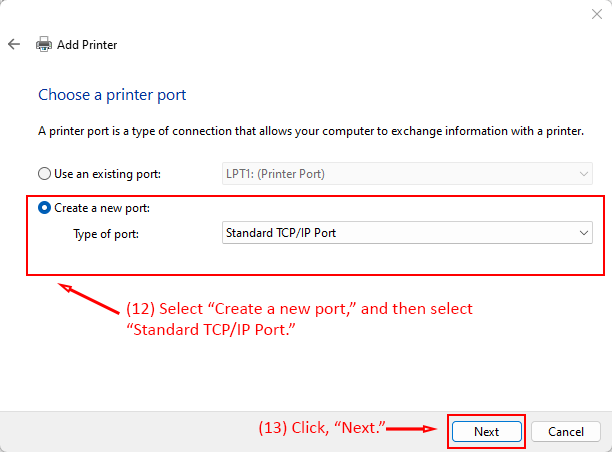
- Select, "Create a new port," and then select "Standard TCP/IP Port."
- Click, "Next."
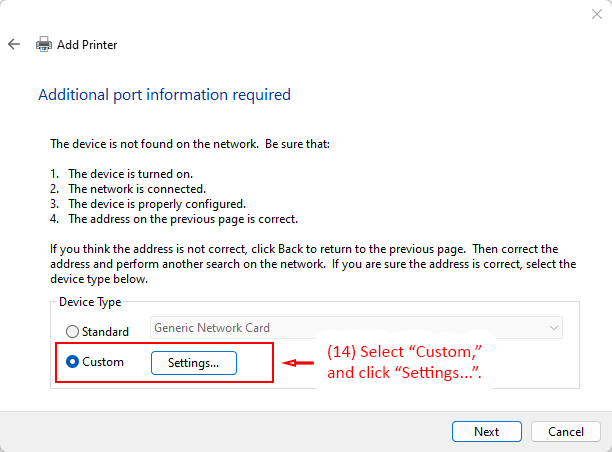
- Select, "Custom," and then click, "Settings...".
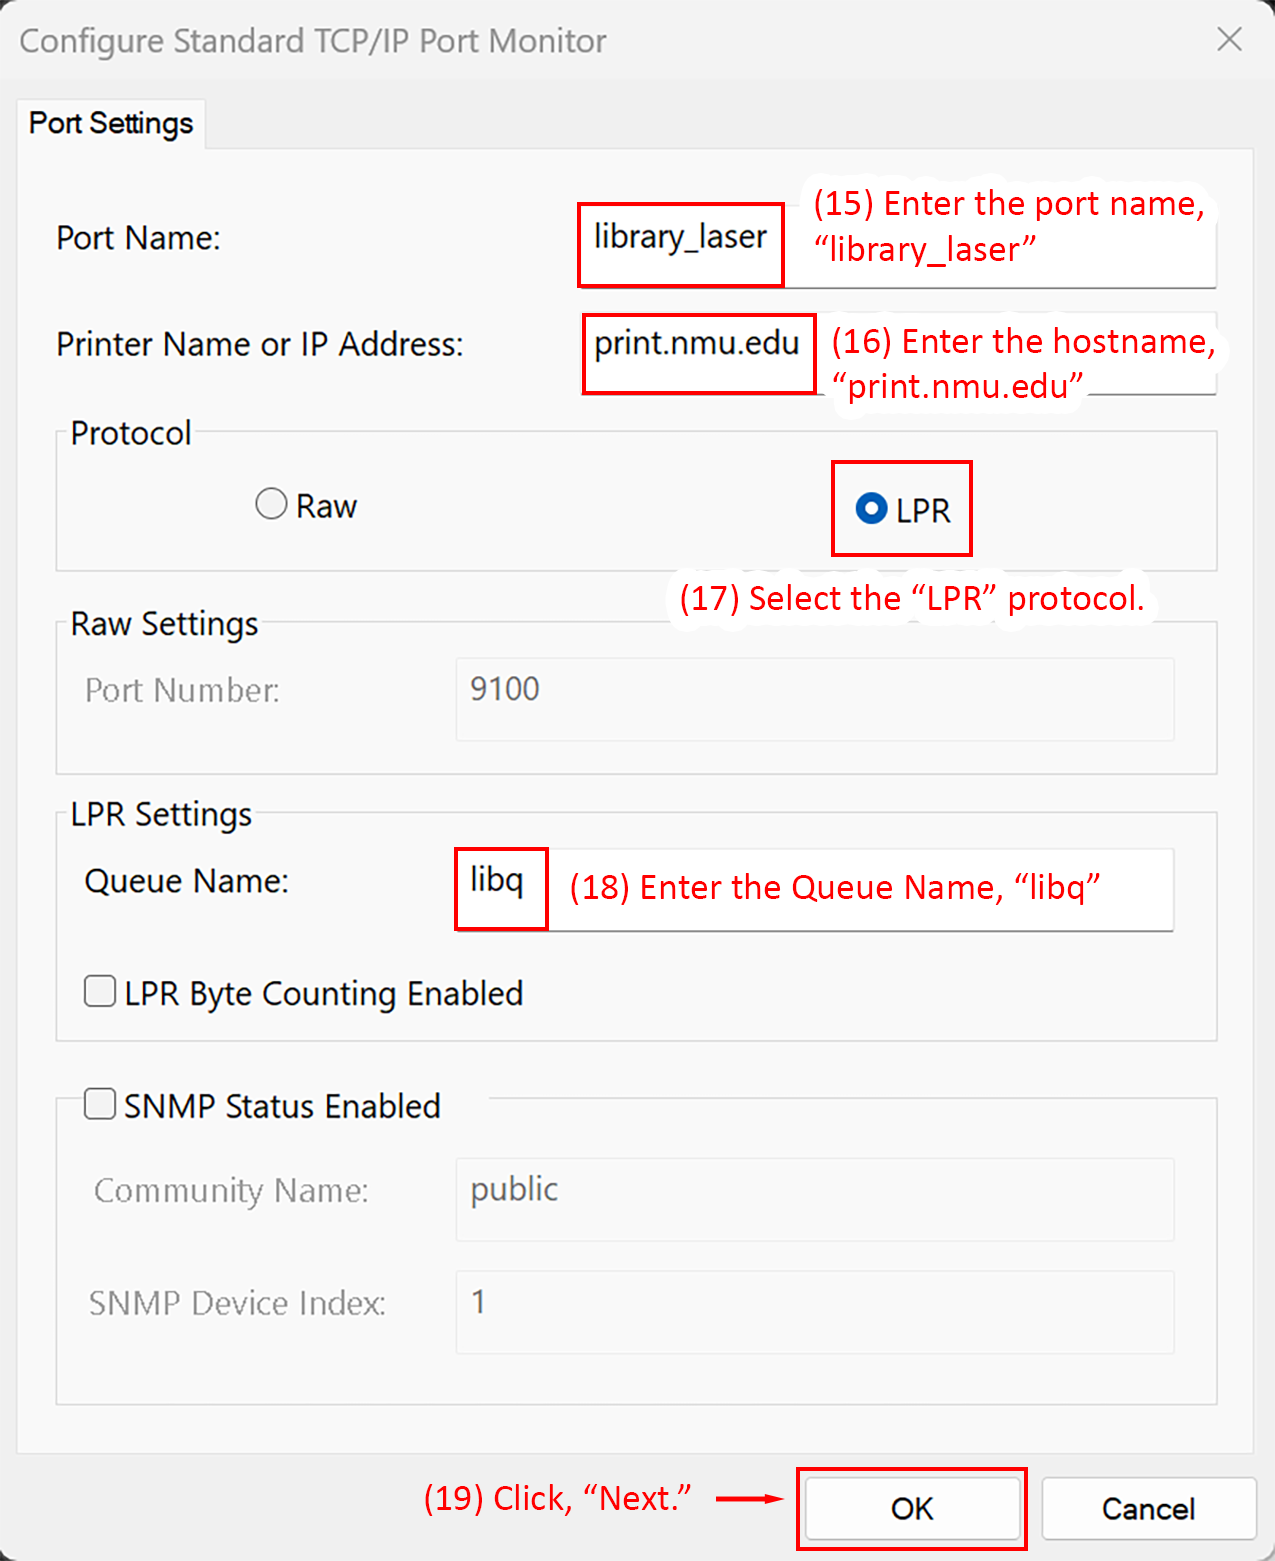
- Enter the port name, "library_laser"
- Enter the hostname, "print.nmu.edu"
- Select the "LPR," protocol
- Enter the Queue Name, "libq"
- Click, "Next."
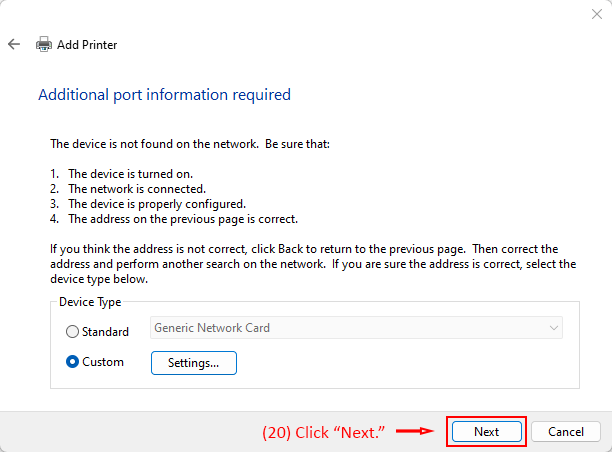
- Click, "Next."
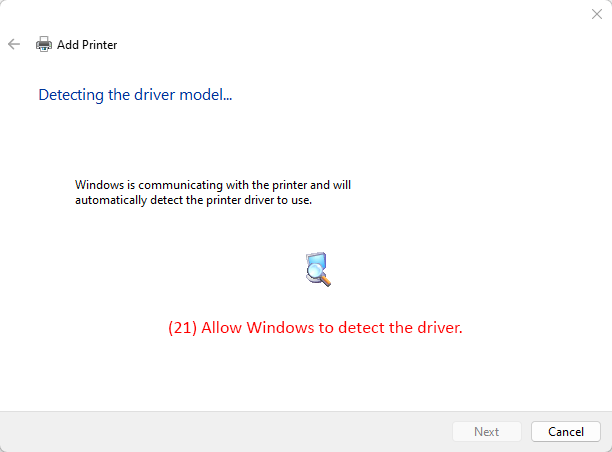
- Allow Windows to detect the driver.
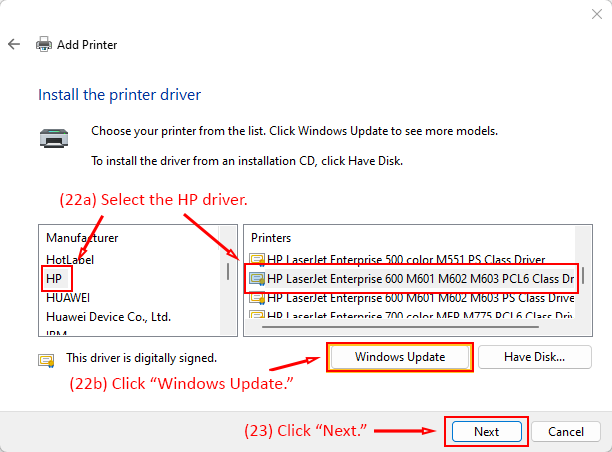
- Install the printer driver.
- Select "HP" in the Manufacturer column, and then select "HP LaserJet Enterprise 600 M601 M602 M603 PCL6 Class Driver," in the Printer column.
- If you do not see this driver available, you must click on the "Windows Update," button to allow Windows to pull the latest driver from the internet. An update window will open and you will be automatically returned to the Install printer driver interface. While this is not a full Windows update, it can take a few minutes to download and add the new drivers - this is normal.
- Click, "Next."
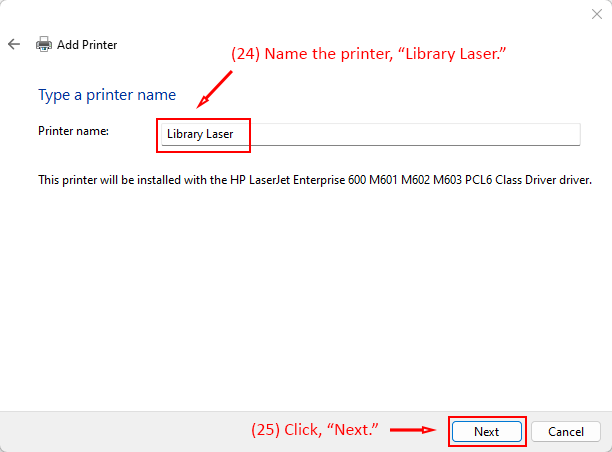
- Name the printer, "Library Laser."
- Click, "Next"
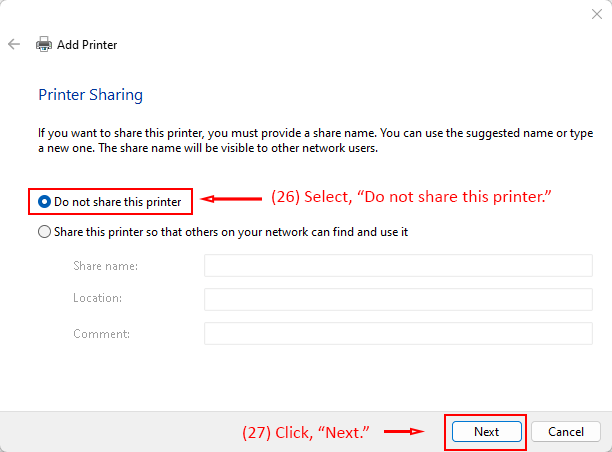
- Select, "Do not share this printer."
- Click, "Next"
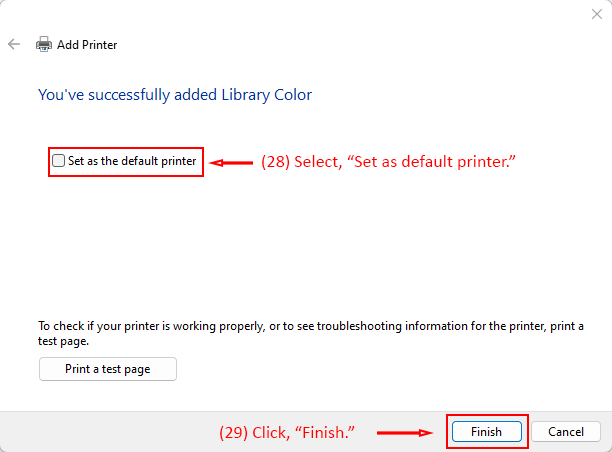
- OPTIONAL: Select, "Set as default printer."
- Click, "Finish."
Enabling Double-Sided Printing
Continue with the following steps to enable duplex (double-sided), printing using the Library Laser Printer.
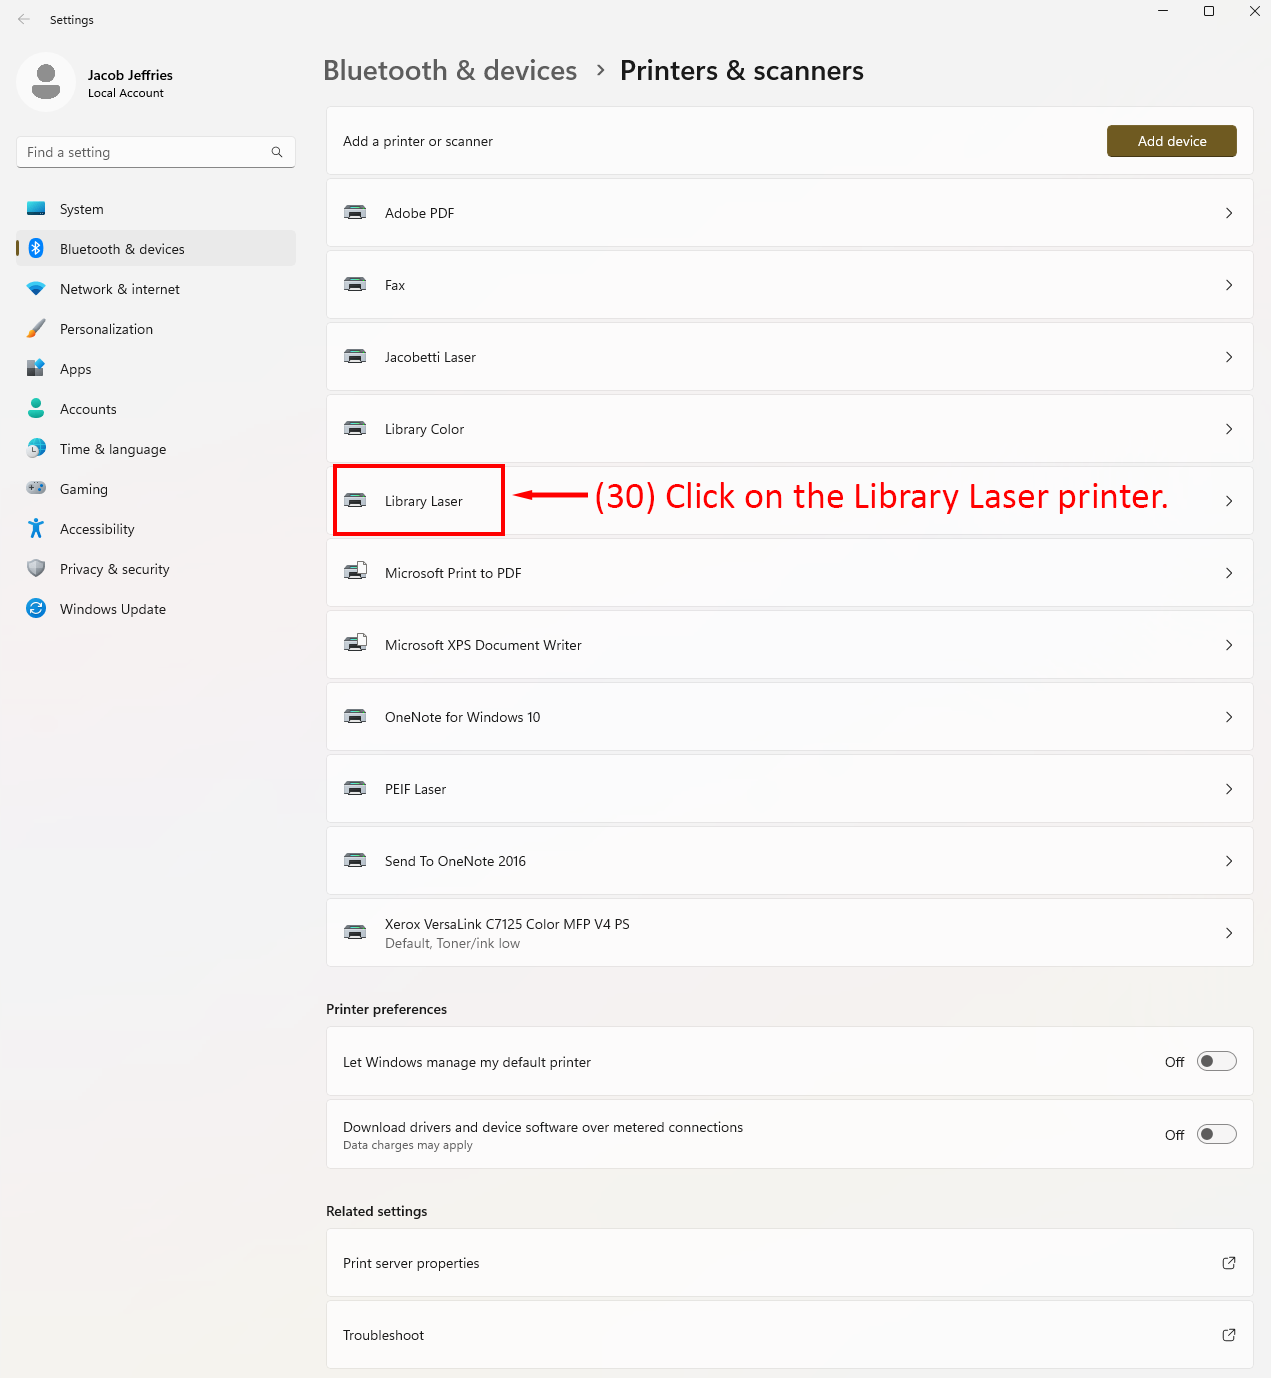
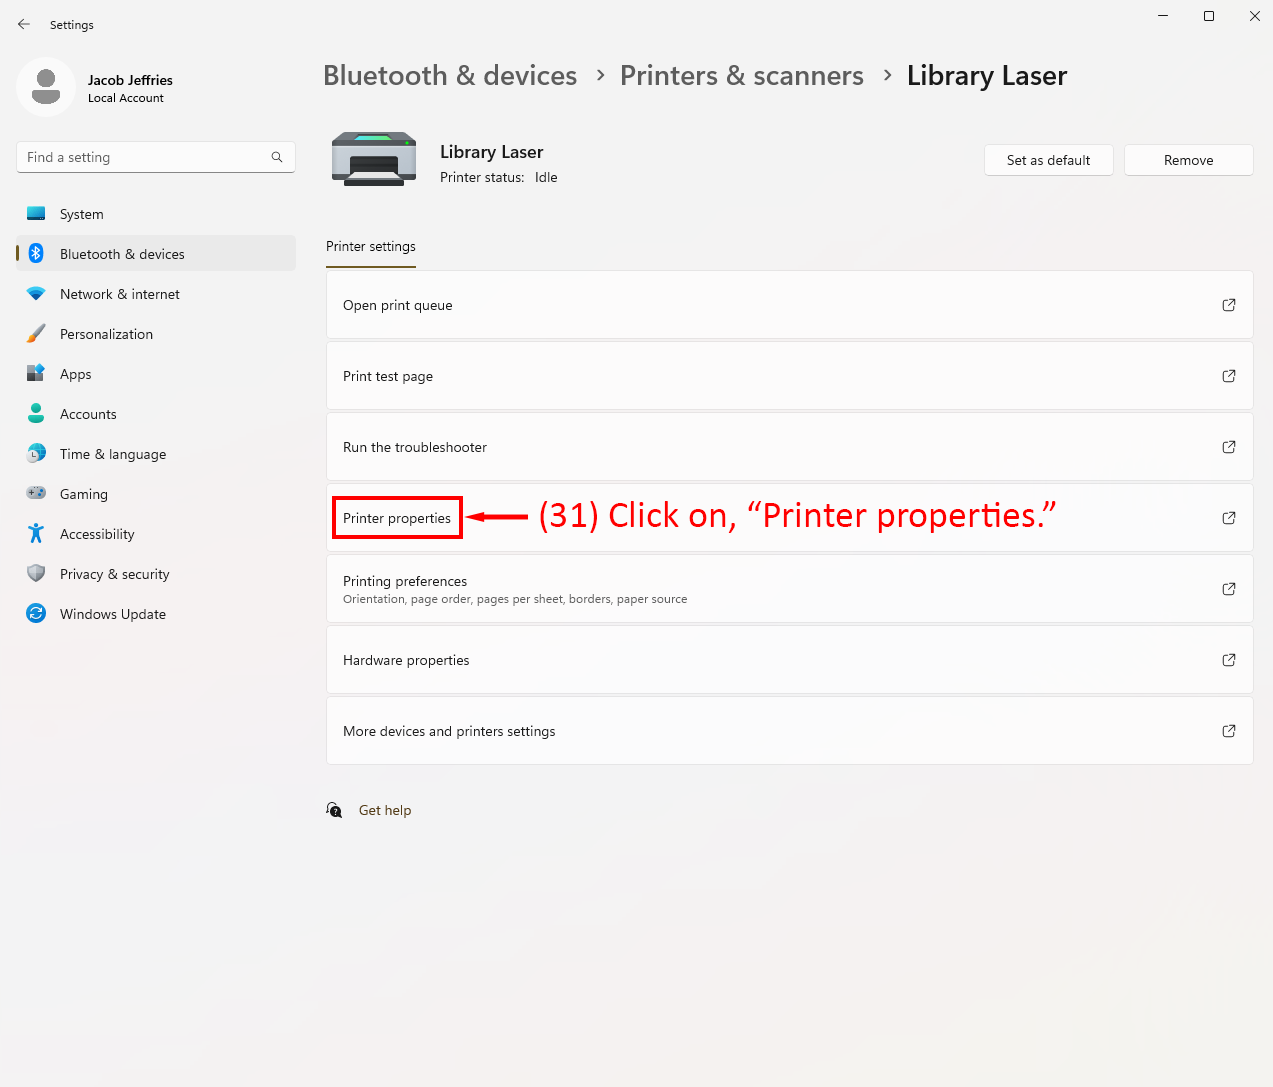
- Click on the Library Laser printer to open the printer options.
- Click on, "Printer properties."
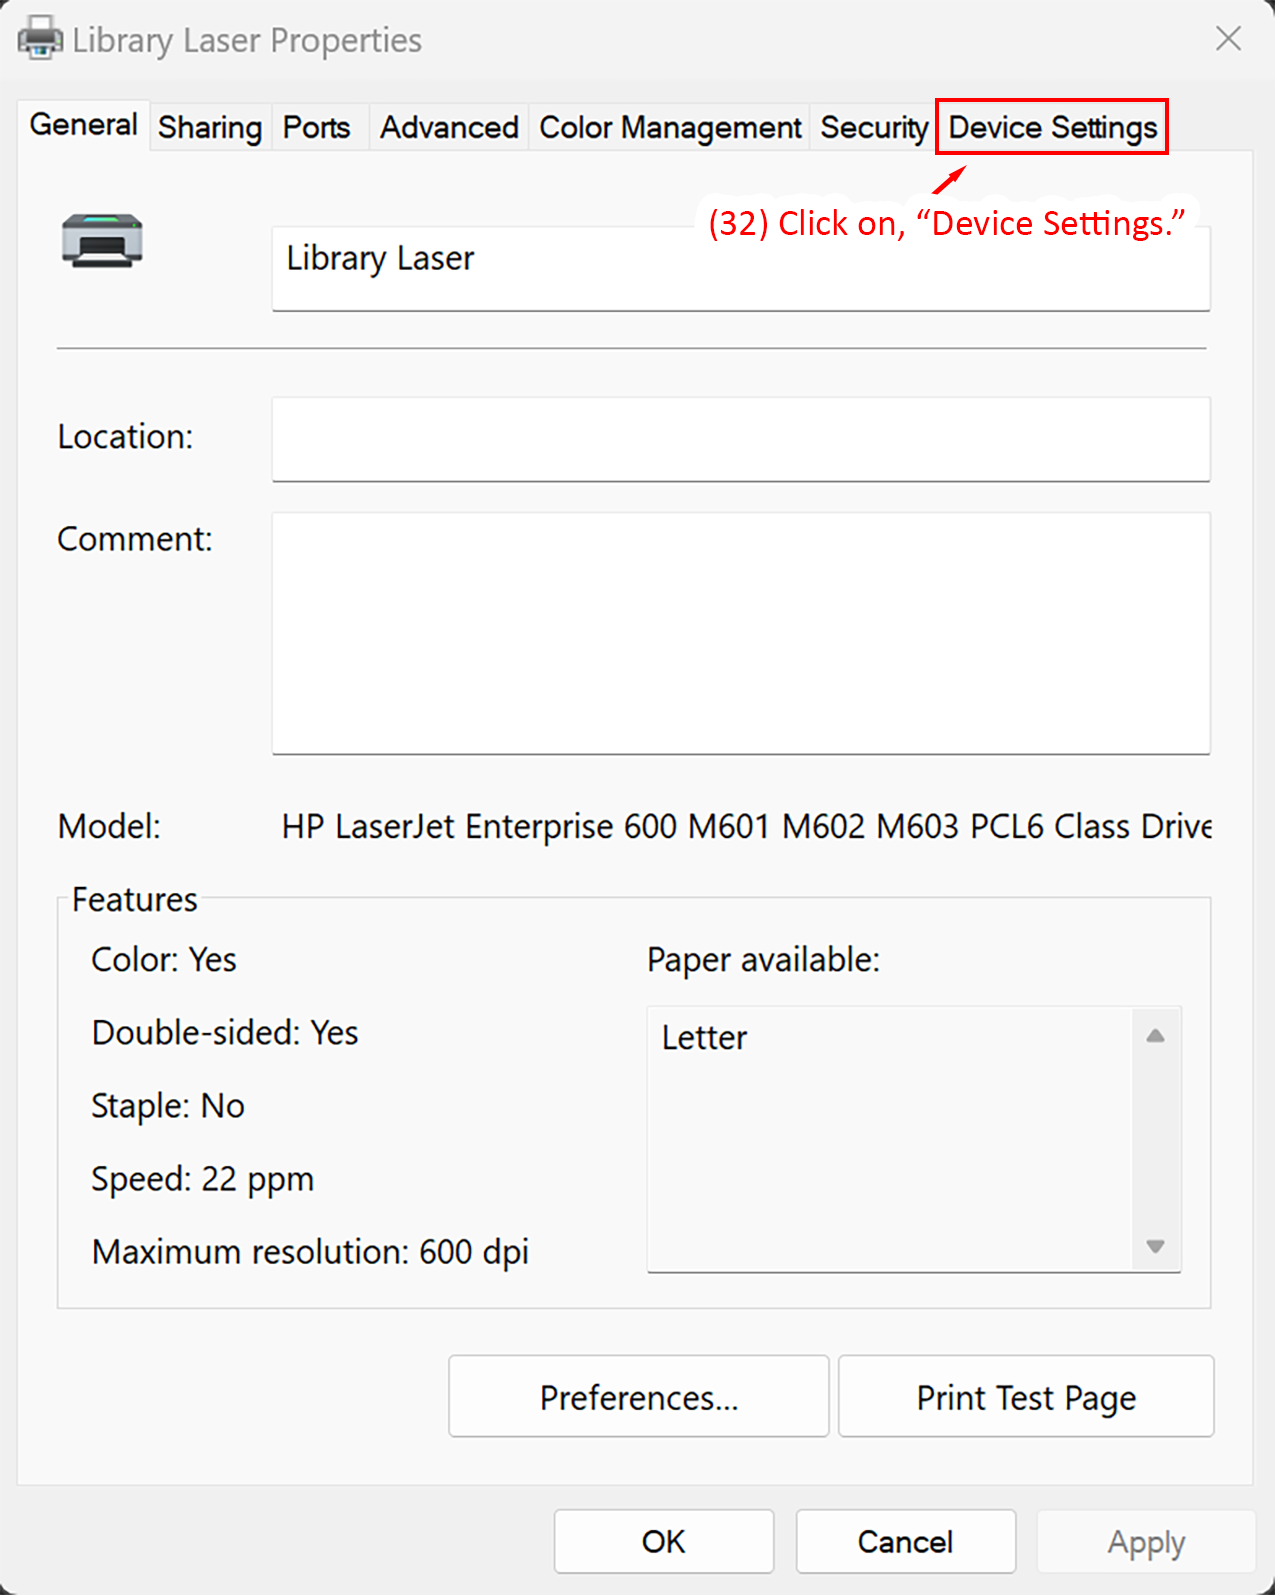
- Click on, "Device Settings."
- Select, "Installed," in the dropdown menu for Duplex Unit.
- Click, "OK."
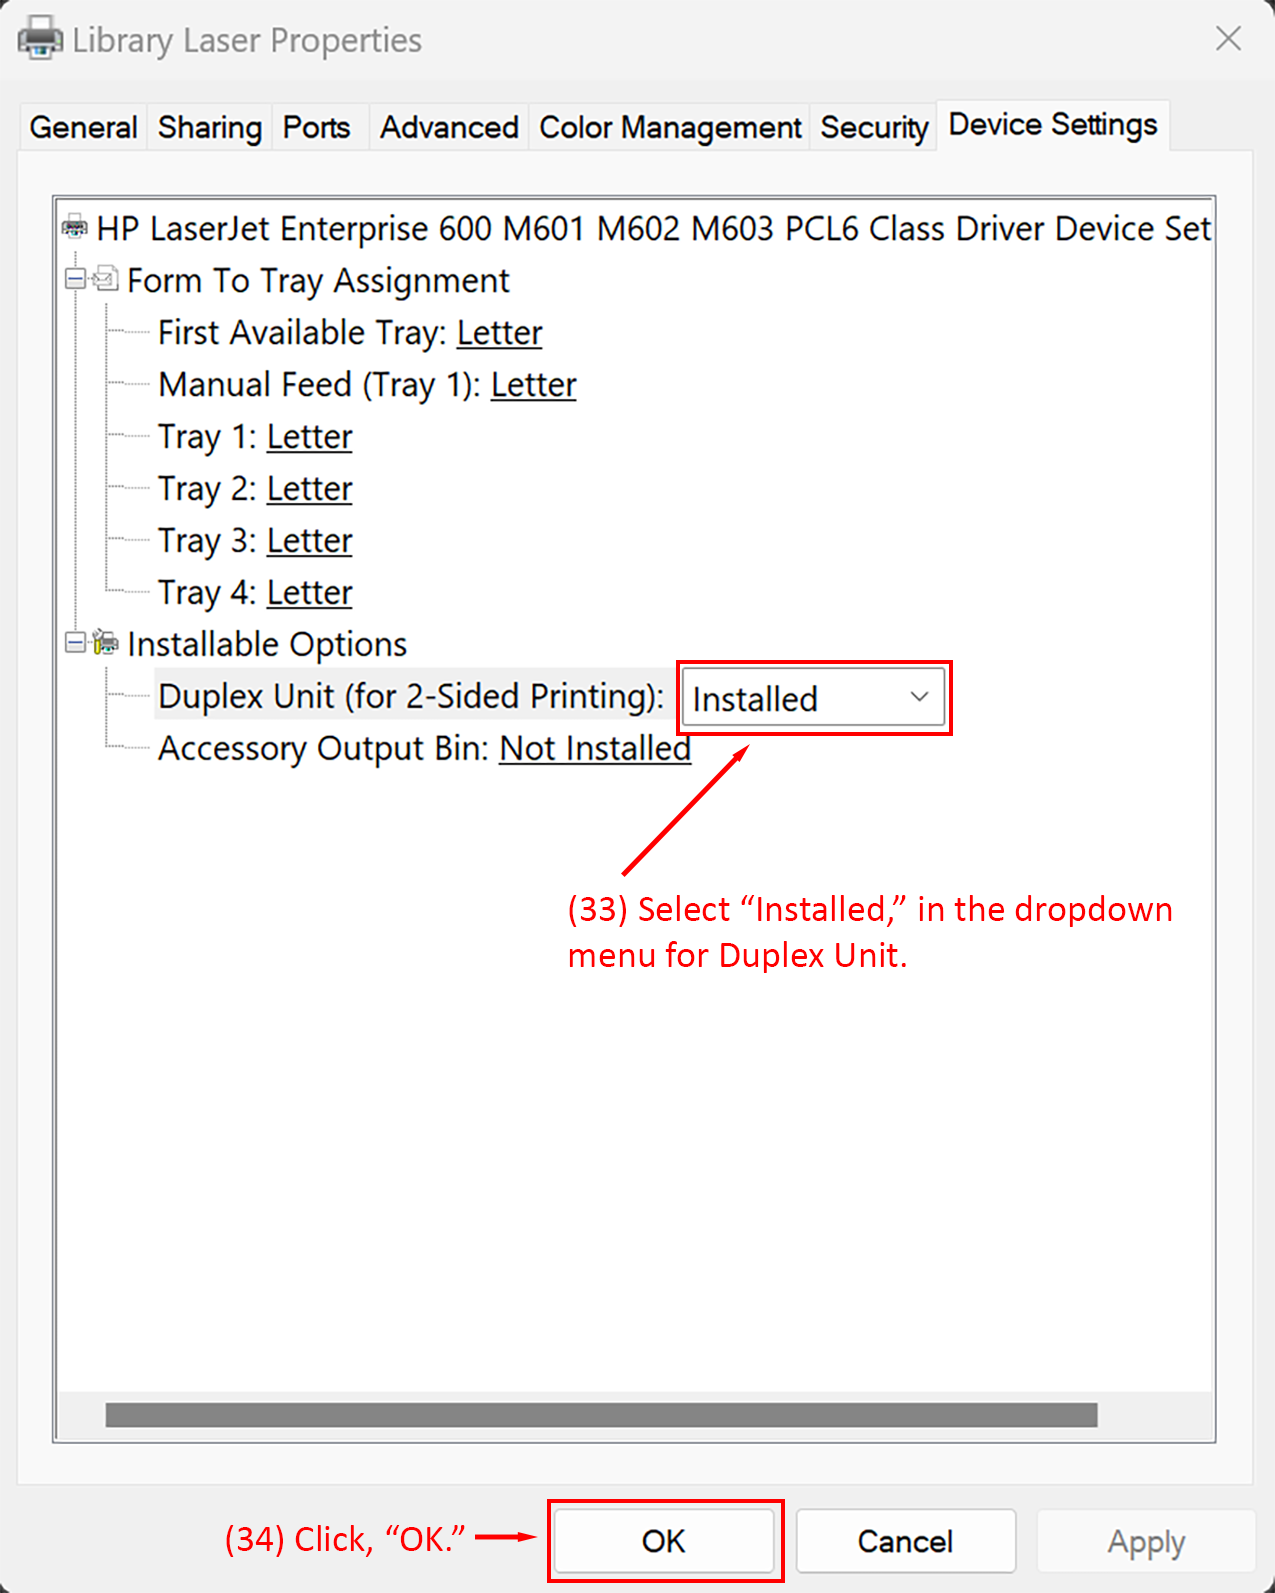
Congratulations! The Library Laser printer is now installed and configured for single and double-sided printing.
Installing on Windows 11
The following set of instructions will guide you in installing the Library Black & White printer on a Windows 11 computer. This process may vary slightly on different versions of Windows, however the printer configuration options will remain the same (e.g. hostname and port configuration in steps 7-19). If you run into problems installing the printer, please contact the NMU Help Desk for alternative instructions.
- Click the Start icon, or press the Windows Key, and search for "Printers & Scanners."
- Select "Printers & Scanners," from the results section.
- Once the Settings panel loads, click on, "Add Device."
- After Windows scans for devices, click on, "Add manually."

- On the Add Printer interface, select, "Add a local printer or network printer with manual settings," then click, "Next."
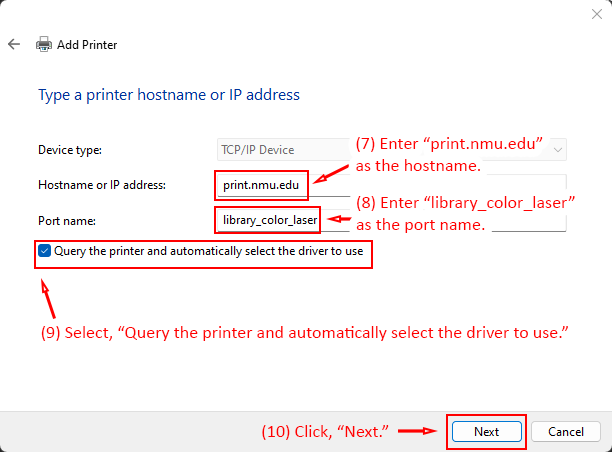
- Enter "print.nmu.edu" as the hostname.
- Enter "library_color_laser" as the port name.
- Select, "Query the printer and automatically select the driver to use."
- Click, "Next."
- Allow Windows to detect the TCP/IP port.
- Select, "Create a new port," and then select "Standard TCP/IP Port."
- Click, "Next."
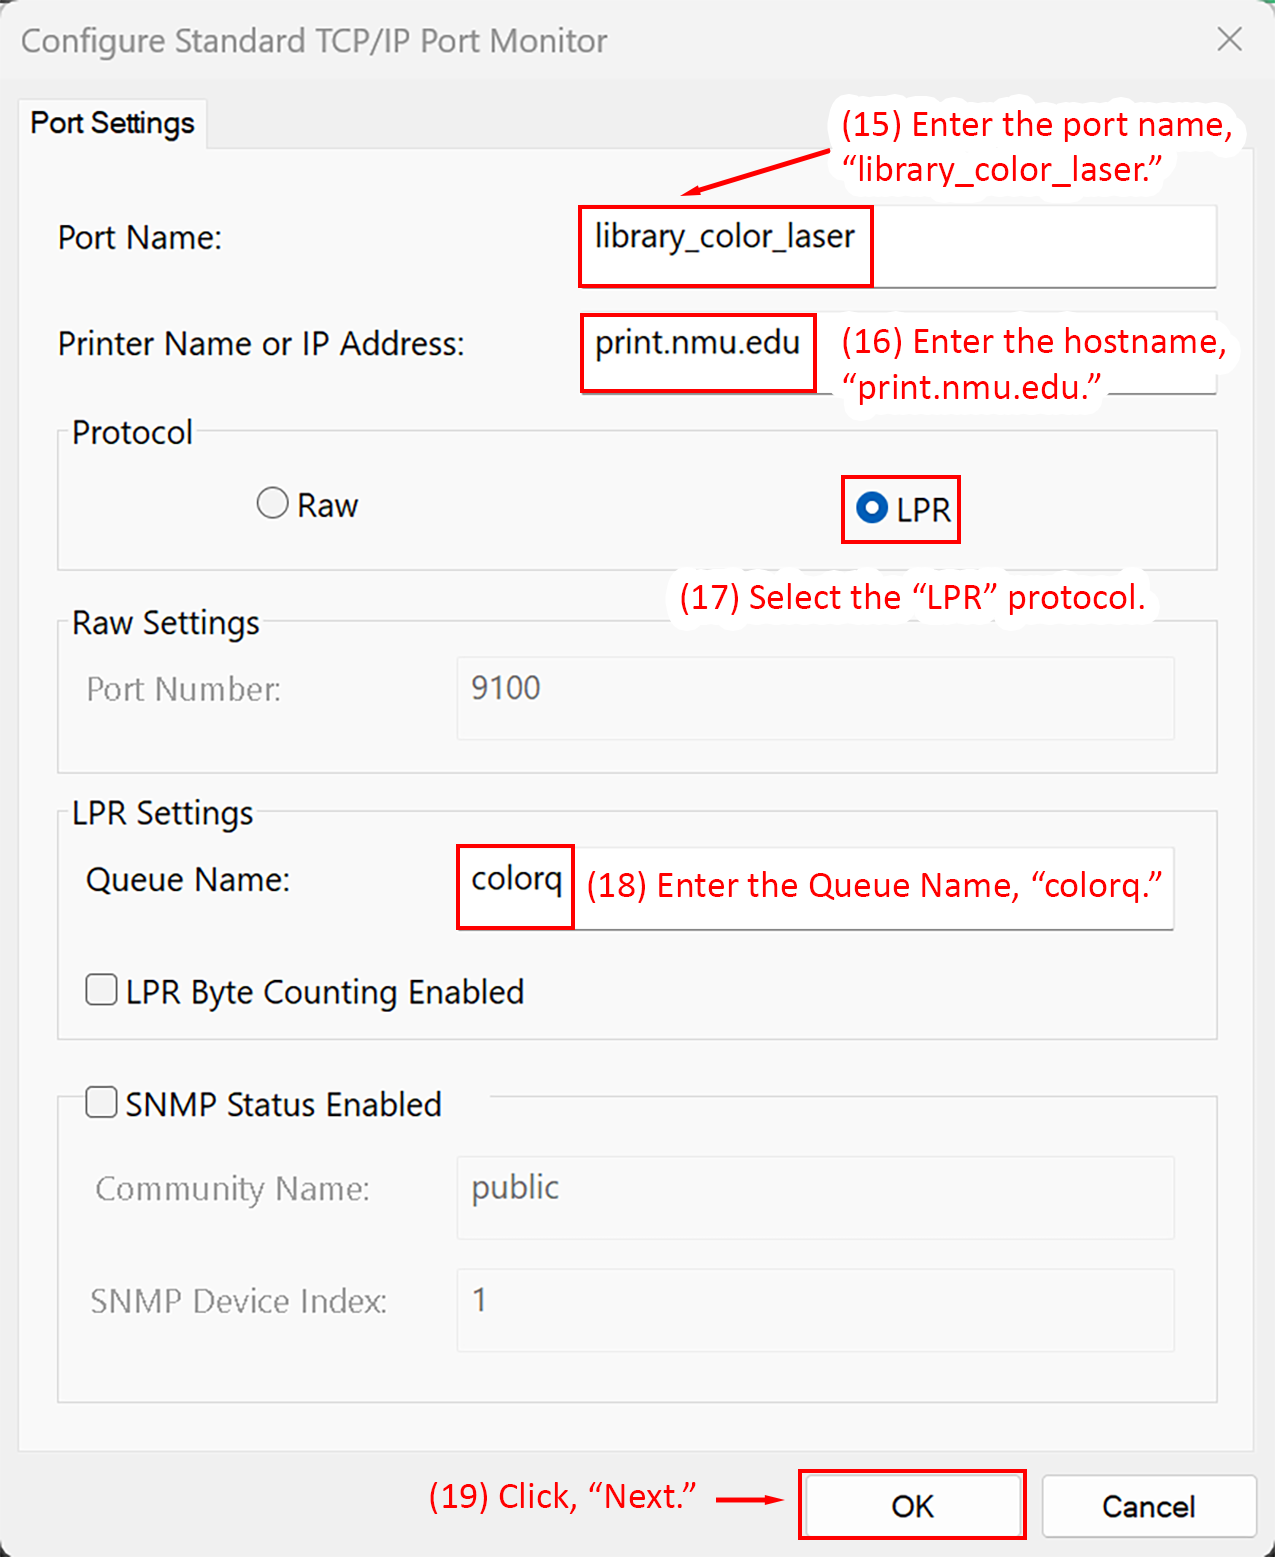
- Select, "Custom," and then click, "Settings...".
- Enter the port name, "library_color_laser"
- Enter the hostname, "print.nmu.edu"
- Select the "LPR," protocol
- Enter the Queue Name, "colorq"
- Click, "Next."
- Click, "Next."
- Allow Windows to detect the driver.
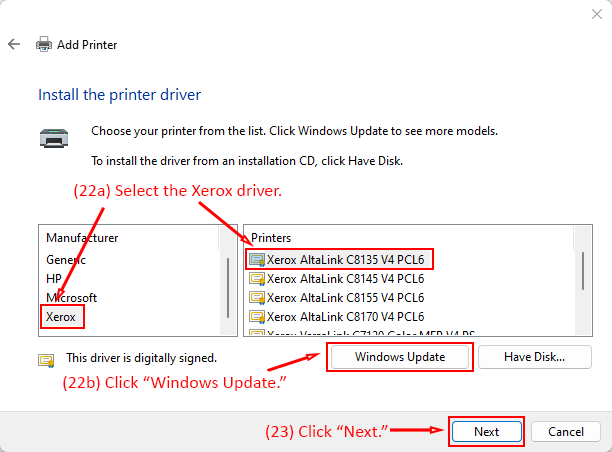
- Install the printer driver.
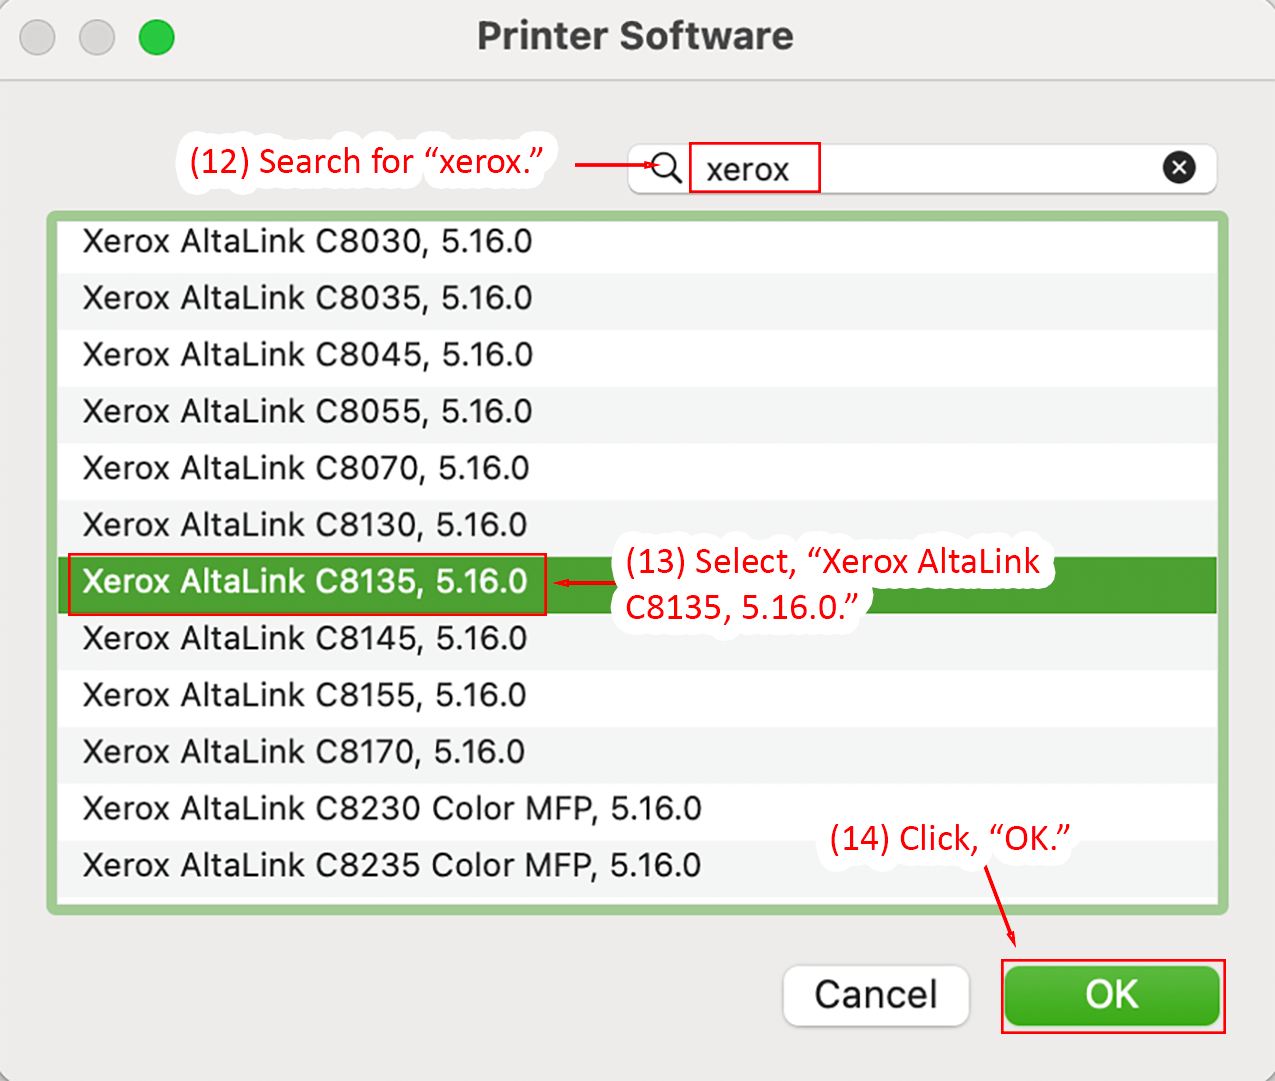
- Select "Xerox" in the Manufacturer column, and then select "Xerox AltaLink C8135 V4 PCL6," in the Printer column.
- If you do not see this driver available, you must click on the "Windows Update," button to allow Windows to pull the latest driver from the internet. An update window will open and you will be automatically returned to the Install printer driver interface. While this is not a full Windows update, it can take a few minutes to download and add the new drivers - this is normal.
- Click, "Next."
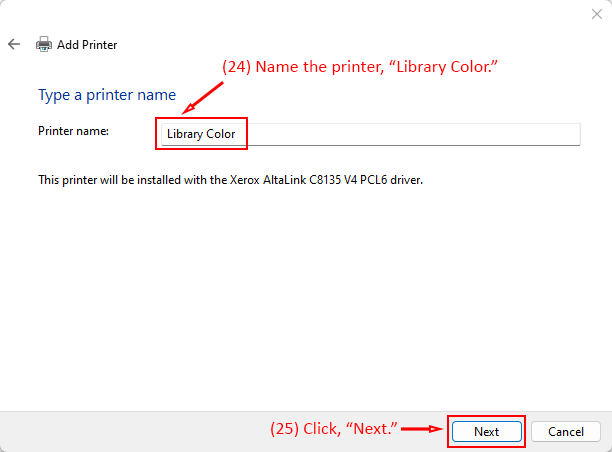
- Name the printer, "Library Color."
- Click, "Next"
- Select, "Do not share this printer."
- Click, "Next"
- OPTIONAL: Select, "Set as default printer."
- Click, "Finish."
Congratulations! The Library Color Laser printer is now installed and configured for single and double-sided printing.
Installing on Mac OS 15 Sequoia
The following set of instructions will guide you in installing the Library Black & White printer on a Mac OS 15 Sequoia computer. This process may vary slightly on different versions of Mac OS, however the printer configuration options will remain the same (e.g. hostname and port configuration in steps 7-14). If you run into problems installing the printer, please contact the NMU Help Desk for alternative instructions.
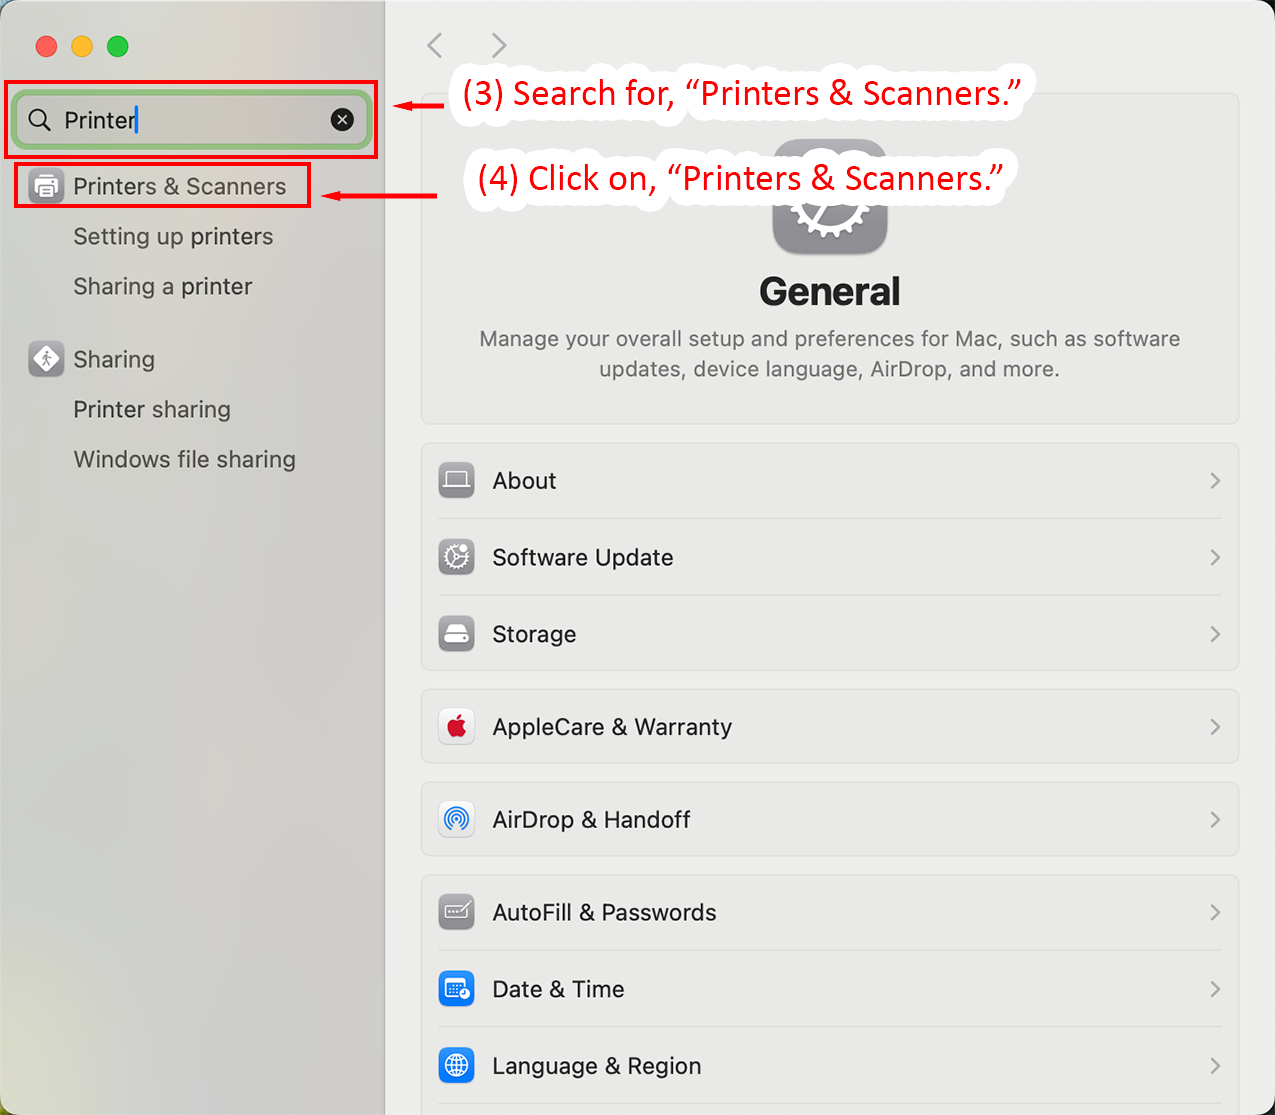
- Click on the Apple Icon, in the top-left of the screen.
- Click, "System Settings...".
- In the search box, search for, "Printers & Scanners."
- When the results load, click on, "Printers & Scanners."
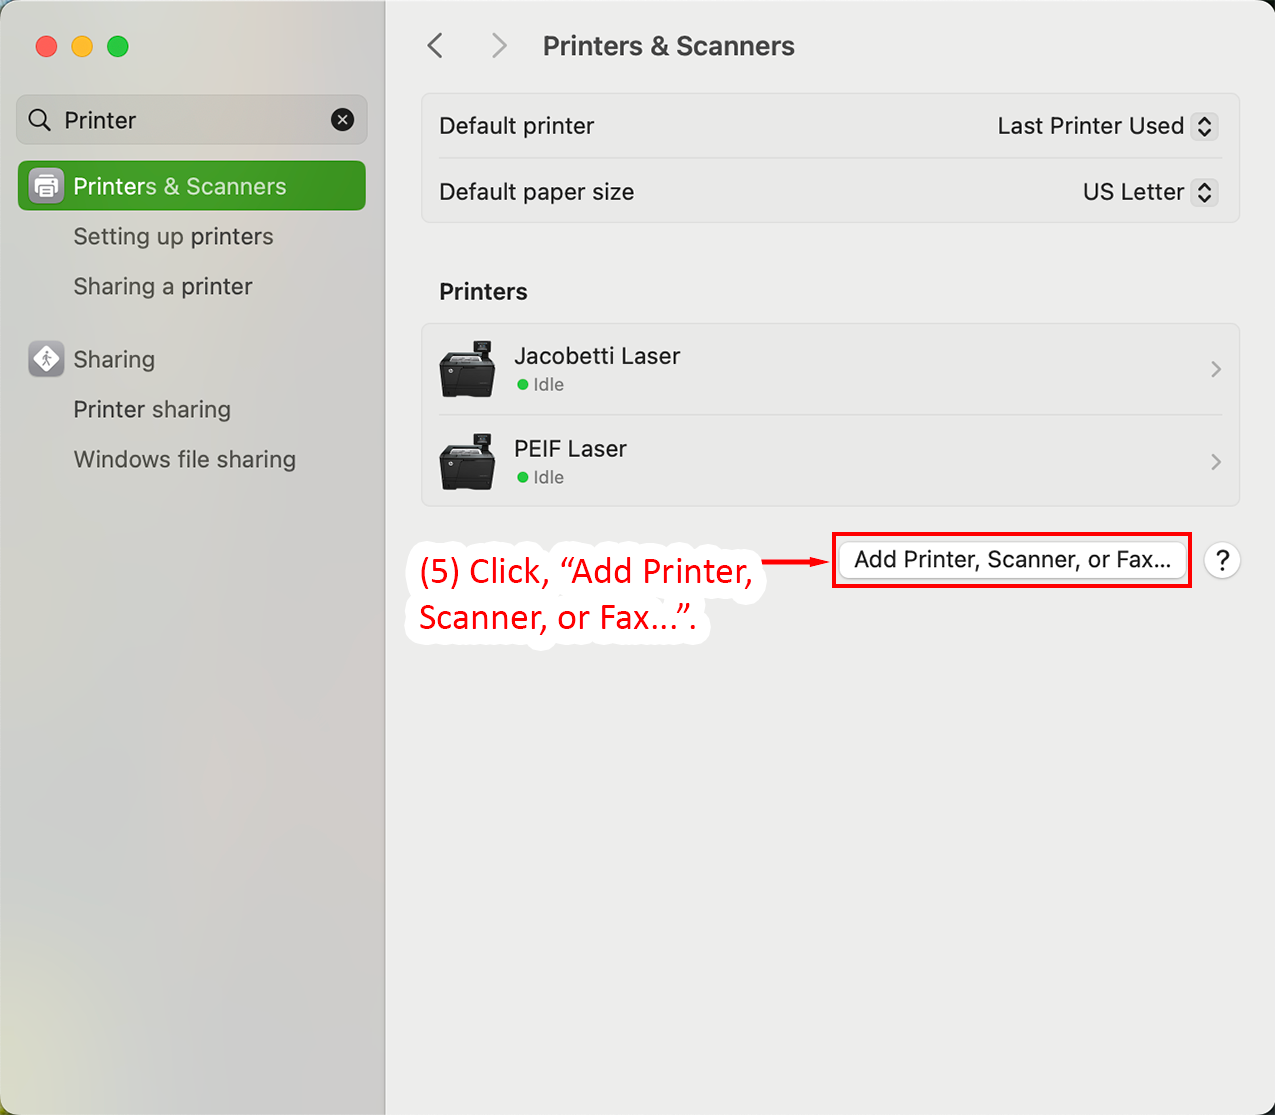
- Click, "Add Printer, Scanner, or Fax...".
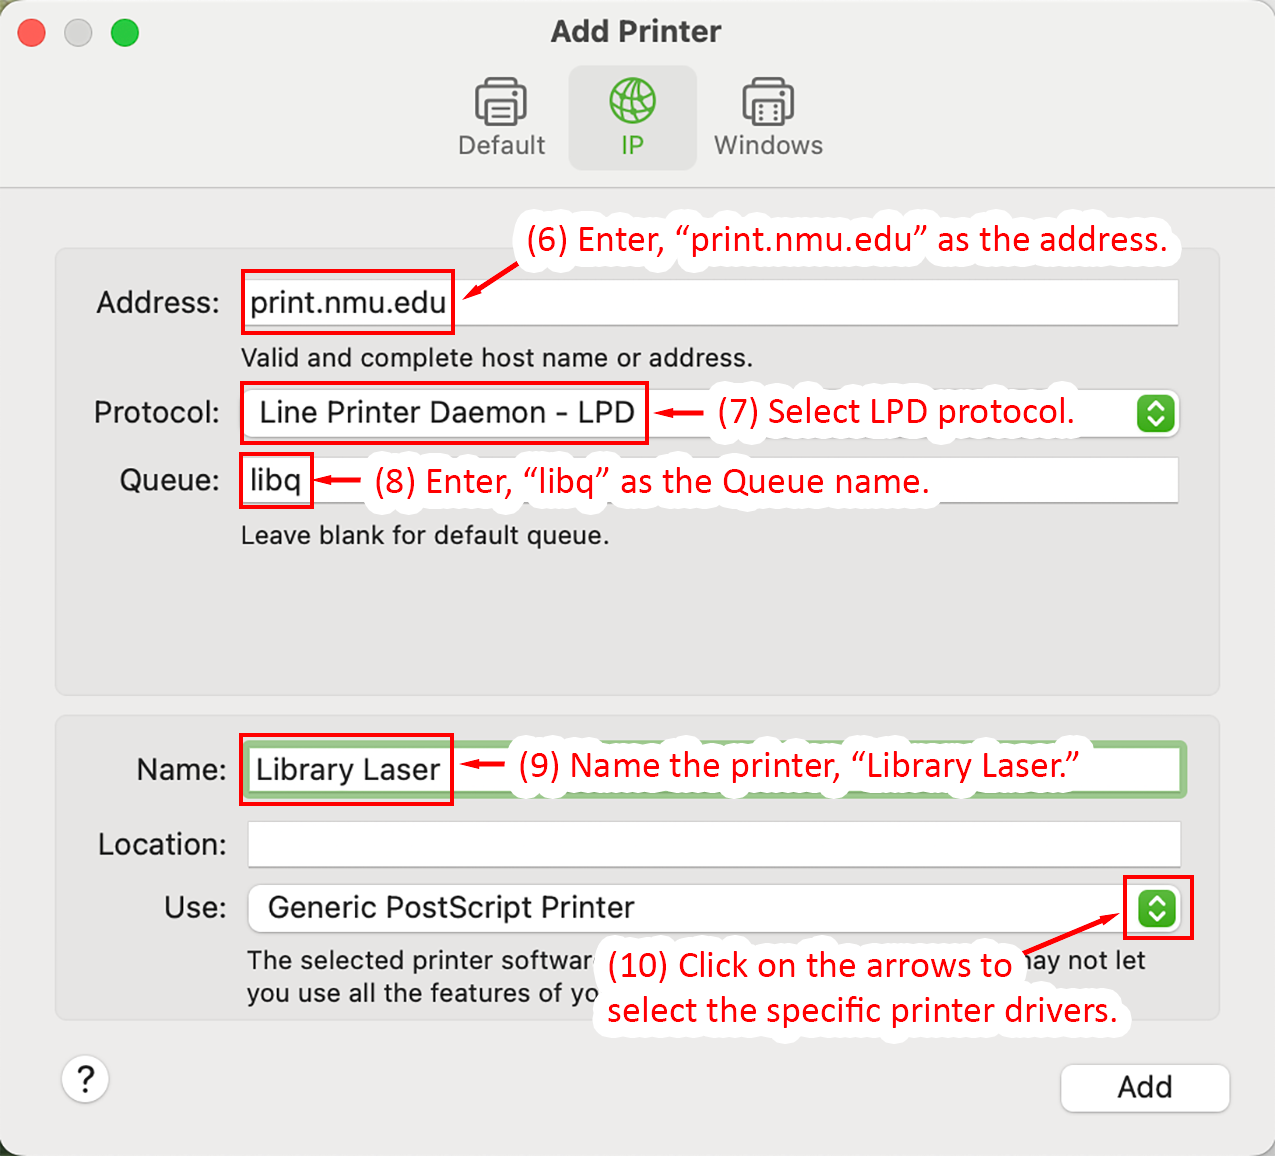
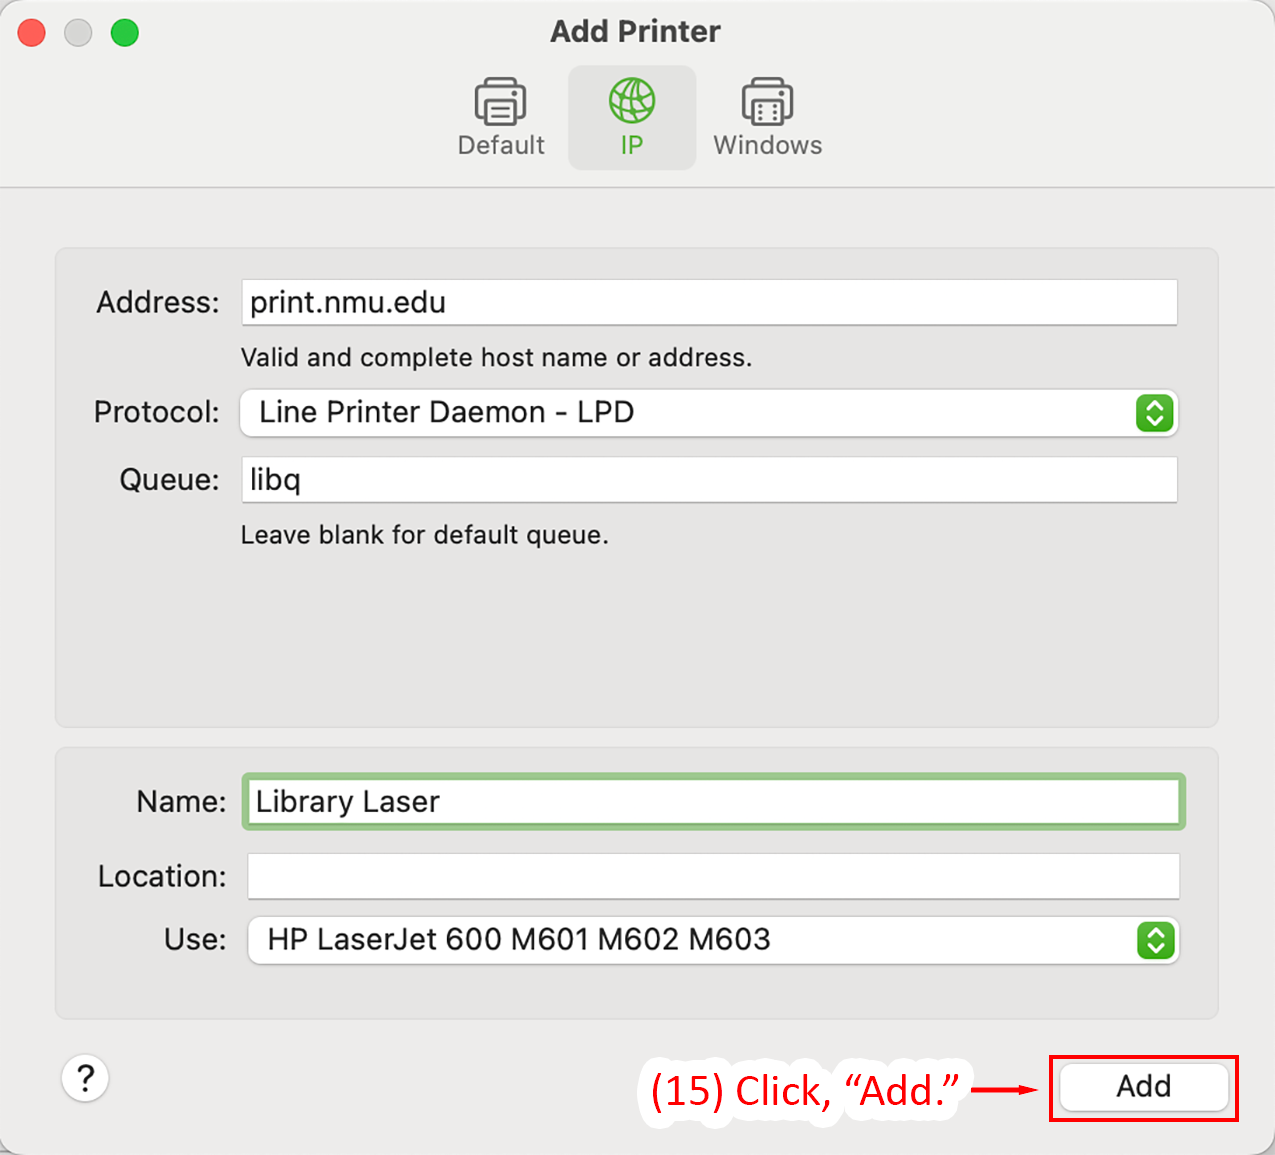
- Enter, "print.nmu.edu" as the address.
- Select LPD protocol.
- Enter, "libq" as the Queue name.
- Name the printer, "Library Laser."
- Click on the arrows to select the specific printer drivers.
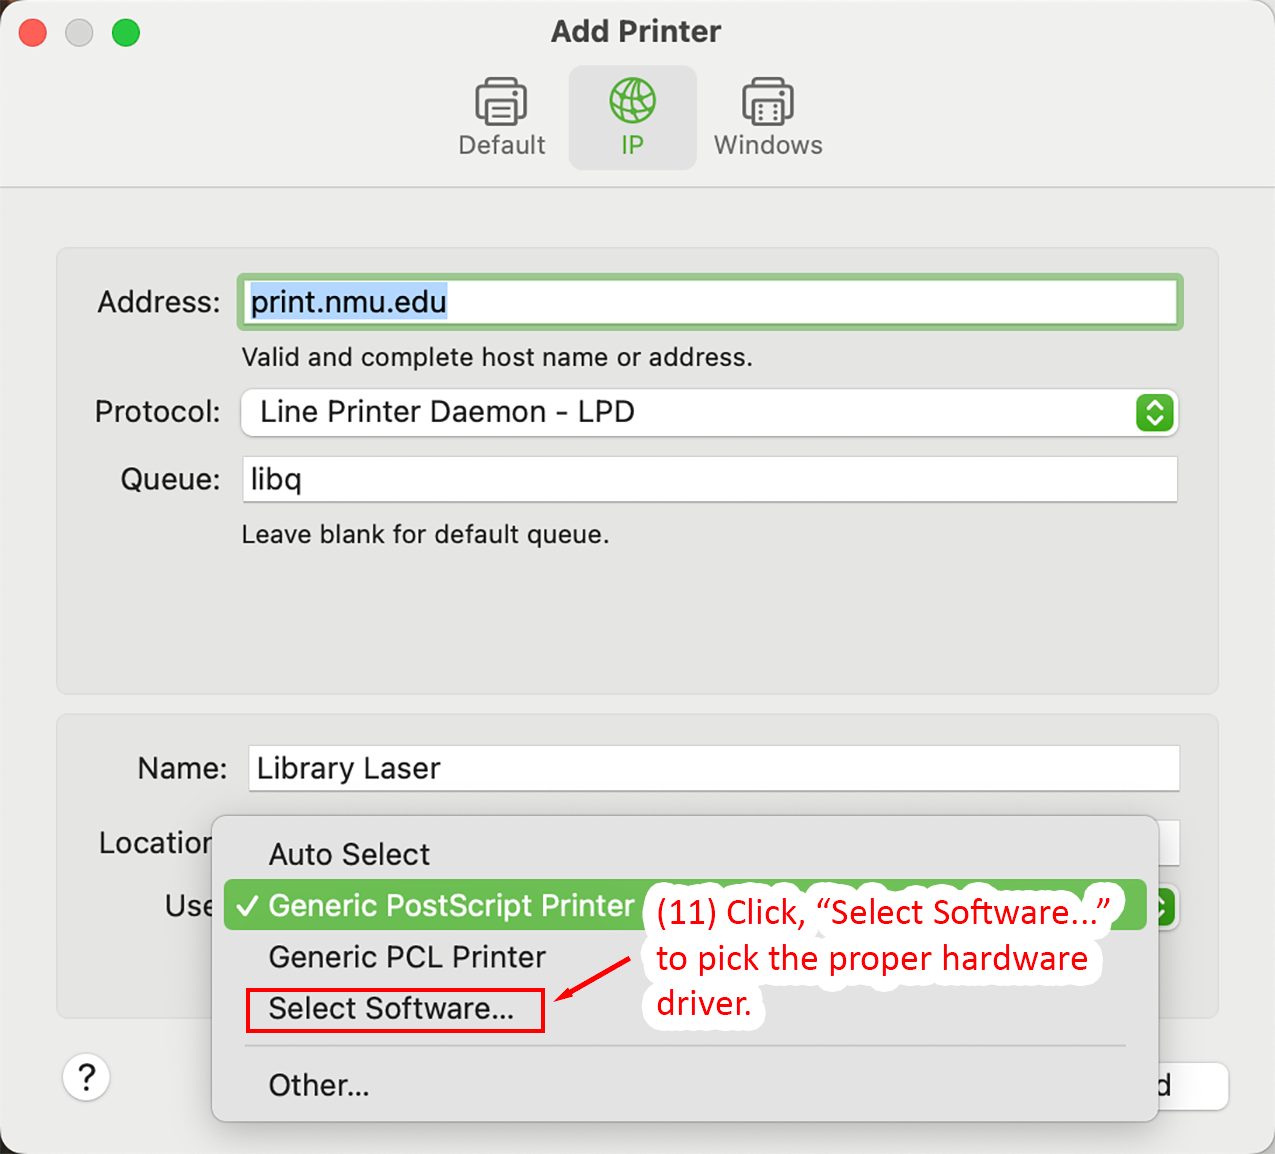
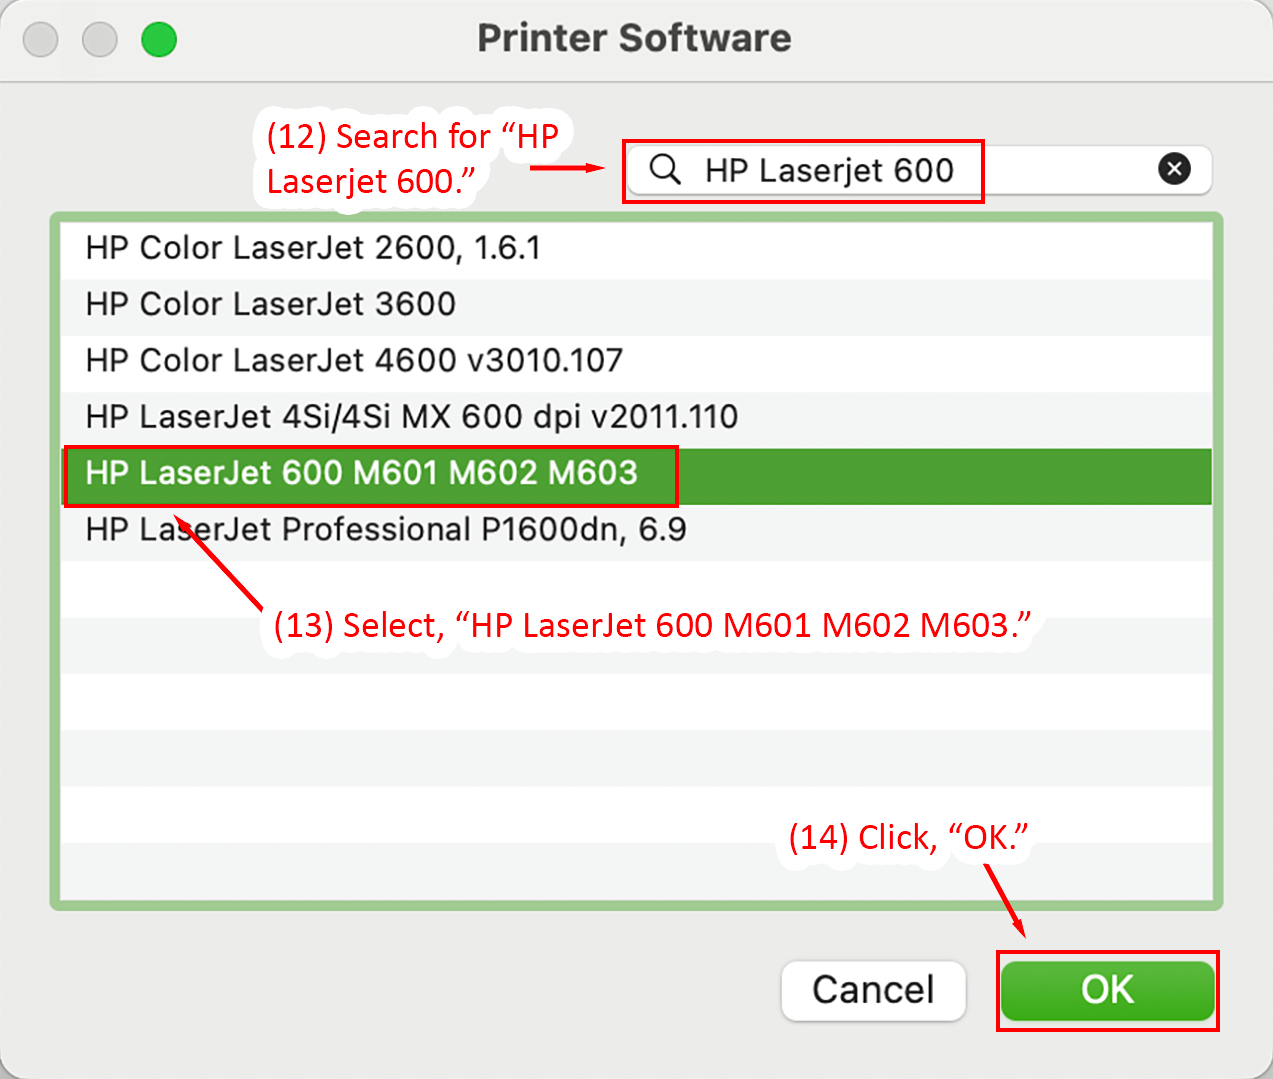
- Click, "Select Software..." to pick the proper hardware driver.
- Search for "HP Laserjet 600."
- Select, "HP LaserJet 600 M601 M602 M603."
- Click, "OK."
- Click, "Add."
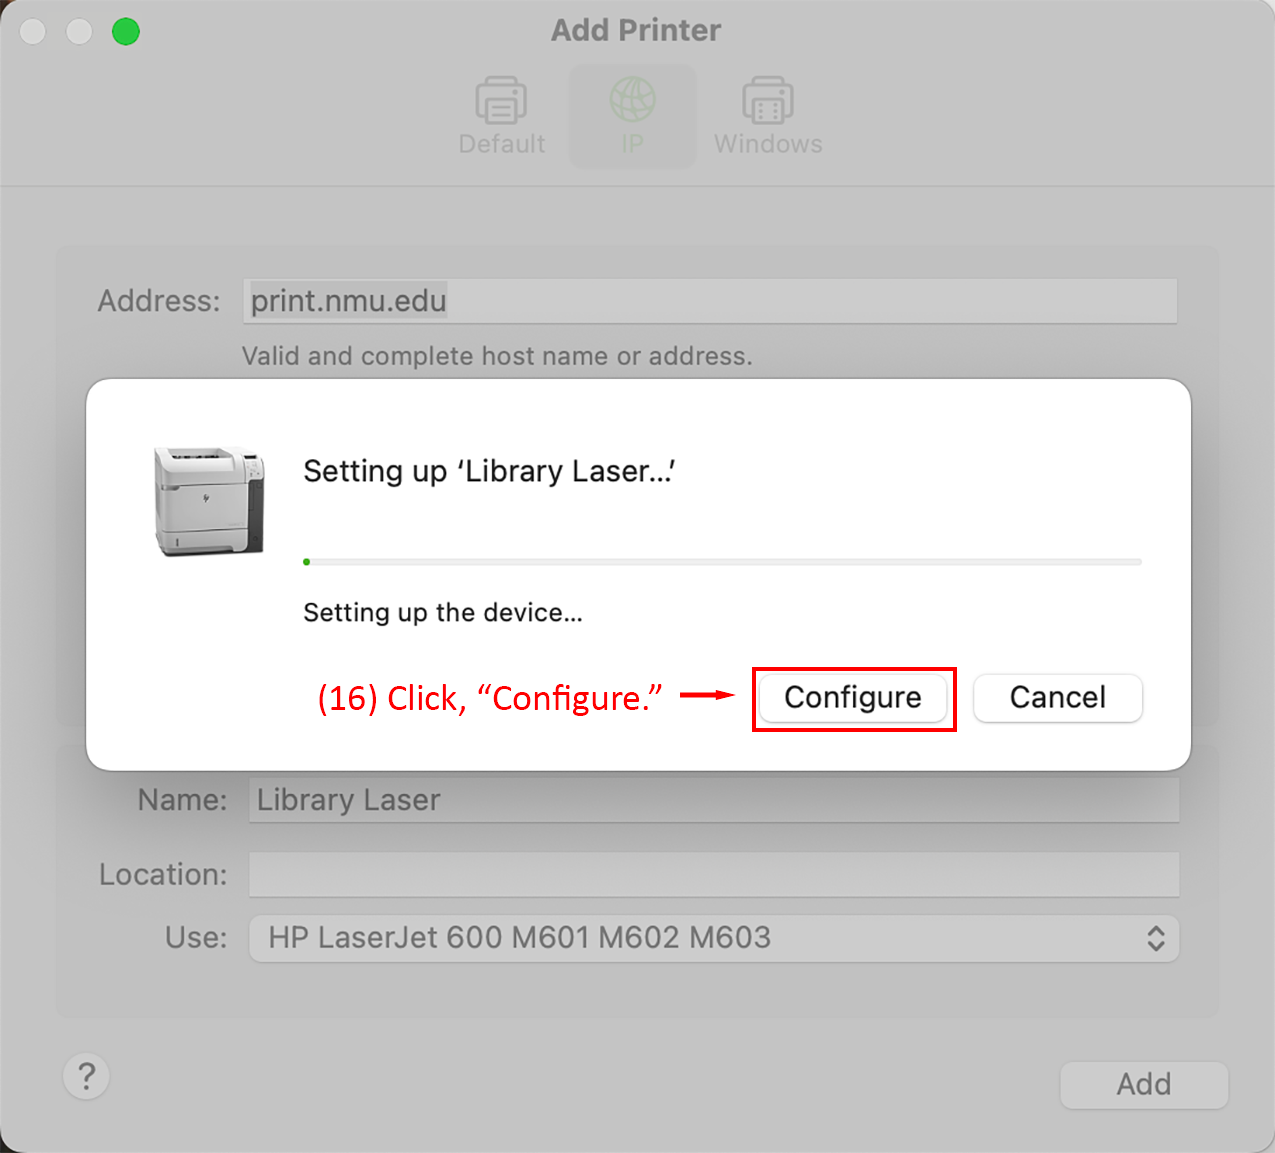
- Click, "Configure."
- Enable the toggle for Duplex Unit, this enables double-sided printing.
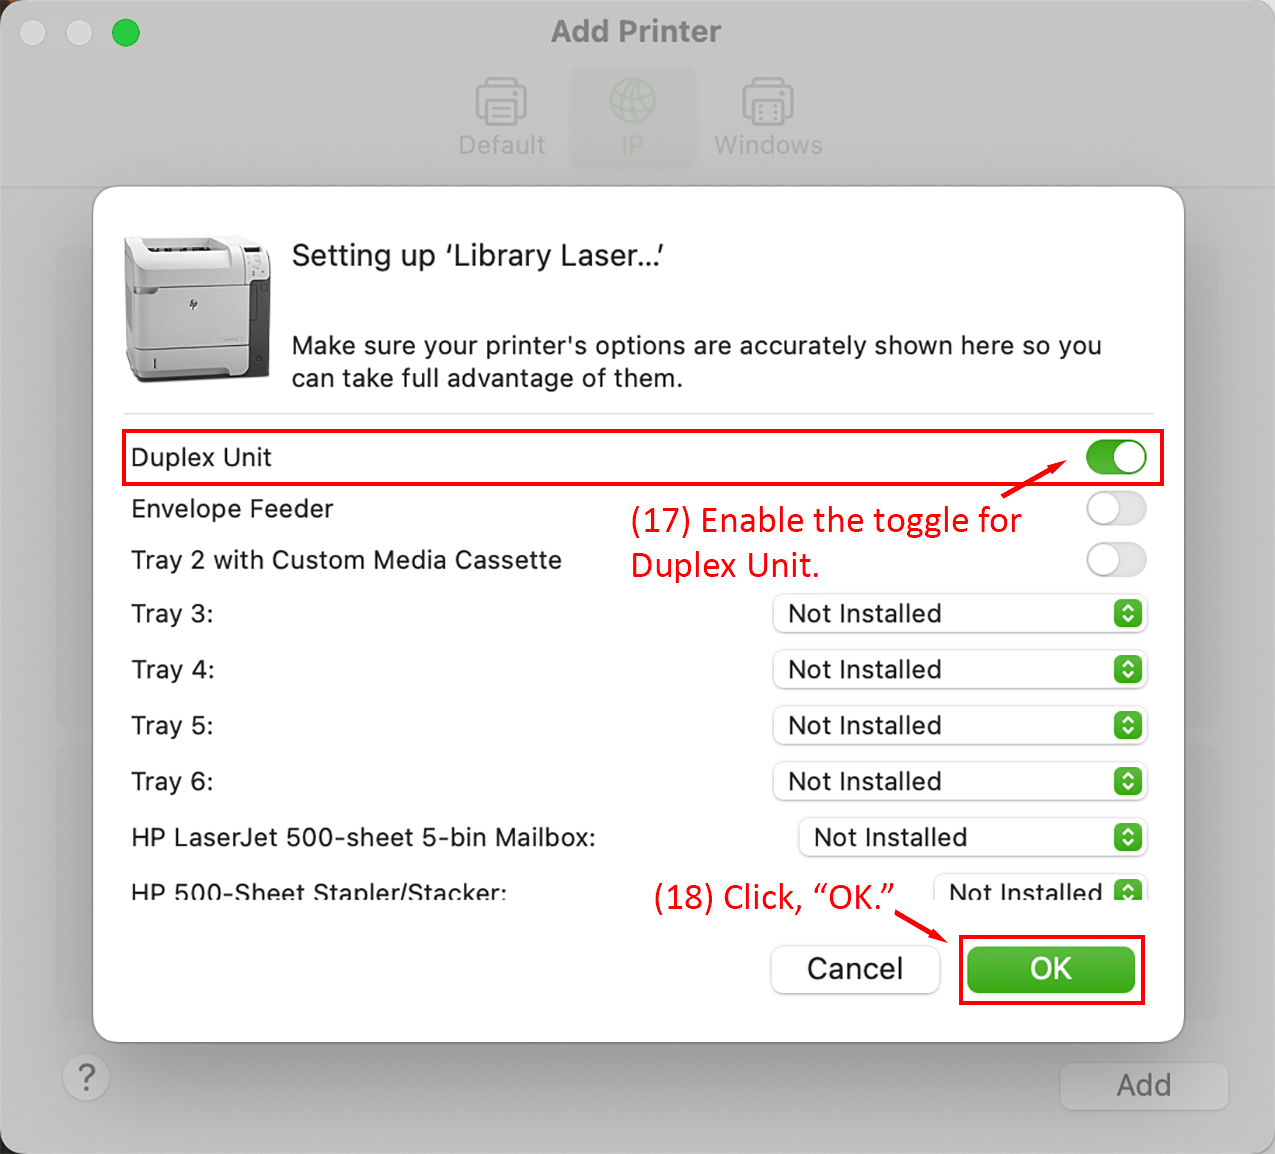
Congratulations, the Library Black & White printer is now installed and ready to use.
Installing the Library Color printer on Mac OS 15 Sequoia
The following set of instructions will guide you in installing the Library Color printer on a Mac OS 15 Sequoia computer. This process may vary slightly on different versions of Mac OS, however the printer configuration options will remain the same (e.g. hostname and port configuration in steps 7-14). If you run into problems installing the printer, please contact the NMU Help Desk for alternative instructions.
Installing the color printer is a 2-part process. The first part involves downloading and installing the Xerox drivers and the second part involves actually installing the printer on the computer.
Installing the Xerox Drivers
Navigate to the Xerox Support site, agree to the terms and download the macOS Print and Scan Driver Installer. Then start the Xerox Driver Installation Application.
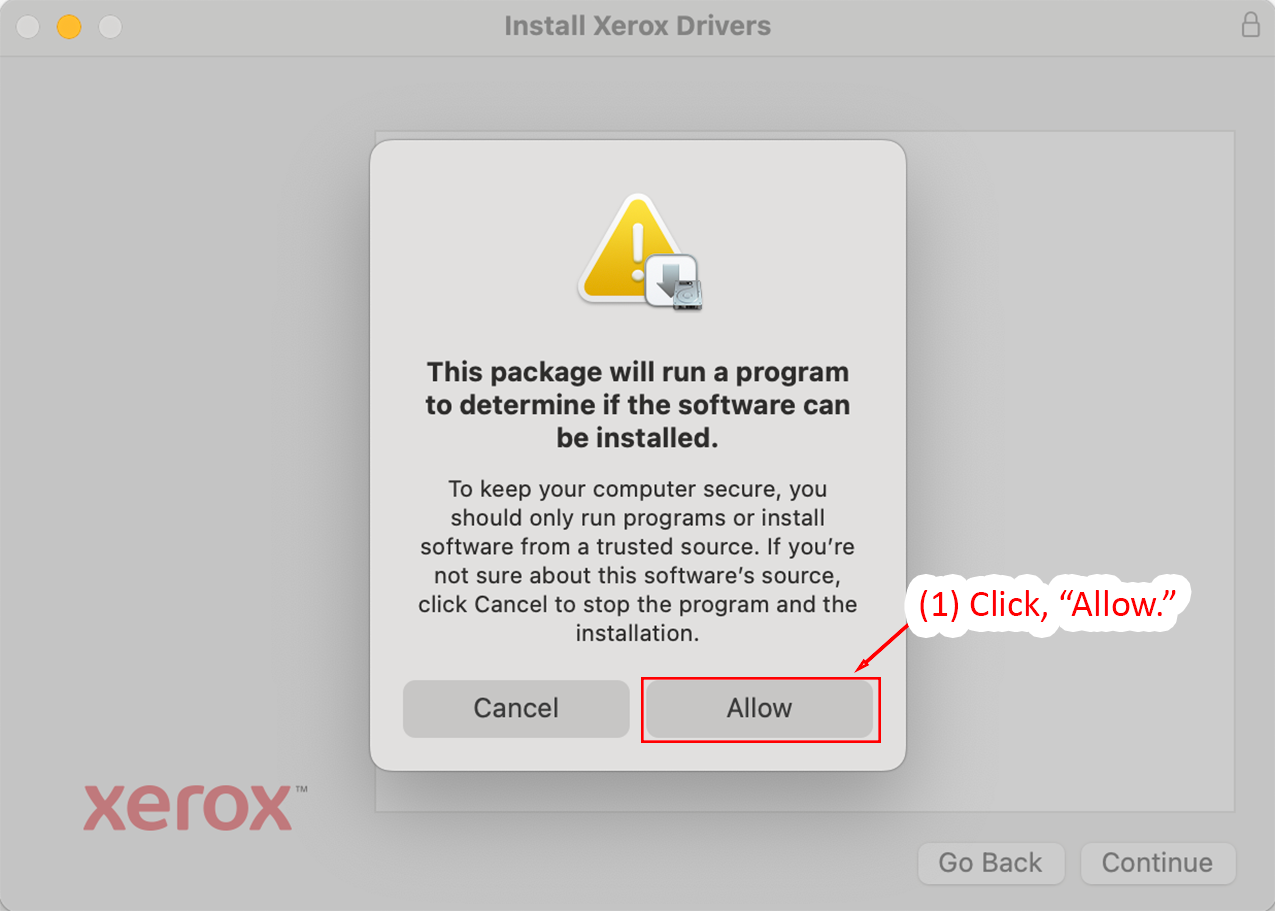
- Once the application launches, click, "Allow," to begin installing the drivers.
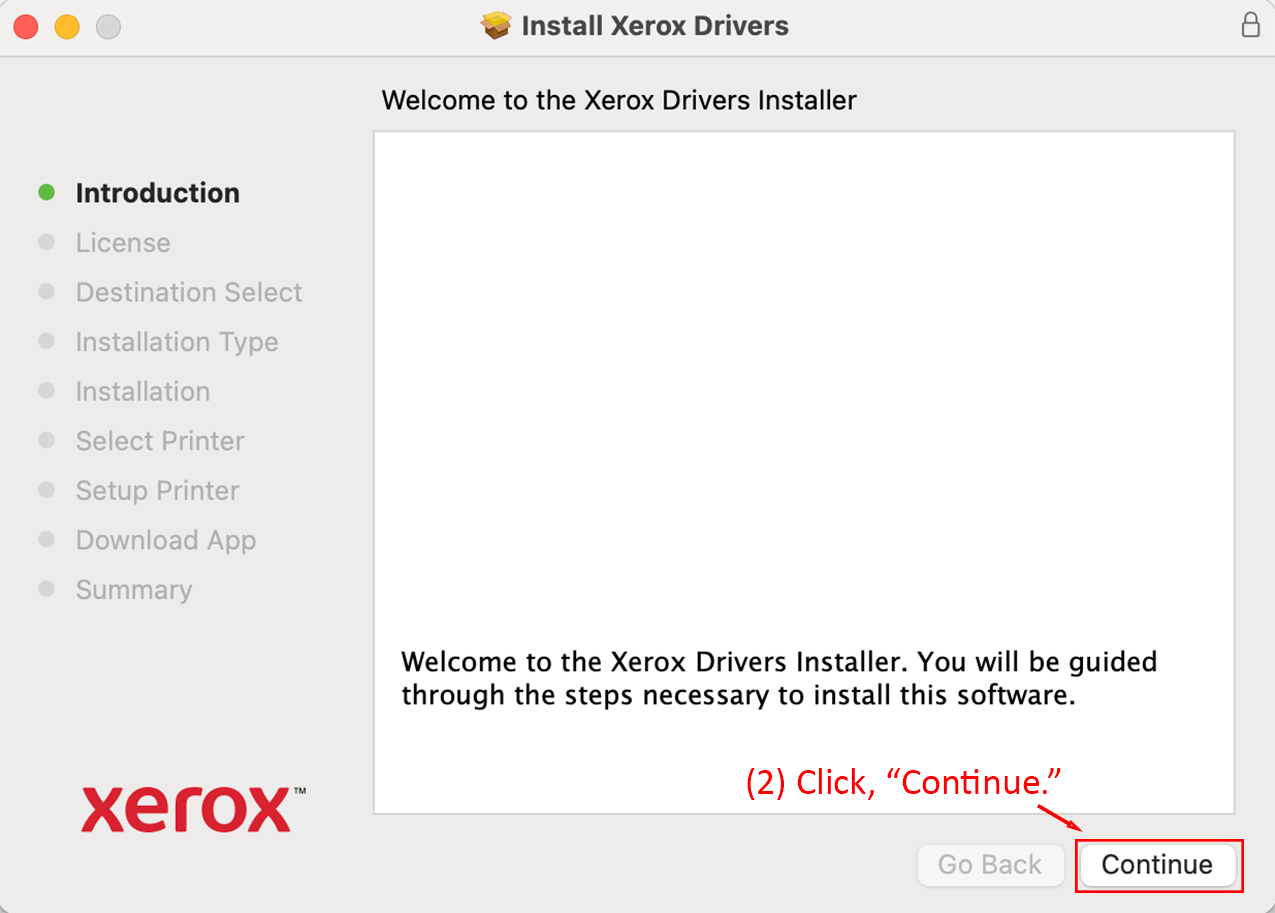
- Click, "Continue."
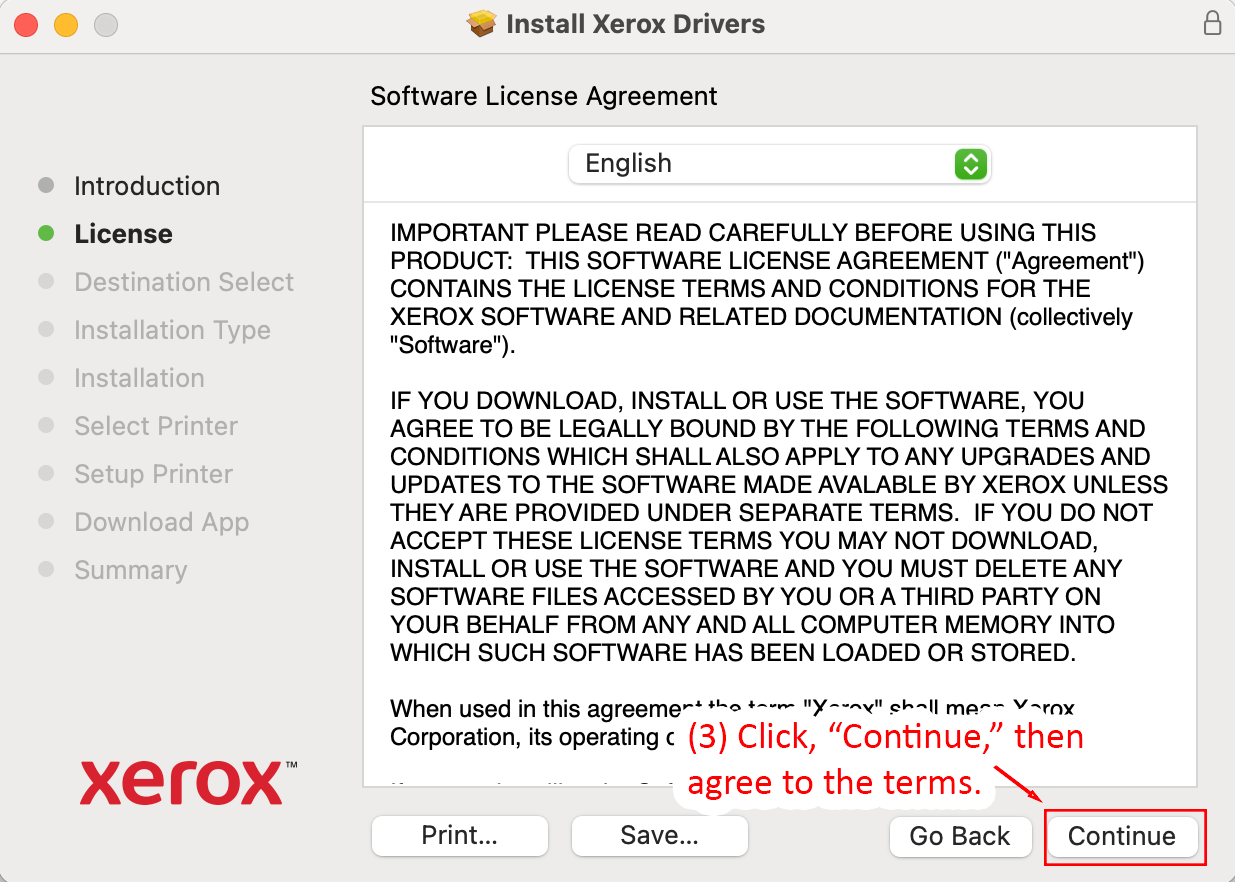
- Click, "Continue," then agree to the terms.
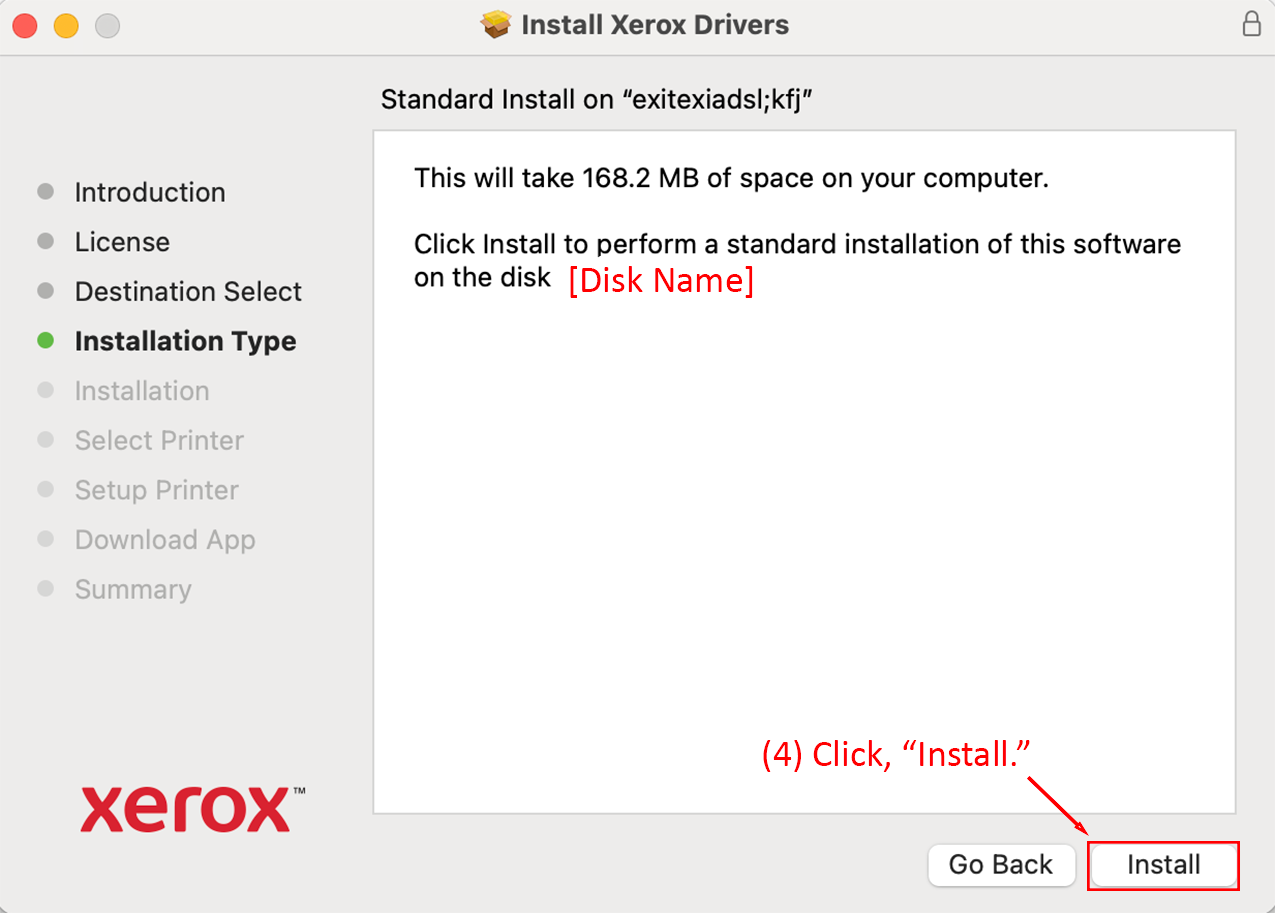
- Click, "Install."
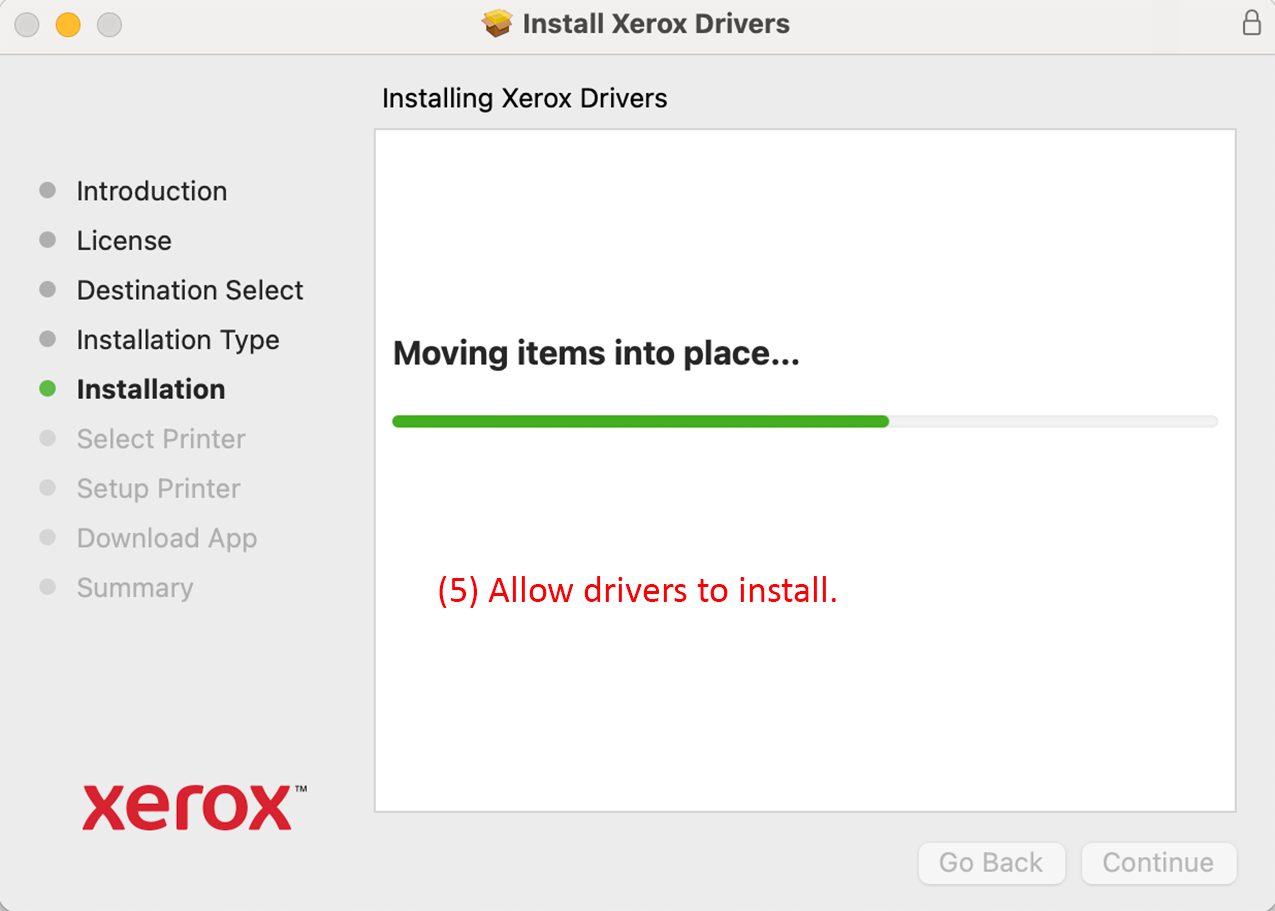
- Allow drivers to install.
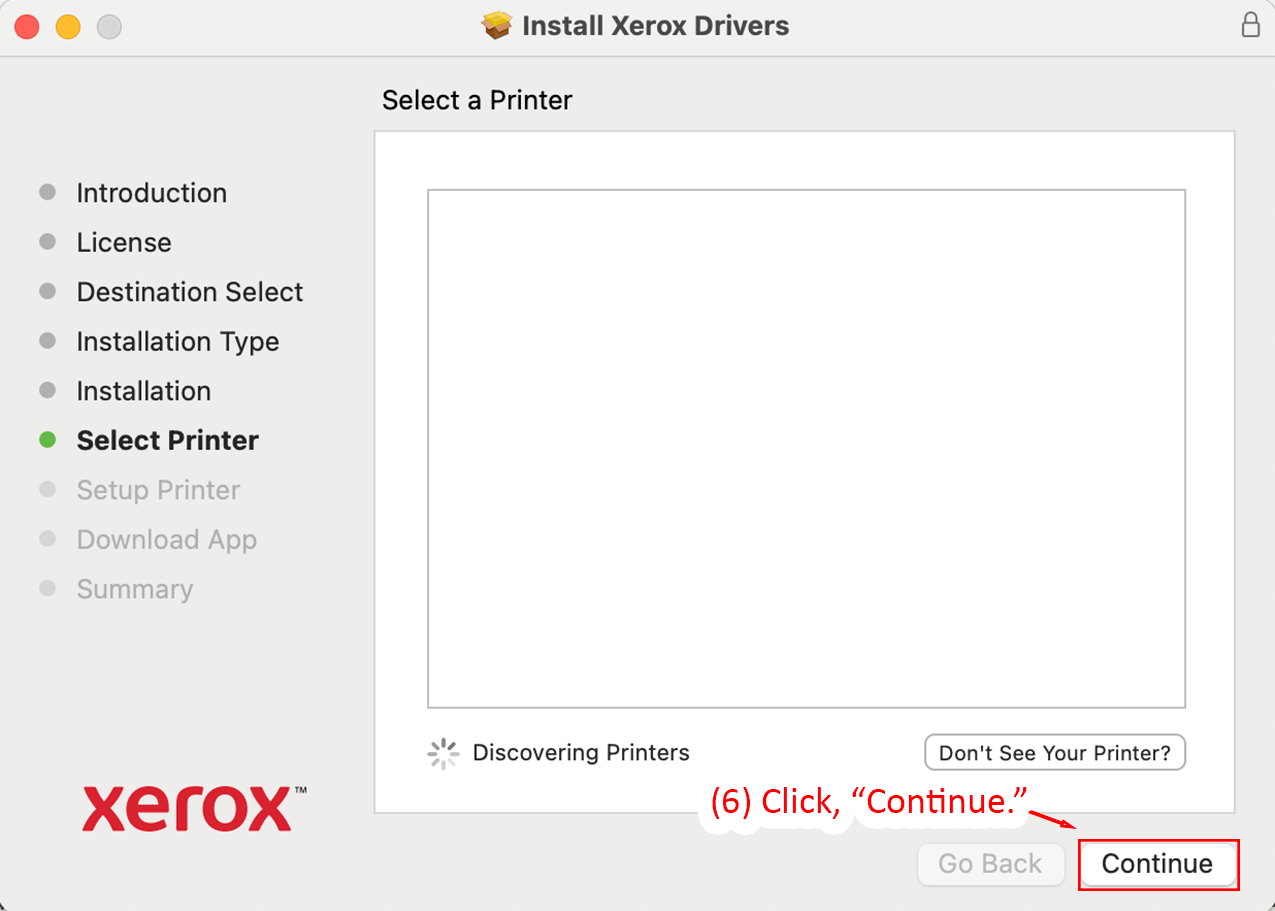
- Do not install a printer with the Xerox Application, click, "Continue."
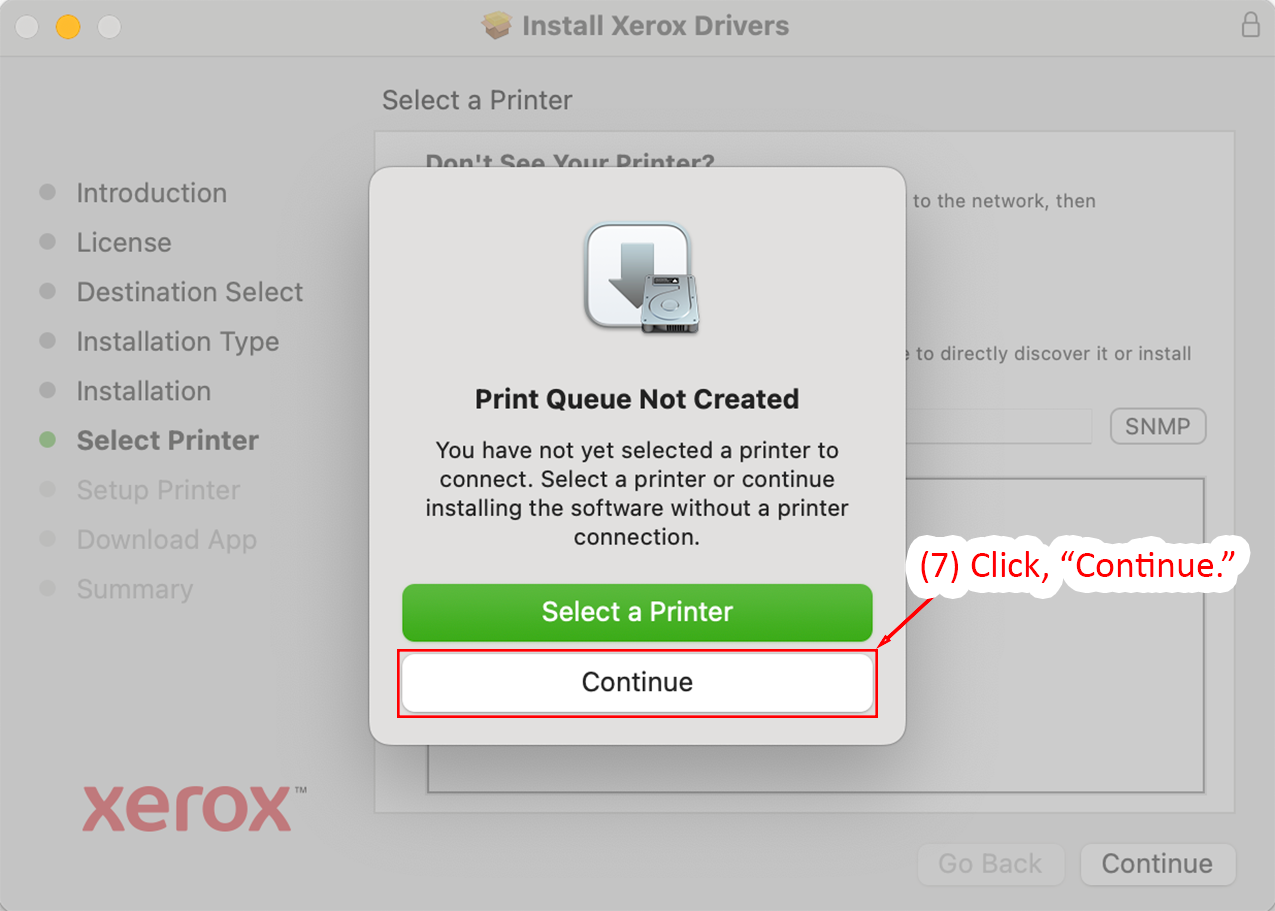
- Do not install a printer with the Xerox Application, click, "Continue."
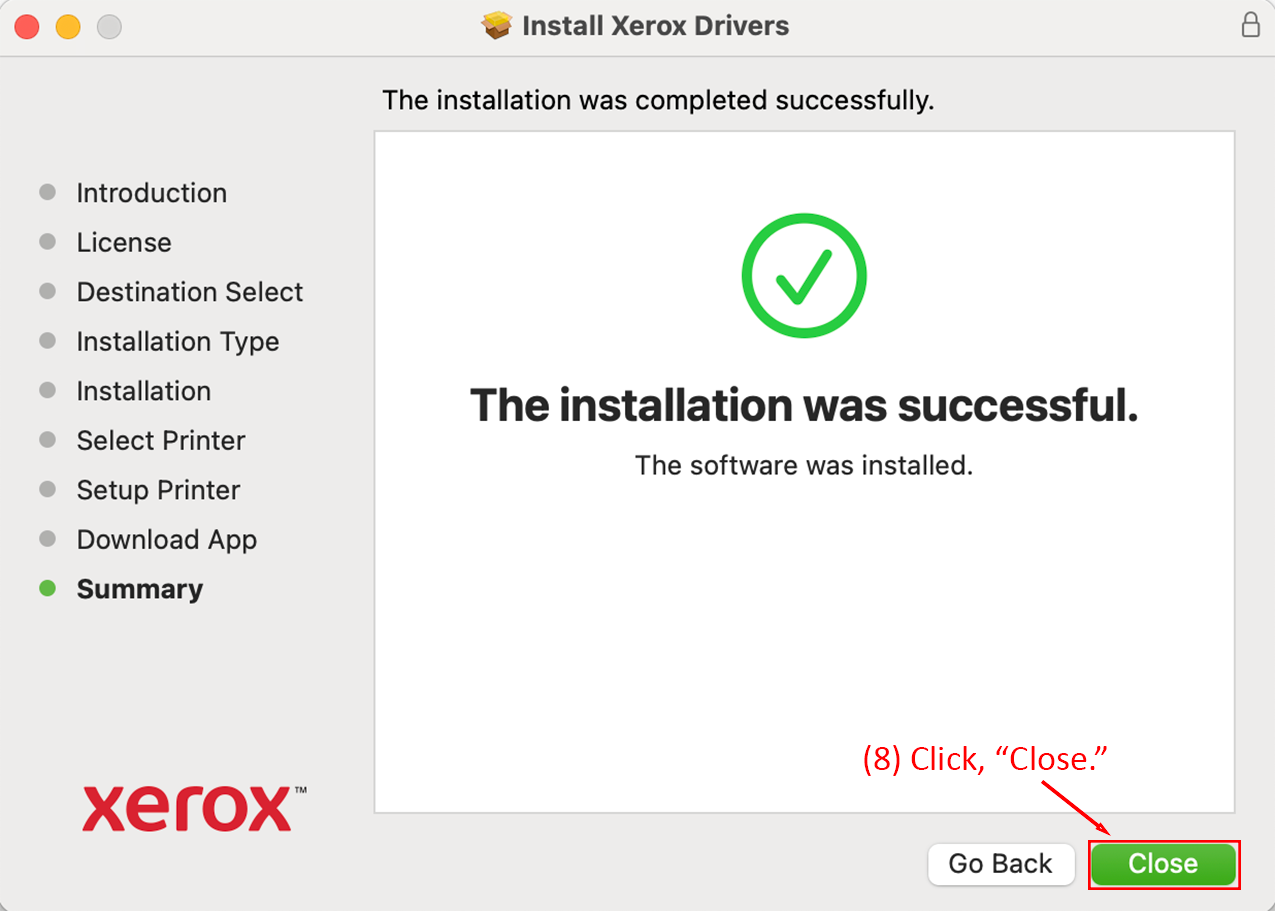
- The installation is complete, click, "Close."
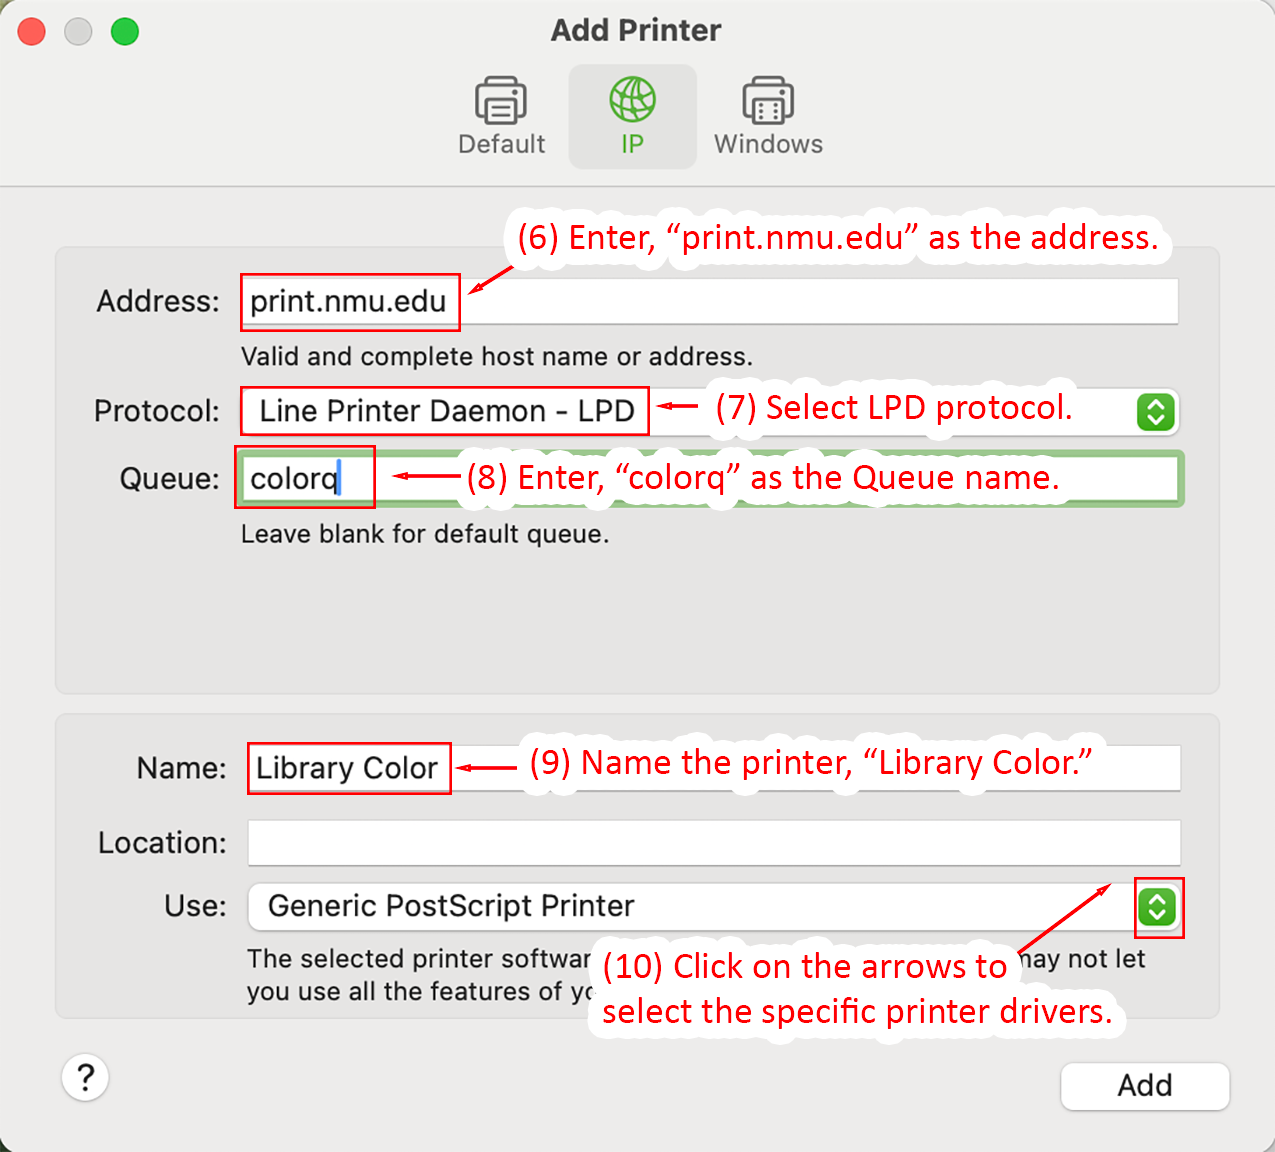
Adding the Xerox Color Printer
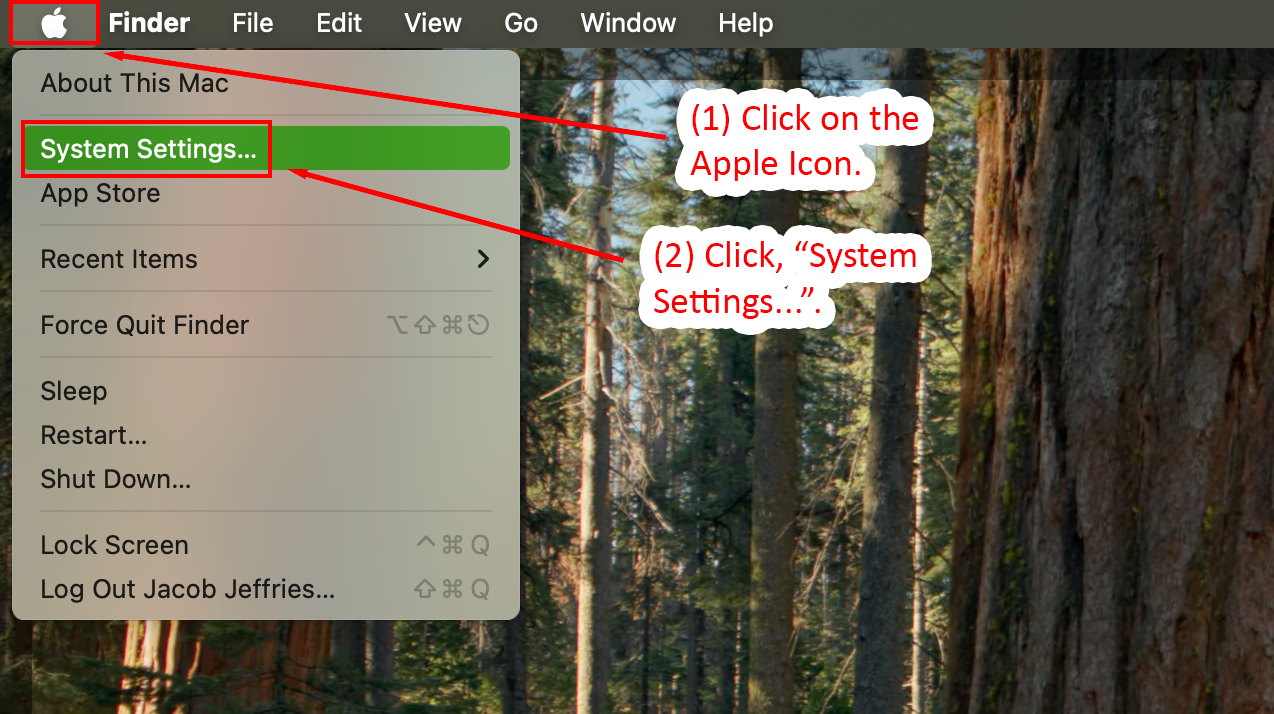
- Click on the Apple Icon, in the top-left of the screen.
- Click, "System Settings...".
- In the search box, search for, "Printers & Scanners."
- When the results load, click on, "Printers & Scanners."
- Click, "Add Printer, Scanner, or Fax...".
- Enter, "print.nmu.edu" as the address.
- Select LPD protocol.
- Enter, "colorq" as the Queue name.
- Name the printer, "Library Color."
- In the Use section, click on the arrows to select the specific printer drivers.
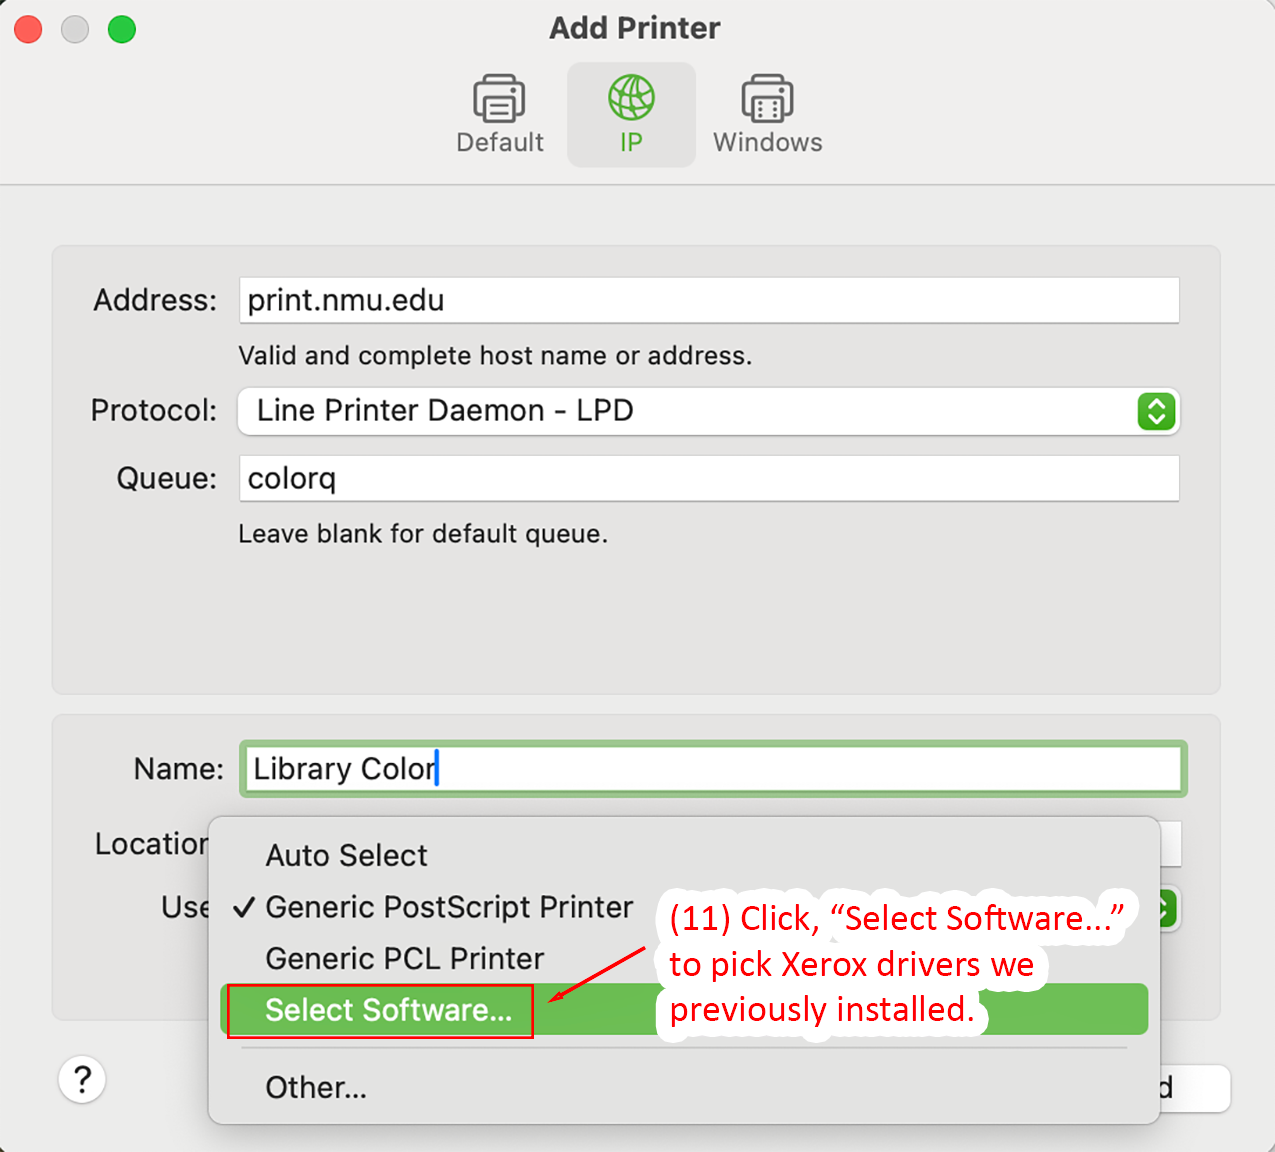
- Click, "Select Software..." to pick Xerox drivers we previously installed.
- Click, "Select Software..." to pick Xerox drivers we previously installed.
- Click, "Add," to finish installing the printer.
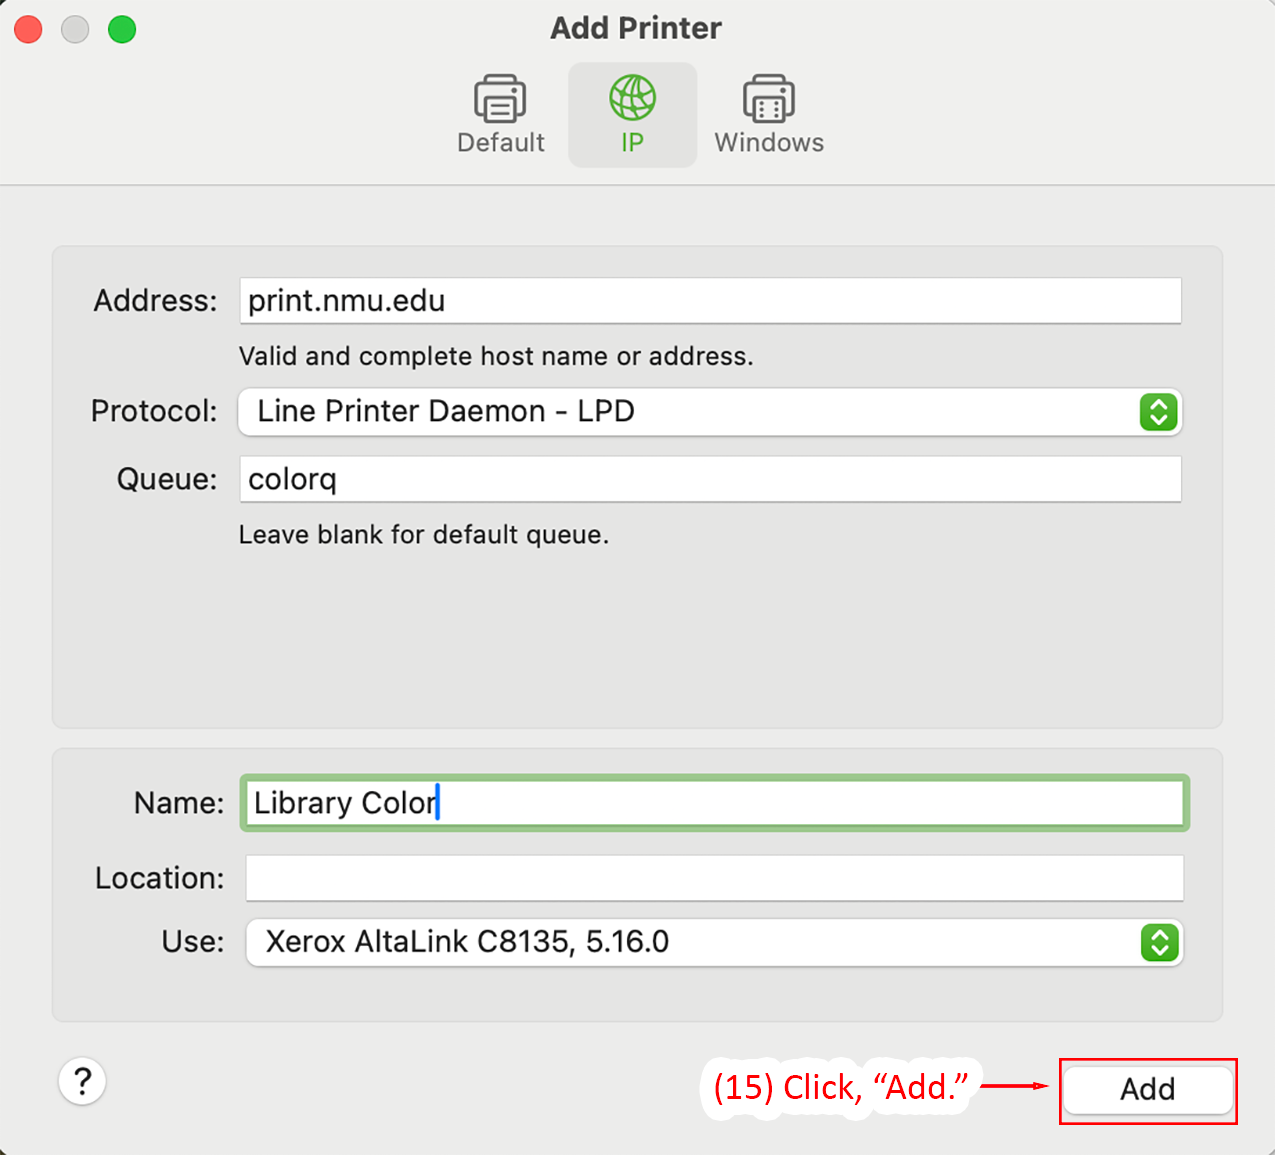
Congratulations, the Library Color printer is now installed and ready to use.